Articles

Celebrating Colorful Coleus

Coleus ‘Henna’ is a real color-filled beauty with shades of green, orange, and purple.

Long ago, Coleus had been considered a house plant. I can remember, my grandmother always had coleus growing in her house. It was a popular winter houseplant because the colorful leaves provided bright spots of color during the long Midwest winter months. Only occasionally were plants planted outdoors during the summer. My, how the times have changed!

Today, coleus varieties have been developed to be sun tolerant and the leaf colors, shapes, and plant habits are widely diverse. While coleus is technically a tender perennial down south, for most of us they are grown as summer annuals and provide wonderful leaf color throughout the season. The plants need warm weather to thrive and cannot withstand frost, but from late spring until the first frost of fall, they look lovely.

Selecting Coleus

The Proven Winner’s Coleus El Brighto glows in a porch garden filled with cannas, sunflowers, colocasias, and lantanas. The coleus flowers were pinched off after the photo was taken! (Image thanks to Mike Darcy)

When selecting garden coleus, a good rule is to set them out at the same time tomatoes are planted. Both coleus and tomatoes need warm weather, and cold weather can stunt or kill plants if set out too early. Even though some new coleus selections have been developed as sun-loving coleus, I have found most perform better in my garden with some afternoon shade.

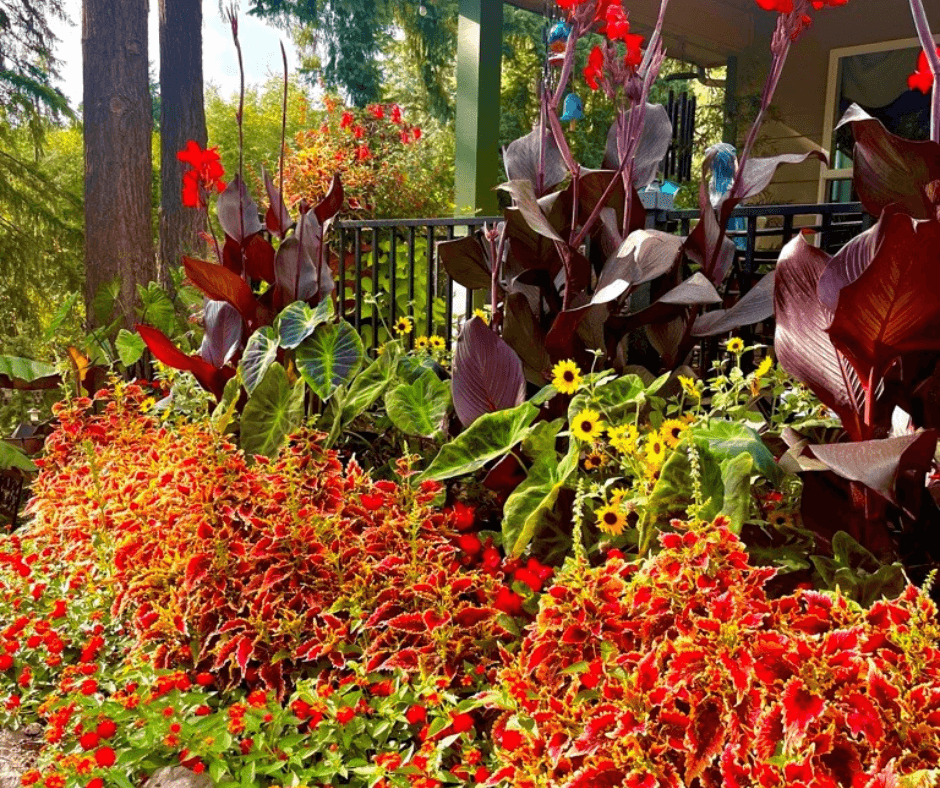
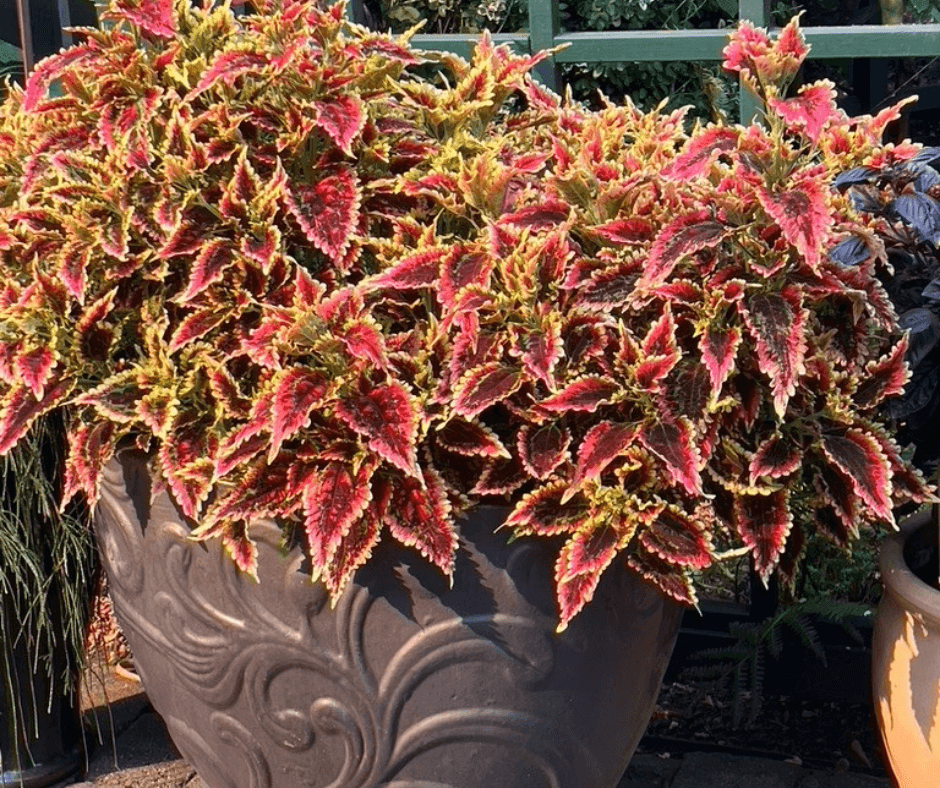
Coleus are ideal in both the garden and containers. More compact varieties make superb container plants with their colorful foliage throughout the summer season, such as the new compact, red, purple, and green Coleus ‘Spitfire’. Another I have grown both in a container and the garden is Proven Winner’s showy, ColorBlaze® El Brighto, with its brilliant fringed leaves of red, purple, and gold. (Click here to admire more of Proven Winner’s Colorblaze Coleus.)

Whatever coleus I choose, my potting mix of choice is Black Gold Natural & Organic Potting Mix. It holds moisture well and also provides for good drainage. I add an organic fertilizer at the time of planting and mix it well into the potting mix.

Planting Coleus

Coleus ‘Spitefire’ has a unique layering growth habit suited to containers and hanging baskets. (Image thanks to Mike Darcy)

When setting out and growing coleus plants, it is a good idea to pinch the tips of the stems often to encourage a compact growth habit and encourage branching. Sometimes plants will send up spikes of white or lavender flowers. Even though bees like them, coleus foliage looks best if you pinch off the buds before they bloom. Pinching will stop flowering and encourage the plant to produce new colorful growth rather than flowers and seeds.

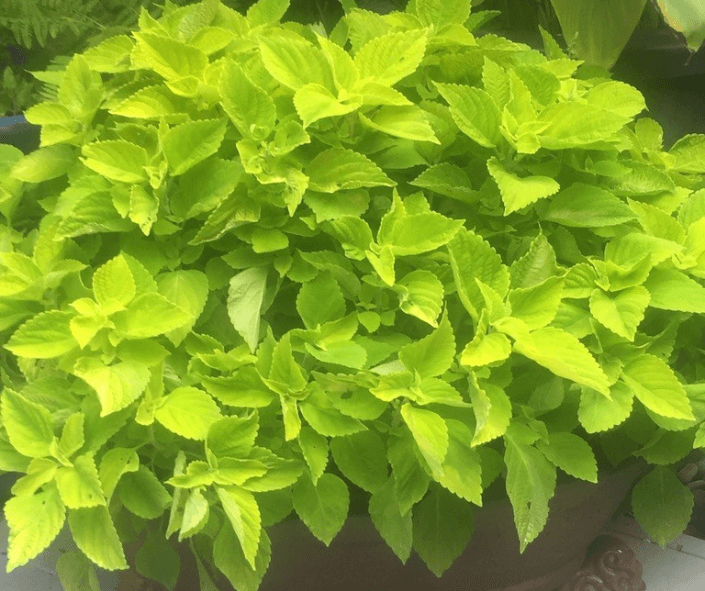
Sometimes one color plant can create a nice ‘pop’ of color. Last year I planted Coleus ‘Campfire’ with its amber-orange foliage, and it stood out nicely against a background of green (image below). Another bold coleus with only one color is Proven Winner’s Lime Time, which provides a beautiful display of chartreuse leaf color and is especially nice in a shady area. It mixes well with ferns in a woodland setting,

El Brighto is equally suited to container plantings. The container shown has three plants planted in early June and the photo was taken in mid-August. One plant would have been enough. (Image thanks to Mike Darcy)

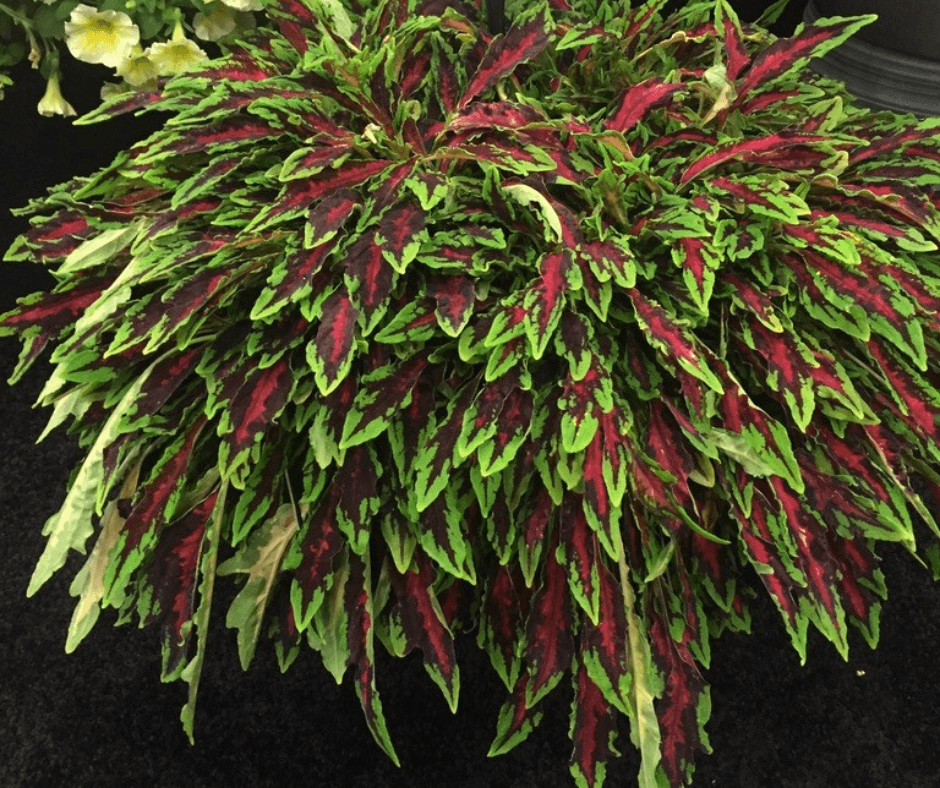
Last summer, I saw a pot of Coleus Spitfire in a garden and was impressed. The variety has a unique layering growth habit as well as brightly colored leaves. It looked beautiful in the container and would work equally well in a hanging basket or a garden edge.

Caring For Coleus at Season’s End

The warm, glowing leaves of ‘Campfire’ look attractive against bright greens and golds. (Image thanks to Mike Darcy)

As the summer season ends consider overwintering a coleus. You can either take a cutting to pot up or transplant the larger specimen. They root easily in water and once rooted, can be planted in a small pot and kept by a window for necessary light. (Click here for video details on how to take cuttings.) The plants will probably have to be pinched often as they reach for light, but they are easy to keep over and then planted outside in the spring.

The selection of color combinations is vast and every year there are new forms on the market. Some dwarf types have small leaves and only grow up to about 12 inches. Then there is the Kong series with leaves reaching up to 8 inches in length! If you have not checked out the coleus section at your local garden center, you will be surprised at the diversity of leaf colors and shapes that are available.

Lime Time will brighten up any bed or potted planting. (Image thanks to Mike Darcy)

Winter 2024 In My Pacific Northwest Garden

If you are like me in January, your e-mail inbox looks like mine with winter warning messages from the city, county, and state. The headings read: “Emergency Alert!” or “Storm Update!” The cold and snow are here, and many homes in the Portland, Oregon metro (where I live) have gone without power for four days or more and temperatures have been in the teens. It seems like a long time since we’ve had warm sunny fall days, and the garden is showing signs of stress.

Many tree branches are scattered throughout the yard, and the leaves of evergreen shrubs are shriveled. It will probably not be until spring before I will know just how much damage has been done. Many of my new specialty plants introduced to my garden recently may have suffered, but here, and there I see signs of life.

Specialty Trees with Winter Interest

My Daphniphyllum has shown some winter stress, but plants are quite resilient and often ‘spring’ back to life. Time will tell. (Image courtesy of Mike Darcy)

One of the specimen trees that I bought from a specialty nursery several years ago is a Daphniphyllum macropodum (USDA Hardiness Zones 7-9). The East Asian native is not commonly planted in the United States, but the tree has proven to be hardy here. The vulnerable leaves are large and look somewhat like those of a rhododendron. I think the harshness of the 2024 winter will be a good test. The photo below is how my tree looks now.

Another plant for winter color that should be mentioned is Acer palmatum ‘Sango Kaku’, also known as Coral Bark Maple. With cold temperatures, the stems turn red and can provide some outstanding color. This tree is winter hardy, it has never had any insect or disease issues, and I do not expect it to be damaged by the current weather.

Lenten and Christmas Roses

Christmas roses are blooming in Mike’s garden through the cold winter weather. (Image care of Mike Darcy)

I always look for something positive in the garden, and the Christmas roses (Helleborus niger) are sending up new growth and buds. Thus far, they are doing alright. The photo above was taken by a gardening friend several days before our worst winter weather. The plant has quite a few flower buds showing through the leaf mulch. I hope they survive the winter blast. Christmas roses are tough, hardy plants, and I’ve had groupings of them in the garden for many years. I have never lost any, even in very cold temperatures, so they should survive.

Seed Catalogs

Seed catalogs are one of the greatest gardening joys of winter, and most companies offer them for free.

A January gardening tradition for many gardeners, including myself, is looking at seed catalogs. Not just seed catalogs but any garden catalog. A delightful way to spend an evening on a cold night is to look through garden catalogs and dream of spring! Many companies have their catalogs on the internet and this can be an ideal way to find new companies. Most seed companies continue to print a paper version and one of my favorites for vegetables is High Mowing Organic Seeds in Vermont. It is like a garden book! Another is Baker Creek Rare Seeds. Their catalogs are beautiful and laden with impressive plants and photography.

Flower aficionados should look to Select Seeds, with their fine selection of heirloom garden flowers, or mainstay seed catalogs, such as Burpee’s, Park Seed, and Jung Seed. These are just a handful of the better seed catalogs available.

With the start of this new year, I wish you all success in your garden. May your flowers be beautiful and your vegetable harvest bountiful. I look at my garden as a place to go for calmness in this busy, hectic world we live in. May you find peace and calmness in your garden.

Autumn in the Garden

Autumn leaves drifting by your window are telling you that fall is here and it is time to put the garden to bed for the winter. For us, it is a very busy time, almost as busy as spring if one sees it as a not particularly enjoyable task and has not done their necessary work the previous fall.  I plead guilty to this almost every year so I will list what needs to be done, starting with the most laborious:

Cleanup This requires cutting back and cleaning up the flowerbeds. I do not realize how many flowers I have until I have to take them out.  Old plant material must be cut off and removed leaving minimal dead material on the ground surface.  This is important for iris as the borers which plague them will winter over in old vegetation left behind.  Roses need the same treatment to discourage black spot the following spring.  I often do my removal in stages: first cut the peonies back to 3 inches then the coneflowers to the base. The Helianthus (perennial sunflowers), both single and double are cut back as well. Next will be the hostas whose leaves are changing color even without frost.  All annuals should be removed as well (although some are still so pretty I am waiting for frost).  This old material should be bagged and disposed of.  We do not compost this material for fear of aiding and abetting garden pests.

Plant new perennials Many nurseries encourage planting new perennials in the fall. I am always leery of doing so as plants from some mail order companies are so small I would prefer to give them a whole season to grow.  The exceptions are peonies, hostas and daylilies. To maximize your planting success, amend the soil with Black Gold® Natural & Organic Potting Mix, Natural & Organic Cocoblend Potting Mix or Natural & Organic Just Coir.

Plant Bulbs. This is the time of year to plant bulbs for next spring.  There are a couple of new things I learned about bulbs that I did not know before.  Wait to plant your bulbs until the weather is cool and after the first frost has the soil around 55 degrees F., but before it has frozen.  Be sure to plant at the recommended depth. If you want to make this job much easier go to GardenersEdge.com and look for the “Bulb Bopper”. Do not add fertilize to the hole as that can encourage root rot.  Fertilize on the top of the ground (1) when you plant, (2) when you see the first foliage poking its leaves up and (3) when the plant starts to die back.  Use a food that is just for bulbs.  Mulch over the bulbs lightly and remove the mulch in the spring when the plants start to come up.  Another surprising piece of information is that some of the gorgeous tulips you see in stores everywhere this time of year should be considered annuals.  The first year after planting they will send up beautiful blooms.  The next year only a few spindly ones and the year after that only leaves.  However, some tulips will not only bloom every year but also naturalize over time.  These include the species, Kaufmanniana and Gregii, and giant Darwin tulips.  Give them at least 6 hours of sun a day and with all bulbs let the leaves die back on their own as they are building up the plants for next spring.

Planting trees and shrubs They do not have the stress of summer heat and will expand their roots over the winter. It is very important to be aware of the minimum distance from the house that shrubs and trees should be planted.  It is so common to see plants smashed against the house.  Small shrubs ought to be 3 to 4 feet away from the house, big shrubs such as lilacs 6 ft. and small trees such as Japanese maples 10 feet. Anything larger goes out in the yard.  Be SURE you know the amount of sun required for each plant.  Shade for rhododendrons and sun for Beauty Bush.

Mulch. Fall is the time to mulch, not so much to protect from the cold of winter, but because it is just too much to do in spring with everything else to do.  I previously mulched in the spring but now I can see the advantage of getting it over in the fall. We use bark mulch from local sources. The mulch should be 3 to 4 inches deep.  The most important thing to remember while mulching is to keep the mulch 3 inches away from the base of each perennial and 5 inches from shrubs and trees.  Mulching right up to plants will cause them to rot.

After the weather clears I will go outside and practice what I preach. Happy Gardening.

Vegetable Container Gardens for Beginners


Potted vegetables are easy if provided summer-long care.

There was a time when almost every household in our town had its own garden plot that stretched between the back door and the alley. There were many reasons for this. First was that my hometown is primarily a farming community, with all that the term implies. Second was the double-barreled effect of (a) The Great Depression (1929 ~1940) and (b) World War II (1941-1945) when what was ripe in your garden was probably what was for supper. Third was a prevalence of first- or second-generation city folks who had been forced off the farmland by financial hardship or by primogeniture (e.g., all the land goes to the eldest son when dad dies). Fourth, many retirees under the (then) new Social Security Act did not trust the federal government to keep its word to continue Social Security benefits after retirement.

Now we live in a time of relative plenty despite the stress and strain on our social fabric and supply lines thanks to the pandemic. Yet many people will plant corn, green beans, potatoes, peppers and tomatoes wherever they can; not out of need, but for the simple pleasure of doing it.  In addition, for the knowledge that if Old Man Trouble happens to stop by you will still have food to fall back on.

Five Vegetable Container Garden Rules and Advice

So let us get to the subject of veggie container gardening, made possible in part by the development of new compact vegetable varieties.

  1. Grow compact vegetables! You may notice the absence of some LARGE vegetable favorites from this article, such as potatoes, corn, and melons. These plants need more space than most containers provide and are not suitable.
  2. Choose your location. The best location should get enough sunlight (6-8 hours full sun) and protection from wind.
  3. Choose large containers. Most vegetables grow best in larger containers. 2- and 5-gallon pots are the most common sizes. 5-gallon window boxes are also good picks, as are 5-gallon paint buckets purchased at hardware or paint stores. Container gardens need lots of sun, but most plant roots cannot stand heat, so white plastic containers are a good choice. Drain holes are mandatory. You also want to provide about a foot of potting mix in the container for root vegetables
  4. Choose the right pot. Most gardeners prefer light-colored plastic pots with good drainage for vegetables because they stay cool and plastic retains water better than most pottery. Pottery is more porous and loses water.  Glazed or unglazed pots are also more prone to breaking. A pretty Terracotta or glazed pot looks more attractive, though. If you choose ceramic containers, just be sure to make sure plants stay irrigated.
  5. Use Quality Potting Soil. Do not use your garden soil as a planting medium (really!). It does not drain well enough and may harbor pests and diseases.  Black Gold® All Purpose Potting Mix and Black Gold® Natural & Organic Potting Mix will meet the demands of your container crops from start to finish. Some experts also advocate filling container bottoms with dead (not green) lawn sweepings or compost and then following that with a foot of potting mix.

Vegetables for Containers

Bush Beans (e.g., Bush Blue Lake, Bush Green, Bush Yellow, TopCrop or similar)

  • 3 plants per 2-gallon container (8-12 inch soil depth
  • Plant seeds directly in containers (does not transplant well)
  • Harvest in 50-60 days

Cucumbers (‘Spacemaster’ or other compact vine variety)

  • One plant per 5-gallon pot
  • Sow seeds directly into pot
  • Harvest time – refer to seed packet

Lettuce (Ruby, Salad Bowl, Buttercrunch, Webb’s Wonderful)

  • 5-gallon window box
  • Sow directly or transplant
  • Harvest time – 40-70 days

Onions (White Sweet Spanish, Yellow Sweet Spanish, and NOTE: Forget Vidalia Onions; the high-sulfur soils around Vidalia, Georgia are the chief reason for their sweetness.

  • 5-gallon window box
  • Plant sets 3-5 inches apart
  • Harvest 100-125 days after planting, or when 50-75% of the tops have fallen over and the skin has dried

Peppers (Cayenne, Long Red, Sweet Banana)

  • One plant per 2-gallon pot
  • Transplant starts or sow seeds directly
  • Harvest time – refer to seed packet

Root Veggies (carrots, beets, radishes, turnips, onions, etc.)

  • 5-gallon pot or window box at least 12-inch soil depth
  • Sow seeds directly in soil
  • Harvest time – refer to seed packet

Tomatoes (determinate varieties e.g., Rutgers, Tiny Tim, Roma)

  • One plant per 2-gallon pot (may require support)
  • Transplants well
  • Harvest in 50-100 days (depending upon variety)

There you have it: quite enough to do, but not enough to get into real trouble.

Climbing Wonders


Climbing Wonders

In the heat of the summer, here in the Midwest, many of the most beautiful, flowering garden vines are blooming their hearts out.  When I go out on the back deck, the Morning Glories (Ipomoea) are about to start opening their large trumpet shaped flowers, which will last until frost.  Morning Glories are native to Mexico, and were thought to have spirits by Native Americans.  The first one to become popular in modern times is ‘Heavenly Blue’. Some years ago, I planted ‘Heavenly Blue’ in one of my gardens.  Morning Glories reseed, and after a few years, I had pink, dark blue, purple and magenta flowers, coming up every year. Now seeds are available in all these colors, plus red, white and yellow, some with stripes.

Morning Glories are annuals that flower from early summer to frost.  Plant them in full sun, in any well drained, soil and keep the soil moist.  Soak the seeds for 8 hours, in ½-inch water, before planting.   Find a trellis, a fence, or a pole, to give them something to climb.

Hummingbirds and bees will be happy if you plant Morning Glories, but deer will not.

Clematis have been popular since 1862, when Clematis jackmanii, a purple flowering vine, was discovered in the Orient.  Since then several hundred varieties have been developed, with colors including blue, pink, white and deep red.  Most of them are single star shaped flowers, but some have gorgeous puffs, such as ‘Taiga’, a winner at the famous Chelsea Garden Show in 2017, with bright purple blue flowers, and centers of, white tipped petals that curve in.  ‘Rouge Cardinal’, another beauty, has 4 to 6 inch wide flowers of red with small white centers, and I even have one with small, blue, bells, ‘Roguchi’. Clematis is a perennial, and will come back every year on its own.  They range from 3 to 20 feet long, and can be trained along a fence, or trellis.  Plant in full sun, well-drained soil, with the crown 2 inches, below the surface.  Clematis are deer resistant.

Honeysuckles (Lonicera) are an old-fashioned favorite.  They have a strong, sweet fragrance, as well as beautiful, tube shaped flowers.  There are two kinds of Honeysuckle plants, shrubs and vines.  One of the shrubs, Lonicera japonica, has become invasive, around the world.  Vines, however, are not a problem, and there are some gorgeous varieties. The Coral Honeysuckle varieties are native plants.  The flowers are fan shaped, and face down.  ‘Major Wheeler’ is covered with red and gold flowers all summer long.  It grows 6 to 8 feet tall and 5 to 10 feet wide.  ‘Goldflame’ has bright rose buds that open to yellow flowers, on 10 to 15 foot tall, and 5 to 6 foot vines and ‘Scentsation’s flowers, are yellow and white, and are extremely fragrant. It gets 10 feet tall, and 6 feet wide. Honeysuckles are one of the humming bird’s favorite flowers, and are deer resistant. Plant in full sun, in well-drained soil.

Last, but the best, are climbing roses.  You do not often hear about climbing roses here in the US, but they are common in Britain. You may have seen them, clambering up  English cottages, in British TV shows, like Midsomer Murders, or Downten Abbey, but these roses would only bloom in spring.  Seventy years ago, an English rose breeder, named David Austin, began cross breeding these roses with Chinese roses that bloom all season. The results are spectacular.  Most range from 6 feet, up to 12 feet, but some are even taller. They have a classic English rose shape, with an outside layer of flat petals, and a thick, bowl shaped, packed center, you will not see in the US.  They come in every color, white, pink, peach, rose, yellow and red.  Most have a strong fragrance as well.  These roses have been available in America for many years. Just go online, or order a catalog.  Some of my favorites include, ‘Gertrude Jekyll’, pink, ‘Lady of Shalott’, peach, ‘Zepherine’ deep rose, ‘Tess of the D’Urbervilles’, red. Plant with the crown at ground level, in a hole a little bit bigger then the plant.

For best results, with all garden plants, dig the hole, put a generous amount of Black Gold® Garden Soil in the bottom, then mix some more in the soil you are putting back into the hole.  Sprinkle with Osmocote on the top, and find a place to plant a climber.


About Teri Keith


Garden columnist, Teri Keith, has gardened for over 50 years in her home state of Indiana. She served as a longtime IGC nursery manager specializing in annuals and perennials in Bloomington, Indiana and still gardens with passion. Each year she plants and maintains over 50 flower containers, many gardens, and a large collection of lilacs.

What Do I Need To Grow Container Vegetables?

“I am starting a container garden for onions, potatoes, and carrots. I will be using the Black Gold potting mix plus fertilizer. Will I have to add any other product to the potting mix? Thank you.” Dennis of Thaxton, Virginia

Dear Dennis,

Potted vegetables grow best in large containers filled with excellent potting soil,  like our Black Gold mixes, and quality fertilizer formulated for vegetables. Be sure that the containers drain well, and keep them evenly moist. Full sun exposure is a requirement. This is about all that you need. Thin your carrot as they grow, and space your onions and potatoes well. I also recommend that you read these articles about growing edibles in containers. We have many, many more on the site.

Happy gardening,

Jessie

Effortless Junipers for Practically Every Garden

Ground cover junipers look handsome when planted in spacious containers.

There are few plants that come in as many different forms as the juniper. The Genus Juniperus includes plants that are grown as ground covers with some that hug the ground at just several inches and others that may reach 2-3 feet in height. Another category is the shrub types, and these can range in growth from 4-12 feet. Junipers can also be columnar in their growth habit with heights ranging from about a few feet up to 20-30 feet. Then, there are the tree junipers that can reach 50 feet or more.

Juniper berries are waxy, fragrant, and distinctive.

Junipers are conifers, but instead of cones, the female shrubs have berry-like, waxy, blue-green fruits. The berries of some types are highly scented and are often used during the Christmas and New Year holiday season in wreaths and often as part of an evergreen indoor table decoration. Often, juniper scent is incorporated into holiday candles. Most juniper plants produce berries that are attractive to many birds.  Hummingbirds often build nests in the larger shrub and tree types.

Juniper foliage color can be various shades of green to blue, gray, and yellow. The leaves of some have smooth or prickly needles, so consider this when choosing a variety. Prickly forms should be planted in areas where people won’t have contact with the foliage.

Growing Juniper

Junipers can be planted in the spring or early fall.

Good drainage is a requirement for most juniper varieties, and once established many require little or no additional water, depending on your plant zone. Be sure and read the plant label for detailed planting guidelines. Most varieties will take a full sun location, but there are some that like some protection from the hot afternoon sun. Well-drained average soil will usually suffice. Amending the soil at planting time with a little Black Gold Canadian Sphagnum Peat Moss will encourage good growth from the start.

There is a vast selection of juniper choices, so it would be impossible to list all of the many varieties here. Instead, I have included several popular varieties that should be readily available at garden centers.

Groundcover Junipers

Juniperus horizontalis comes in several pleasing, low-growing varieties.

Tam juniper (Juniperus sabina ‘Tamariscifolia’, Zones 4-7), is often referred to as simply Tam. With blue-green foliage, expect this juniper to reach 2-3 feet in height and a width of 10 ft. It is one of the most widely used junipers in gardens.

Blue rug juniper (J. horizontalis ‘Wiltoni’, Zones 3-9) has silver-blue foliage that hugs the ground with long trailing branches. It is flatter and grows closer to the ground than the Tam Juniper. Expect it to spread beautifully. Specimens will tolerate some salt-spray and sandy soil, so it is a great oceanside shrub.

Shrub Junipers

Golden junipers add extra pizzaz to every garden.

Weeping needle juniper (J. rigida ‘’Pendula’, Zones 5-8) has an upright main stem and is often trained and staked to show off the secondary branches with weeping tips. Its green foliage and blue-black fruits are appealing. It will reach 15-20 ft in height when mature.

Pencil point common juniper (J. communis ‘Compressa’, Zones 3-7) is a very tight shrub with blue-green foliage. It is a slow grower that only grows about 2-4 inches per year. This is an ideal conifer for a rock garden and rarely needs pruning. Sometimes it is planted in rows as a dividing line in the garden.

Gold Coin common juniper (J. communis ‘Gold Coin’, Zones 3-7) is a conical, upright form with finely cut foliage. It is most admired for its brilliant new golden growth which turns bright green in the summer. It will reach about 10 feet.

Moonglow Rocky Mountain juniper (J. scopulorum ‘Moonglow’, Zones 3-7) is a dense conical grower with steel-blue color. At maturity, it will reach 8-10 feet. It makes a good screen and can be sheared as needed.

Tree Junipers

Western cedars are high-value trees for wildlife.

Western juniper (J. occidentalis, Zones 4-8) has fragrant green foliage and is native to intermountain regions from Central Washington to Southern California. It is very large growing and will reach 50-60 ft. The fruits are essential food for many native birds.

Weeping blue juniper (J. scopulorum ‘Tolleson’s Blue Weeping’, Zones 3-7) will usually reach about 20 feet and has very distinctive weeping branches that are silvery blue. It makes a graceful weeping tree.

I suggest visiting a local arboretum or garden center with a conifer display garden. Most conifer display gardens will include junipers. It is always wise to check out plants that will be permanent in your garden before making a final selection. Seeing plants growing out in the open may give a very different ‘look’ as compared to seeing them in a nursery container.

Putting Perennials To Bed In The Fall

Depending on where you live in the country, September, October, and November are the main months for putting garden beds to rest.  You may still have some warm days in these months, but once the nights and then days become chilly, it’s time to get to work. And, if you do it right, it is quite a bit of work, but more work now means less work later. Spring will be a breeze!

1. Weed

Pull as many weeds as you can in the fall to make spring gardening easier.

I have just started on the first step, which is getting all the weeds out, and it is going to take me quite a while.  Some seasons, I stay on top of weeding, and other times other priorities get in the way. This past summer was busy, so the weeds had a “field day.” It is especially important to clear weeds from right around the base of each garden plant. When weeding, it is wise to choose good tools for the job. Luckily, we have an excellent article written by my daughter, Jessie, that details the best weeding techniques, times, and tools for the job. Read it and weed! (Click here to learn how to week like a pro.)

2. Mulch

A moderate layer of mulch will protect against winter weeds, and protect perennials from the cold.

This brings us to step two, putting down fresh triple-shredded bark mulch, my preferred garden mulch, which I purchase in bulk by the yard or occasionally by the bag when only a small amount is needed. (Click here to learn about different mulch options.) Not only will mulch stop weeds, but it will also keep the soil moist, and protect your plants from big temperature swings. In addition, mulch breaks down over time, adding organic matter to the soil. Areas I have mulched for years have slowly turned into rich garden soil.  Put down around 3 inches of mulch, being careful not to cover the plant. (Not sure how much mulch to get? Click here for guidelines to calculate how much your garden will need.)

There are four rules to mulch application, particularly when it comes to mulching around plants: 1) leaf space around plants, 2) don’t mulch too thickly, 3) don’t apply mulch against the trunks of trees or shrubs, and 4) apply mulch when the soil is moist to make post-application irrigation easier. Leave a  3- to 4-inch gap between the base of the plant and the mulch, to avoid smothering the plant and causing crown rot. This is especially true of evergreen perennials and perennials with surface rhizomes, like bearded iris (Iris germanica hybrids). Peonies are also sensitive to excess mulch. One year, I mulched my peonies thoroughly in the fall and was so pleased with myself for getting it done early, but the following spring two of my prize peonies did not show up.  I had mulched too thickly and killed them. Also, do not mulch low, spreading, evergreen to semi-evergreen perennials, including Heuchera, Dianthus, ground cover sedums, such as ‘Angelina’. Mulching them commonly causes crown rot and death.

3. Cut Back Perennials

When frost takes your perennials, such as these hostas, it is time to cut them back. Semi-evergreen lamium (foreground) should be left alone until spring.

Wait until the frost has killed the leaves of herbaceous perennials before cutting them back and removing the old stalks and leaves.  This is especially important with hostas, one of my favorite perennials (I have hundreds!).  Unlike other perennials, if the leaves are removed while green, the plant will put up next year’s growth prematurely, and the following spring will have just a few scrawny leaves, so cut back hostas to 2-3 inches after the frost has taken them.

Evergreen perennials, such as Lenten rose (Helleborus spp.), myrtle euphorbia (Euphorbia myrsinites), and candytuft (Iberis sempervirens), can be left alone until spring, and semi-evergreen perennials, like coral bells (Heuchera spp.), dead nettle (Lamium maculatum), and certain daylilies, can also be left to trim back until the spring.

Some plants that add winter beauty to the garden should also be left alone.  Ornamental grasses, with pretty seed heads, gently wave in the wind, coneflowers (Echinacea spp.), black-eyed Susans (Rudbeckia spp.), and perennial sunflowers (Helianthus spp.) set seeds that songbirds like to eat in winter, so I leave them alone until the spring. Fall bloomers, such as chrysanthemums and asters, can also be trimmed in the spring. The protective stems of chrysanthemums sometimes help the tender perennials overwinter, which is nice if you like to keep them from year to year.

Another tip is to meticulously cut back perennials that are highly susceptible to leaf fungal diseases, particularly bee balm (Monarda spp.) and tall garden phlox (Phlox paniculata). Cut them back low, thoroughly, and be sure to completely remove the old leaves from the surrounding area. They should not enter the compost pile. Certain diseases can persist in the soil, even composted soil.

4. Divide and Plant

Divide large perennial clumps and spread them around in the garden to add more summer flower color where needed.

Mid-fall is the best time to divide and move hardy perennials, such as hostas, daylilies, monarda, rudbeckia, and coneflowers. If you live in USDA Hardiness Zones 3-5, or colder, divide and replant perennials earlier in the season, and only move those that are reliably hardy in your zone.  If you live in warmer zones, then you have a little more flexibility time-wise.

When dividing perennials, I typically use a sharp spade to neatly cut away a section of the plant. It is essential that each chunk has a nice portion of the crown with lots of buds on the top and roots beneath. Then I move and plant them in locations that have the right site conditions and need the color. Some falls are dry where I live in Indiana, so I am sure to irrigate my new divisions well when the weather does not bring rain. Adding Black Gold Garden Soil to the bottom of each hole adds needed fertility and a boost of fertilizer, which all plants appreciate.

So, I must get going to finish my fall garden cleanup, while the going is good (and so should you)! Then, I can spend the winter focusing on next year’s garden, worry-free.

Does Moss Make a Good Groundcover?

“Even though moss dries out in summers, will it make a good ground cover for dirt that is largely dark clay?” Question from Susan of Junction City, Oregon

Answer: If you live in an area with consistent moisture and lots of shade, then it can make a good ground cover, though we recommend amending any clay soils first. There are lots of different moss species that are sold by specialty moss nurseries, or mosseries. (Moss Acres is one and Mountain Moss is another.) Most mosses grow best in moist, fertile soil that holds water well and is more acidic (pH 5.0 to 6.0), though some mosses will tolerate some sunshine. (Click here for a list of shade-loving mosses and click here for sun-tolerant moss options.)

Steps for Growing Garden Moss

Here are five steps to getting moss to grow in your yard or garden.

  1. Work up shaded lawn or garden areas that are bare.
  2. Apply fertile amendments, such as Black Gold Natural & Organic Garden Compost Blend or Black Gold Canadian Sphagnum Peat Moss, into at least the top three inches of soil.
  3. Apply moss as sheets or fragments purchased from a quality mossery. Make sure that they are the right species for your area.
  4. Water in the new moss and keep it moist. Follow the care steps as provided by the mossery.
  5. Keep your moss moist during the hottest, driest times in summer.

It’s that simple! If you like the look of mossy rocks, you can even apply moss starts to rocks to get that lush, green, mossy look.

Happy gardening!

Jessie Keith

Black Gold Horticulturist