Articles

What Is Causing My Grape Leaves to Look Distorted?

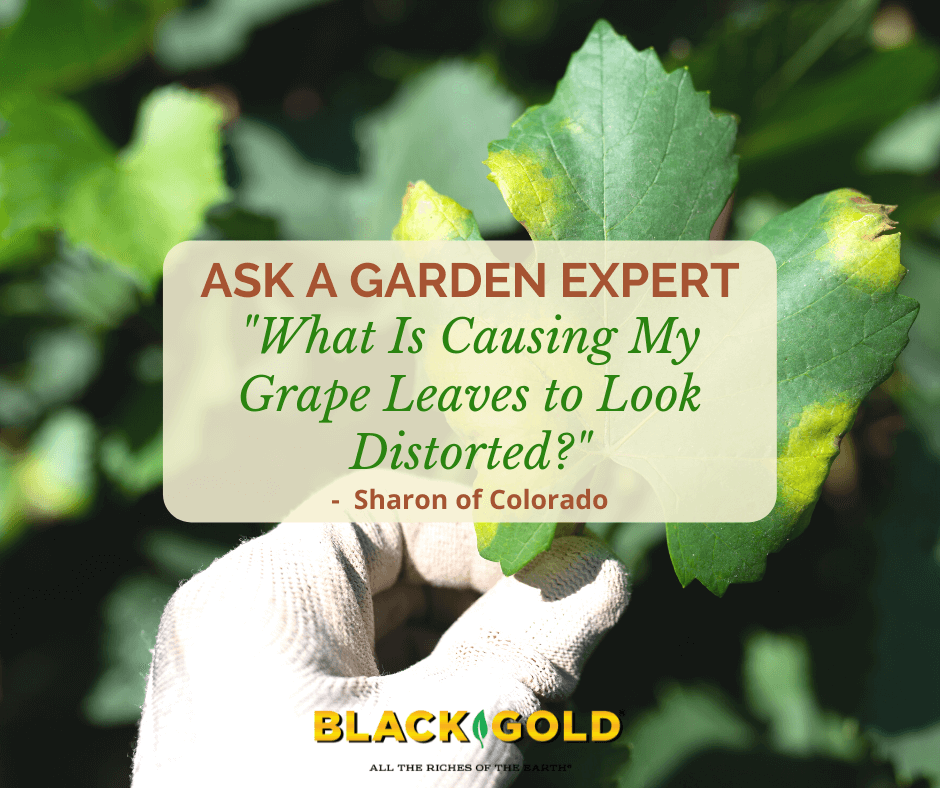
“I have a St.Theresa grapevine that has grown and produced very well. After being devastated by Japanese beetles last year, it developed several distorted leaves. Is it possible the Japanese beetles gave it some virus or disease? I cut it way back. Now, this spring, it has been making a comeback. But I noticed yesterday that some of the leaves at the ends of the new growth look distorted and discolored again. They look like the pictures of Eutypa Dieback. Help! What do I do?” Sharon of Colorado

Answer: Japanese Beetles (Popillia japonica) have been reported to vector some bean viruses, but there is no report or research to support that they spread any diseases of grape (Vitis vinifera). What is more likely is that your vines were weakened by the damage, left more prone to infection, and they obtained a disease. Other grape pests, such as mites, also spread grape diseases and they could have been the vestors. Either way, there are several grape diseases that can cause leaf distortion and discoloration. Here are some possible foliar grape diseases along with identification tips and management suggestions.

Grape Foliar Diseases That Cause Distortion

  1. Grape Anthracnose (Elsinoe ampelina, fungal) causes symptoms on both leaves and fruit. Foliage will appear spotted and have brown lesions that cause leaves to curl. The grapes also develop dark lesions. Apply a Bordeaux mixture spray or Liquid Copper Fungicide to infected vines when they are dormant.
  2. Eutypa dieback (Eutypa lata, fungal disease): Leaves can appear stunted, curled, and cupped. It is easily identified by cutting a stem: infected wood will have a wedge of darker, discolored wood against healthy, lighter wood. It infects older vines that are over five years of age. There is no known cure, so infected vines must be removed.
  3. Viral Diseases: There are many viral diseases of the grape that cause leaf distortions. (Click here for a visual guide of grape viral diseases.) All are incurable, so I recommend removing any vines that you are certain are infected with a viral infection.

Getting outside help is my ultimate recommendation. The best way to firmly identify your grape disease is to send a sample to your local extension agent and have it tested in a lab. (Please click here to search for your local extension agent!) Definitive results are necessary because you do not want to destroy your grape if it has a curable disease.

I hope that these tips help!

Happy gardening,

Jessie Keith

Black Gold Horticulturist


Why Are My Pine Trees Dropping New Growth?

Why Are My Pine Trees Dropping New Growth?

“I have a number of pine trees in my yard. Last year I had a number of trees that dropped new growth, this happened in the fall and winter.  This year a larger number of the trees dropped the new growth.  It looked like a green carpet. under the trees.  The weather was dry warm and the winter was colder than usual.  This year was quite warm and the winter was warmer than usual, stayed in the 20deg.  Also, we had heavy snow.  Also higher wind both years.  Is there a problem with the weather or something else? The new candles are falling.  All the candles are falling, it looks like a carpet.  They are falling in the fall and winter.  I’m really not sure what kind of pine they are.  The pines did drop some needles in 2019, too.” Question from Raymond of Holt, Michigan

Answer: If the fresh, new candles on your pines are falling to the ground green, then it is likely that insect pests are at work, though some environmental conditions can also cause needle drop. I will cover a few possible answers for you, but without knowing what species of pines you have, and without seeing images of the damage, I cannot provide a definitive answer. I recommend that you follow up with your local extension agent at Michigan State University. Extension agents are paid to help state residents with garden and landscape problems. Yours sounds serious! (Click here to see your local agents.)

Pine Defoliating Pests in Michigan

Pine Sawflies: These nasty pests defoliate the older green needles of pines in summer. (Click here to learn more about their management.)

Pine Shoot-Tip Beetles: The damage caused by these black beetles is typically shoot-tip and branch injury. (Click here to learn more.)

Pine Tip Moths: These moths cause new growth in pines to die in summer. (Click here to learn more.)

For a detailed list of more problems that can assail pines, I recommend that you read The Christmas Tree Pest Manual (2014). It is a super resource.

I hope that you get the help that you need for your trees this season!

Happy gardening,

Jessie Keith

Black Gold Horticulturist

What Caused My Azaleas to Suddenly Die?

What Caused My Azaleas to Suddenly Die?

“I have many azalea bushes in my yard, and this year, I had three suddenly die off. I couldn’t detect any pests or that type of issue. They were around a tree, and all four lost their leaves very quickly. One has sprouted green. One seems quite dead, and the other two are still bendable and not dead, but have no leaves. Any thoughts on what caused this? Also, do you feel the others that are bendable may come back?” Question from Mary of Longwood, Florida

Answer: There are several fungal diseases that can cause stem dieback and/or sudden death in azaleas. All become more pronounced when there is excess moisture, humidity, and the soil is not sharply drained. Here are the top three possibilities.

Azaleas Diseases that Cause Sudden Death

  1. Phytophthora Root Rot (Phytophthora cinnamomi) is a common, fast-acting, deadly disease of azaleas, and excess soil moisture and warmth encourage its growth and spread. Some infected plants will wilt and die very quickly. Others will grow slowly and may have poor-looking living branches, but infected plants typically succumb to death pretty quickly. To identify this disease, look for discolored, reddish-brown roots that are dead or dying. Badly infected plants will show the same discoloration on the lower stems. Remove all infected shrubs and dispose of them away from your garden. Sadly, this disease remains in the soil, so consider raising the soil in your beds to encourage better drainage, and plant something different in the spots. (Click here for good information about the best Florida landscape plants.)
  2. Phytophthora Dieback (Phytophthora cactorum) is the most common azalea disease that causes dieback. It is also a disease caused by poor soil drainage. The first symptom is wilting with leaves that curve inward. One difference from root rot is that the roots look blackened and pull up easily. The stem will often show brown discoloration at the base near the soil surface. Treat as you would for Phytophthora root rot.
  3. Rhizoctonia Root Rot (Rhizoctonia solani) is a deadly disease that behaves like the others, but the plants exhibit severe brown and black spots on the leaves, so I don’t think that this is the disease that took your azaleas.

When removing any diseased plant material, rake away and remove any dead leaf or stem material that may be contaminated with disease-causing spores. When pruning your surviving azaleas, avoid cross-contamination by cleaning your pruners in a 10% bleach solution when making cuts from one plant to another. Adding additional topsoil and amending beds and new planting areas with fertile organics, like Black Gold Canadian Sphagnum Peat Moss, will help any future azaleas that you plant.

Underwatering Azaleas

Azaleas properly planted in well-drained soil need regular water. One other less likely option is that your shrubs dried up due to lack of water. If this could be the cause, I suggest laying drip hose around the remaining azaleas, applying mulch, and irrigating the shrubs once or twice weekly in the absence of drenching rain.

I hope that this helps!

Jessie Keith

Black Gold Horticulturist 

Should I Sterilize Potting Soil to Reduce Greenhouse Pest Problems?

“In an effort to keep down the insect population of my indoor veggie garden, I’ve been sterilizing my soil in the oven or microwave. I’ve had whitefly and fungus gnat infestations from using Miracle Gro and other soils right out of the bag, so someone told me to sterilize, and it seems to work. However, if there are beneficial microorganisms in your Black Gold soil, I fear that sterilization may kill them. So, my question is this… should I heat sterilize my Black Gold organic soil before using it indoors? Or is that defeating the purpose of the soil’s ingredients?” Question from Holt of Georgia

Answer: Theoretically, fresh, straight-out-of-the-bag potting mix should be pest and disease-free. Black Gold® gets good grades in this arena, but if a bag gets slashed or torn during transport or is improperly stored, the contents can pay the price. (Only buy Black Gold® bags that are undamaged with contents that are not waterlogged.) Otherwise, you shouldn’t have to worry. Still, if you prefer to play it safe, soil sterilization is certainly helpful with preventing damping-off (click here to learn more), and it would kill any harboring pest eggs, but beneficial microbes will also pay the price.

The chief potting soil beneficials to consider are mycorrhizae and the good microbes in earthworm castings and sometimes compost. Other soil components, like Canadian Sphagnum peat moss and bark, are not particularly rich in any worthy beneficial microbes accessible to plant roots. Currently, we do not add mycorrhizae to any of our Black Gold® soils (unlike some of our Sunshine® mixes), but we do add earthworm castings and compost to quite a few, including our Black Gold® Natural & Organic Potting Mix. Sterilization would certainly kill any soil good guys, but if you are determined to sterilize, it should not impact your growing dramatically. And, you can always beef up your soil after sterilization by adding Black Gold® Earthworm Castings Blend from a well-sealed bag, or dry mycorrhizae spores, which are available at most garden stores.

Even after the sterilization of greenhouse pots, surfaces, and soil, pests may come. Every open door, window crack, or new plant brought indoors is a threat. When it doubt, fight back early using smart IPM. We have lots of blogs on the topic. (Click here to read an article about managing the worst indoor plant pests, and watch our video below about beating fungus gnats.)

Happy indoor vegetable gardening!

Jessie Keith

Black Gold Horticulturist


Why Are My Tropical Hibiscus Leaves Dropping?

“What are the reasons leaves drop from [tropical] hibiscus?” Question from Brenda of Miami, Florida

Answer: Tropical hibiscus (Hibiscus rosasinensis) are lovely shrubs when they are healthy and happy, but they look so dismal when they’re in poor shape–especially when they start dropping their leaves. There are LOTS of problems that can lead to leaf drop. Some of these depend on whether your plants are potted or in the ground.

Here are several common leaf-drop causes in potted hibiscus.

  1. Bound Roots – This means the plant has overgrown its pot and needs an upgrade. In this situation, the roots cannot access proper water and nutrients, and plants begin to decline. Poor growth, wilting, and leaf drop are just a few of the signs. Watch the video below to learn how to identify and repot pot-bound plants.
  2. Overwatering or Underwatering – Watering too little or too liberally can stress plants out. Tropical hibiscus need good soil moisture, but they can’t stand waterlogged soil. Irrigate when the top inch or two of the potting mix feels dry, and then water the pot thoroughly until the plant’s saucer is full. Your soil must also drain well while holding lots of moisture (Black Gold Moisture Supreme Container Mix is a good choice).
  3. Change of Scenery – If you recently moved your hibiscus to a shadier, windier, or indoor location, changes like this can cause stress and subsequent leaf drop. Give them good care, and they will snap out of it.
  4. Spider Mites – These tiny, destructive pests are nearly impossible to see but cause discoloration of leaves and eventual leaf drop. If you have them, you might also see little webs on the leaves and tender stems of infested plants. To determine if you have mites, take a clean piece of white paper, hold it beneath the leaves, then tap the leaves onto the paper. If you have mites, lots of tiny specs will fall and eventually, they will start crawling around. These are spider mites! (Click here for everything you need to know about getting rid of these pests.)
  5. Diseases – There are lots of diseases that can cause leaf drop. If your leaves show spots or mottling, then they are most certainly diseased. (Click here to learn about potential hibiscus diseases, pests, and solutions.)
  6. Poor Soil and Lack of Fertilizer – Be sure to refresh your plant’s soil every two years, and provide it with ample fertilizer for lush growth and flowering (follow manufacturer’s recommendations).

If your plants are growing in the ground, sharp temperature changes and high winds can cause leaf drop as can pest and disease problems. Considering that you live in Miami, I doubt that temperature changes are an issue.

Please let me know if any of these solutions help!

Happy hibiscus growing!

Jessie Keith

Black Gold Horticulturist

Why Didn’t My Hydrangeas Flower and Why Do They Have Spots?

“My hydrangeas didn’t flower this year and also have “black/brown” spots on the leaves.  Any ideas on what to do?” Question from Debra of Saint Inigoes, Maryland

Answer: Mophead or lacecap hydrangeas (Hydrangea macrophylla) are prone to fungal leaf diseases when there is excess moisture and the shrubs are poorly aerated. And, there are a couple of reasons why hydrangeas fail to bloom. 

Hydrangea Leaf Fungal Diseases

Do the spots on your plants look small, roundish, and purplish brown with lighter centers? If so, then they have the common disease, Cercospora leaf spot. It is not deadly, but it is unsightly and can eventually cause leaf drop. If your spots are larger, greyish, and more irregular, then your shrubs are suffering from Anthracnose spot. This appears when weather is excessively rainy and hot.

Both diseases take hold in spring but do not become visually apparent until later in the season. The best way to manage them is to clean old and diseased leaves diligently, and selectively prune to help aerate plants, which will reduce the onset of the disease. Also, refrain from overhead watering, which can further spread leaf spot.

Remove select stems down to the ground within your hydrangeas to encourage airflow, and if only a few leaves are spotty, remove them as you see them. Any fungicides you might use would be strong and not 100% effective at this stage, so I do not recommend them. In fall, be sure to remove all of the leaves that fall to the ground, and apply a fresh layer of mulch around them. Next year, keep an eye on your plants and remove any spotty leaves as you first see them.

Some hydrangeas resist spot diseases. These include the varieties ‘Veitchii’ (whitish flowers), ‘Pretty Maiden’ (soft pink flowers), ‘Ayesha’ (pink or blue white-centered blooms), and ‘Tovelit’ (brilliant pink or violet-blue flowers). If you continue to have lots of trouble, remove your hydrangeas and plant one of these.

Why Hydrangeas Fail to Bloom

Leaf spot will stress plants and can reduce bud set, but it should not totally keep hydrangeas from blooming. Two of the most common reasons hydrangeas fail to bloom in a season are 1) improper pruning or 2) winter dieback. If you prune Hydrangea macrophylla, then it is important to cut back the old blooms right after they flower. Otherwise, you may cut next year’s flower buds off. (Click here on a full tutorial on how to prune many different types of hydrangeas.) The same thing can happen if your shrubs suffered winter dieback. Sometimes late freezes damage the flower buds in spring as well.

I hope that this information helps. Please let me know if you have any additional information.

Jessie Keith

Black Gold Horticulturist

I Need Organic Solutions for Vegetable Pests and Powdery Mildew

“Which is the natural and most efficient solution against pests, aphids, white powder, etc. that year after year destroy our vegetables?” Question from Doina of Bothell, Washington

Answer: I wish that I could give you a simple answer. There are so many vegetables and so many pests and diseases that attack them that it is impossible to know where to start. You specifically mention aphids and powdery mildew, so I will give you guidelines for managing these. It will be followed up by two general steps that you can take to discourage veggie pests and diseases.

Aphid Management

Aphids are slow-moving insects that suck the juices out of tender plant parts, like stem tips and leaves. When aphid populations are high, they cover the tips of growing plants in masses. It looks creepy and can seem overwhelming. Lucky for you, they are easy to manage organically.

I always start by putting my hose setting on jet or center, then I spray. Aphids are delicate and can be spritzed off a plant in no time. To keep them from returning, follow up by spraying your plants with an insecticidal soap that is OMRI Listed for organic gardening. Keep them spritzed as you see more aphids. This method will put them in check quickly.

Powdery Mildew Management

This one is really simple! Powdery mildew is a leaf surface mold that can be removed with all-natural products containing the mild chemical potassium bicarbonate, which is similar to baking soda. GreenCure® is one of the most popular commercial examples on the market.  Just spray your mildew-ridden squash or cucumber leaves with these products and the spots disappear. It’s a remarkable transformation.

Two Steps For Disease- and Pest-Free Vegetables

Here are two more steps towards protecting your plants from pests and diseases. Both may sound deceivingly obvious.

1. Don’t stress your vegetables. When plants become stressed, they create stress chemicals that are detected by insect pests that are then attracted to the plants. What’s worst is that many common pests, like cucumber beetles and leafhoppers, spread common vegetable diseases. Stress also makes plants far more susceptible to disease. Weak plants have weakened immunity. So, grow your plants in well-fortified soil (see our long list of Black Gold soil amendments), provide them with good fertilizer throughout the season, and keep them well watered.

2. Choose resistant vegetable varieties (!!!). Choosing good varieties is the single most important way to protect your crops. When selecting varieties to grow in your garden, look for descriptions of pest and disease resistance. Award-winning plants also tend to be resistant and robust. Plants bred for resistance are the easiest to care for naturally and organically.

I also suggest you read the Fafard (our sister brand) article, Beating Vegetable Garden Pests Naturally, as well. It has even more information to help you. I hope that these tips help!

Happy gardening,

Jessie Keith

Black Gold Horticulturist

What Are the Spots on My Flowering Dogwood?

“What are the spots on my dogwood tree leaves, and how can I prevent them? They come back every year.” Question from Jennifer of Ramsey, Indiana.

Answer: If you see no stem or branch dieback on your flowering dogwood, then it is likely suffering from spot anthracnose (Elsinoe corni), a fungal disease that is unattractive but NOT deadly, unlike dogwood anthracnose. Another possibility is Septoria leaf spot (Septoria cornicola). Spot anthracnose is a more common spot disease of dogwood, so this is likely what your tree is suffering from.

Spot Anthracnose Symptoms

The main symptom of spot anthracnose is lots of tiny spots on the leaves with dark purple borders. The flowers can also develop little brown spots. White-flowered dogwoods tend to get the disease more severely than pink-flowered varieties. This disease is most problematic when springs are extra cool and wet.

Septoria leaf spot produces larger purple spots that are more angular than round. It is also most problematic in cool wet weather. If this is what you believe you have, manage it as you would spot anthracnose.

Managing Dogwood Spot Anthracnose

This is a difficult disease to manage on large trees, but there are several measures that can help. First, the disease overwinters on infected leaves, so clean up all of your dogwoods leaves well in the fall. This is not a foolproof measure because the disease can also overwinter on fruits and buds, but it will reduce the amount of disease-causing material. In early spring, just as the flower buds begin to break and the leaves unfurl, spray your trees with a fungicide every week to two weeks throughout the early part of the growing season. This will reduce and help control its onset. Liquid copper fungicides and neem oil are two options approved for organic gardening that are reported to work.

If you are game to plant a new tree, there are also quite a few flowering dogwoods that are resistant to fungal spot diseases. These include the double-flowered dogwood ‘Plena’, the heavy flowering and disease-resistant ‘Cherokee Princess’, the deep-pink-flowered ‘Cherokee Chief’, and the hybrid Stellar Pink®, which has large, pale pink flowers.

I hope that these tips help!

Jessie Keith

Black Gold Horticulturist

Yellow Chlorotic Blueberries

“My blueberry plants have yellow leaves. Why is this happening and what can I do?” -Question from Emily of Columbus, Ohio

ANSWER: Your blueberries have chlorosis. This is caused by a soil pH problem. Blueberries like acid soils between 4.5 and 5.5. When soils are too alkaline (have a higher pH) blueberry plants cannot access necessary nutrients, and their leaves start to turn yellow. Thankfully, this problem is easy to fix.

First, it helps to determine the pH of your soil. Take a soil sample to your local Ohio State University Extension Service (click here for instructions). Once you get the results, you will know how much you need to lower your soil’s pH for your berries.

You can lower soil pH by amending with Canadian Sphagnum Peat Moss and adding a soil acidifying fertilizer around the base of the plants. Aluminum sulfate will quickly lower soil pH; there are also other brands of soil acidifiers and acid fertilizers specialized for crops like blueberries. Follow the instructions on the packaging to adjust the pH around your blueberries, and they should bounce back in no time!

Happy Gardening!

Jessie Keith


Maintaining Soil Health for Plant Health

(c) Eddie Greenly 2011
The more you can do to make plants healthy and avoid stressful conditions, the likelier they are to thrive.

In many of these web articles, I have often stressed the importance of soil health. Whenever we plant something in the ground it offers an opportunity to amend the soil around and below the root zone. At no other time can one easily add compost or fertilizer to the soil around and below the roots. The same thing is also true when we plant something in a container, except that in a container we have more control over the actual soil.

Health guidelines for people stress that maintaining a good diet and lifestyle will help keep our bodies healthy. This same principle is true for plants. The more we can do to make a plant healthy and avoid stressful conditions, the likelier that plant will thrive. Of course there are some exceptions to this, and roses are a good example. Some roses will get black spot on their leaves regardless of overall plant health. Even in the case of roses, there are techniques we can do to lessen the effect of damaging diseases or insects. I have always had some rose bushes in my garden, and over the years I have removed those rose plants that are susceptible to black spot and replaced them with new varieties that are disease resistant.

When I look at my own garden, I have learned that by providing the best gardening practices will greatly reduce stressful conditions for plants. I continually add Black Gold amendments whenever I am planting something new. I mix fertilizer into the existing soil and add Black Gold Garden Compost Blend. In the many containers that I have on my deck and throughout the garden, I perform a similar treatment. I use either Black Gold All Purpose Potting Soil or Black Gold Natural & Organic Potting Soil. At this time, I also add some quality all-purpose fertilizer, and then I know I am providing my plants with what they will need for an excellent beginning.

Rose Knock Out
Choosing disease-resistant roses really pays off.

One thing that I find many beginning gardeners (and experienced gardeners too!) tend to overlook is the right environment for their particular plant. By environment, I mean determining whether it is a plant that needs sun, partial sun or full sun. If a shade-loving plant is placed in a very sunny location, there is no amount of fertilizer, water or proper soil that is going to keep that plant from getting stressed. Always check the plant label and ask your local garden center personnel about the proper planting location for the plant you are selecting.

Another major factor is watering. Here in the Pacific Northwest, we have recently had some very hot weather. Even plants that thrive in the sun may wilt because they are losing more water than they can absorb. On particularly hot days, after an early morning soil drench, I like to actually spray wilted plants with water as I have found that this will usually revive them. Of course this is a temporary course of action, but it does work. Another solution is to add a mulch around the root base using Black Gold® Garden Compost Blend as this is excellent water retentive material for plants both in the ground and in containers.

Digiplexis 6-17-14
Plant potted plants in the best mix and caring for them well will keep them healthy and thriving.

There are many plants in containers in my garden that are in the sun, and I find that sometimes I may need to water them twice a day, especially later in the season as the plant roots fill the container. As a plant grows, the roots may soon fill the container, and this will make the pot become drier much faster than it would have earlier in the summer when the new roots are just beginning to grow.

I do not think many people like to use chemical sprays and in their gardens; I have not used any insecticides or fungicides for many years. I have many birds and encourage them as I find that they can keep many insects under control. There are times when spraying is necessary, but do some research before you do. A good rule to follow is to check with your extension service or local garden center to learn what is the least toxic chemical option available.

Gardening should be fun and relaxing, and you can help make it that way by providing your plants with the best possible materials for them to grow and thrive. Yes, there will always be some failures, but that is how we learn. We don’t give up. We try again!