Articles

How Do I Protect Apple Trees from Fungal Disease?

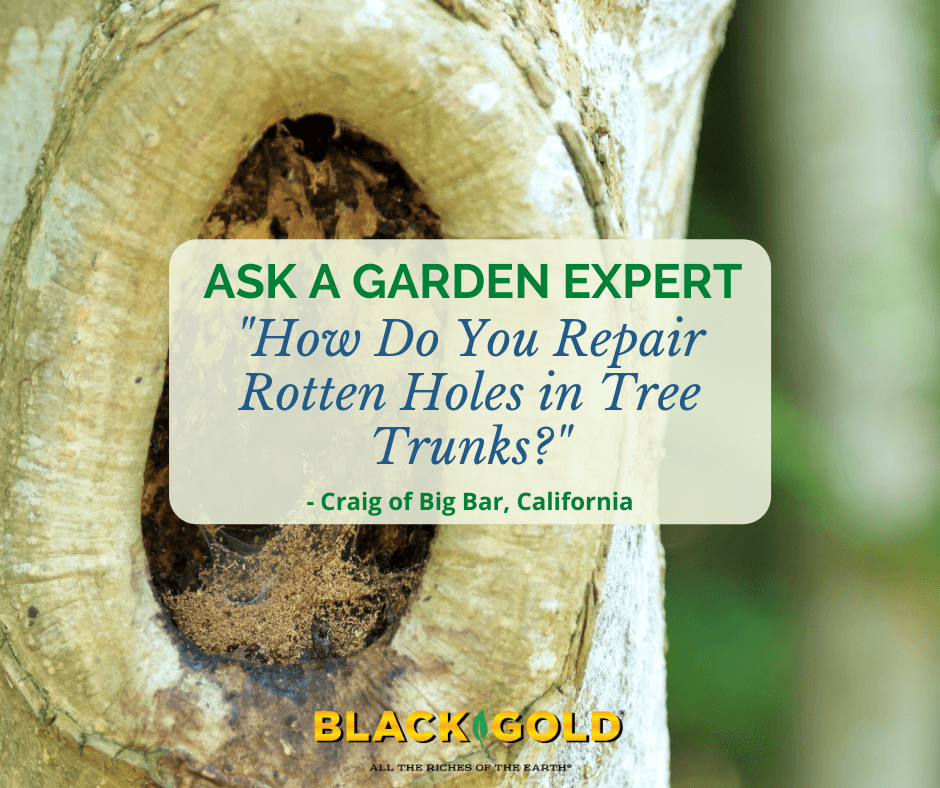
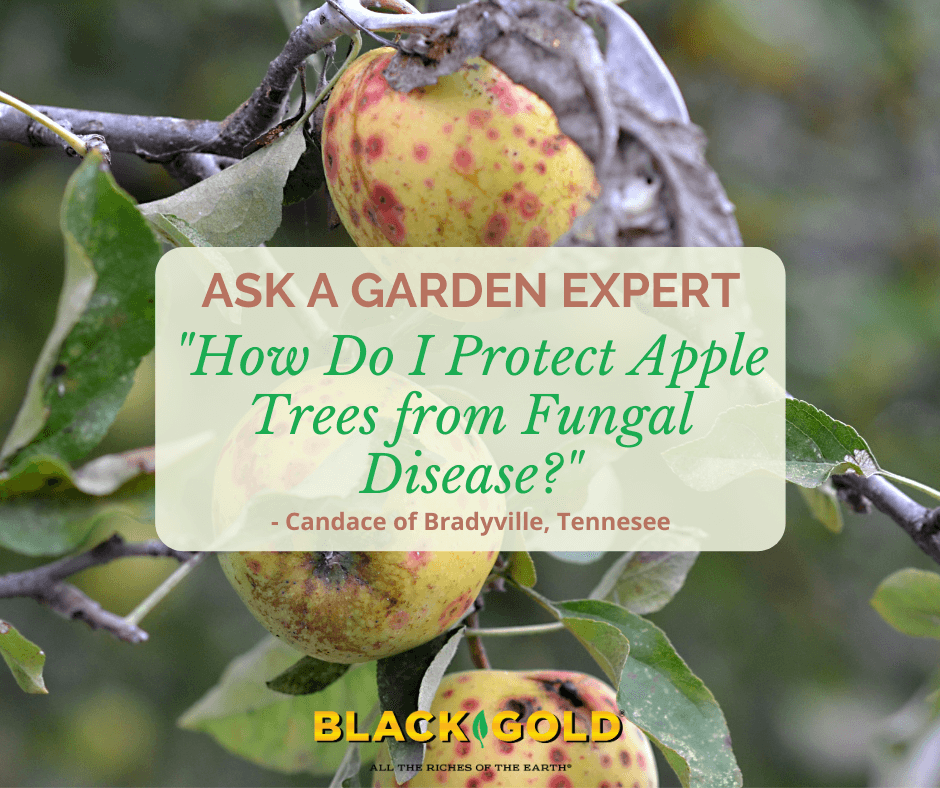
“I have fungal diseases on my apple trees and fruits. I have tried all different sprays and had no results.” Question from Candace of Bradyville, Tennesee

Answer: Apple trees get loads of fungal diseases (Click on this link for a full list). Some cause trees serious damage while others are just disfiguring and reduce fruit set. Either way, you can reduce fungal disease problems by taking these steps.

Wet springs are sure to cause fungal disease symptoms on infected trees. There are several cultural and safe chemical means of controlling them. These include:

  1. Applyingdormant oil fungicide spray in late fall, again in late winter before the trees leaf out, and again after they begin to leaf out in spring. If the spring is unusually wet, apply an additional copper-based fungicide spray through the spring during a dry spell. (Click here to read more about dormant oil sprays.)
  2. Watching for leaf spotting when weather conditions are favorable, and spraying with a Bordeaux mixture fungicide of copper sulfate (CuSO4) and slaked lime (Ca(OH)2) as soon as they appear. (Note: Moist spring air between the temperatures of 40 degrees F and 86 degrees F encourages the onset of fungal diseases.)
  3. Spraying with a Bordeaux mixture fungicide during the growing months. This fungicide is effective and approved for organic growing.
  4. Removing badly infected or dying stems with clean shears or loppers as you see them.
  5. Raking up all of the fallen leaves that may carry disease in fall, and bagging and disposing of them in the garbage.

Repeat treatment yearly as needed, especially in moist years, to overcome this common fungal disease of apples!

Happy gardening,

Jessie Keith

Black Gold Horticulturist

How Do You Repair Rotten Holes in Tree Trunks?

How Do You Repair Rotten Holes in Tree Trunks?

“My pear tree has some large rotten holes on the trunk. What can I fill these up with (concrete)?” Question from Craig of Big Bar, California

Answers: That is an excellent question. The key is cleaning up trunk holes to stop the rotting process. Concrete won’t cut it (it’s also a chainsaw hazard), but there are some practices and products that will. Wound healing and closure is the goal. Here are my suggestions for treating your peartree trunk holes in four steps.

  1. Gently scrape away the soft, rotted wood in the holes to reveal the living tissue. Take care not to cut into any protective firm wood or living tissue! I recommend wearing Kevlar gloves to protect against potential cuts and using a planting knife to remove any bulk, loose deadwood, and a wood-shaving tool to scrape away dead wood closer to the living tissue. Clean your tools with a 10% bleach solution, before and after work, to avoid potentially spreading disease.
  2. Once the holes are free of dead tissue you can either leave them to naturally heal, if the damage is just peripheral, or you can treat them with an antifungal spray and effective tree-wound sealer.
  3. If you want the extra protection of a fungicide and sealer*, I recommend first spraying the area with liquid copper fungicide spray. Once it has dried, try using quartz-based Tree Bandage, which is promoted by foresters and is said to be breathable and truly protective.
  4. If you want to fill the hole to keep animals out, I suggest using a high-powered stapler to stable a piece of strong screen over the hole. But, if you like animals this step is unnecessary.
*Do not use petroleum-based wound paints. Studies have shown that tree wound paints containing petroleum, latex paint, shellac, and asphalt do not promote healing and wound closure. (Click here for an article about the myths and concerns regarding wound paints.)

Here are other precautionary measures that can be taken to stop any fungal disease:

  1. Free the root crown of excess soil and mulch (tree volcanos), if needed.
  2. Cutaway any dead or dying branches, being sure to clean tools before and after.

I hope that these tips help!

Happy gardening,

Jessie Keith

Black Gold Horticulturist

How Can I Prevent Damping Off When I Sow Seeds?

“How can I prevent damping off when I sow seeds?  That is my problem.” Question from Bev of Philadelphia, Pennsylvania

Answer: This is a problem that I have faced many times starting seeds in university greenhouses, professional greenhouses, and at home. Thankfully, the solution is pretty simple, and it all involves keeping everything clean. Let’s start by covering the sources of damping off disease.

What is Damping Off?

Damping-off is a disease of sprouting seeds and seedlings that is primarily caused by two soilborne fungi, Pythium and Phytophthora spp. They cause rot and death in developing seeds and seedlings, usually at the roots or base of tender developing stems. Damping-off is a problem when growers keep the soil too moist and the disease is present.

To keep damping-off from taking hold you need to start with good soil, clean pots, and follow up with smart care.

Sterilizing Mix and Pots

Disease-carrying mix is the biggest concern. I used to work in large-scale greenhouses where they used big heater/steamers to sterilize mix at a temperature just high enough to kill any soilborne diseases (around 180°F). This is essential for growers that reuse mix, but careful growers sterilize new mix, too. Why? Because the airborne spores of damping-off fungi can be practically anywhere –especially in places where plants are being grown.

Additionally, unused seed-starting mix, like Black Gold Seedling Mix, is typically produced in clean facilities and bagged pathogen-free. But, if bags tear in transport and/or bags are not stored properly, Pythium and Phytophthora spores can infiltrate. Bags of seedling mix should be lightweight (meaning no water from the outside has seeped into the bag) and without tears. Improperly stored open bags at home can also be a danger. If you are not certain of your mix’s cleanliness, then it’s time for home sterilization.

I sterilize seed-starting mix using this fast and easy method.

Ingredients: Seed-starting mix, a 9″ x 13″ cake pan, 1/2 cup water, aluminum foil, and an oven.

Directions: Preheat your oven to 180°F, fill your pan with seedling mix, sprinkle it with the water, cover the pan with the foil, and bake it for 30 minutes. After baking, remove the pan from the oven and allow the mix to cool before using.

These diseases can also hang out on dirty old pots, so in the greenhouse, we’d also wash used pots and trays really well in hot water with good dishwashing liquid and sometimes a dash of bleach. I do this at home as well.

Seed and Seedling Care

Aside from starting with clean soil and pots, it is essential to discourage wet soils when starting and growing seedlings. I generally keep newly planted seeds gently sprinkled with a bottle waterer (see video below), so the soil is never over saturated. Once my seedlings pop up, I bottom water by adding 1/4 to 1/2 inch of water to the water-holding trays every two to four days, depending on seedling size. It also helps to encourage airflow, to help soil surfaces dry more quickly, and keep trays warm with a heat mat.

These cultural practices will definitely kick your damping-off problem away for life!

Happy gardening,

Jessie Keith

Black Gold Horticulturist