Articles

Growing Cabbage, Kale, & Collards: Fresh Super Foods

A single large clay pot easily supports cabbage, parsley and Swiss chard for porch or patio.

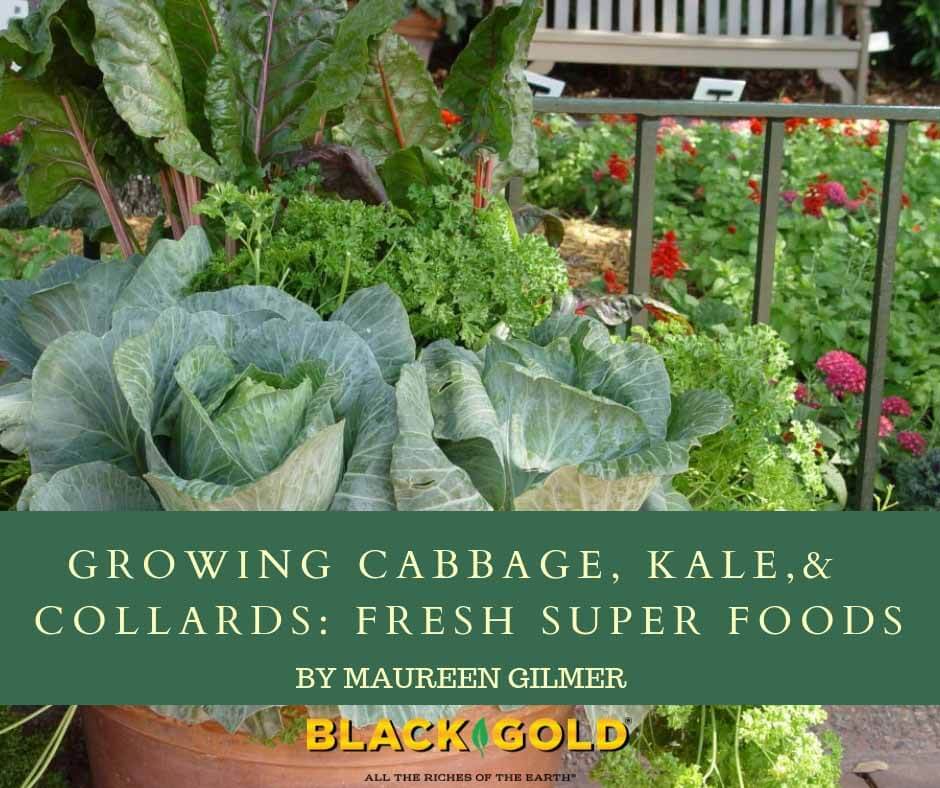
Until recently, collard greens were known only in the South and among African Americans who brought this “soul food” into northern cities during the Great Migration a century ago.  Today collards and kales are heralded as “fresh super foods” due to the high nutritional value of these large-leaved members of the cabbage family. These “pot greens” are eaten stewed, steamed, or wilted for a quick healthy meal.

kale
Curly leaf kale is actually sweeter after it’s exposed to frost making this an ideal Fall crop.

Brassica is a genus with dozens of variants, most being from the original species, Brassica oleracea.   Among them are cauliflower and broccoli, Brussels sprouts, and collard greens.  Such close relations mean virtually all of them are grown the same way in western gardens.

Let back-to-school ornamental kale and cabbage displays in the grocery store be your reminder that it is Brassica season.  August is the time to start your fall and winter garden, which can feed a family with healthy greens even after frost sets in.  If row covers are used, plants can remain productive despite significant late-fall cold inland and at higher elevations.  The key is sowing your brassicas while it’s warm enough stimulate good germination and maturation of seedlings, indoors or out.

Start Them Indoors

Brassicas can best be grown from seed sown indoors in advance while conditions are too warm to plant outdoors.  Time their indoor planting so they’re ready to plant out into the garden when temperatures cool off in September.  Seed germinates best between 65 to 75º F but will sprout at lower temperatures, though it may take more time.

collards
Collard greens are a staple of the old South that’s catching on everywhere for plentiful pot greens.

Sow the small seeds in Black Gold Seedling Mix with RESiLIENCE® to provide a clean, moisture-holding media for optimal germination.  After the seedlings germinate, carefully move them to individual pots of Black Gold Moisture Supreme Potting Soil with RESiLIENCE®.  Be careful transplanting these vegetables because damage to stems can introduce unwanted disease.

Sow Them in the Ground

Cabbage family greens also germinate nicely out in the garden while the soil is warm.  It’s an old custom to cover seedbeds in wet burlap on hot dry days to keep them moist and shaded during germination.  Some gardeners create shade covers to aid seedling development.

greens
Pick a “mess” of greens from the garden for a quick, easy and highly nutritious meal.

If you grow a “mess of greens”, it’s enough to feed a family for months since leaves are cut while the plant lives on to make more foliage.  A big pile of leaves lose a lot of volume in the cooking process, so don’t underestimate the numbers of plants needed. Err on the side of overdoing it.  Space the plants as stipulated on the seed packet since these will be very large at maturity.

Recondition soil before you introduce your Brassica seeds or seedlings into the garden.  The ground may be depleted by summer crops, so it’s important to boost fertility.  Greens depend on nitrogen, the nutrient responsible for stem and leaf development in plants.  Make sure you fork in Black Gold Garden Compost Blend before planting.

Grow Them in Pots

Flowering cabbage, yet another Brassica, is often grown in pots with annual flowers for winter gardens.  This demonstrates how well-adapted leafy greens are to pots and troughs on your porch, patio or deck.  Blend your greens with violas and calendulas, both easy-to-grow cool-season annual flowers with edible blossoms.

Too many Americans have grown up without ever tasting real “pot greens”, but when picked fresh their rich sweet flavor will soon become a family favorite. (Keep in mind that most greens actually tastes better after it’s exposed to frost!)  What’s even more surprising is it takes less than an hour to harvest and cook greens into a healthy, garden-fresh meal.  That makes it a time saver that doesn’t sacrifice nutrition.

This year, grow a wide range of these super foods in your fall and winter garden, so there’s always fresh picked fast food in your kitchen at the end of a busy day.

Summer Annual Herbs for The South

Defining an herb can be so confusing. Botanists say if something is “herbaceous” it is a seed-bearing, non-woody stemmed plant, but this term refers to all non-woody flowering plants. Herbalists, consider plants to be herbs as long as their leaves or stems benefit mankind in some way as medicine, dye, pest deterrents, perfumes, or, for our most popular modern herbs, for flavoring food. (A spice, in contrast, is when a plant’s dried seed, fruit, root, bark, or vegetable is used in comparable applications.)

1-borage
A beautiful borage flower ready for picking.

For the purposes of this article, I am going to limit our list to a few annual culinary herbs that also happen to be herbaceous, and perform well in Southeastern gardens.

How to Grow Herbs

First, let’s discuss how to grow herbs. You could assume that most culinary herbs would grow well in the hottest states on the East Coast because so many of our favorite flavorings are from the balmy Mediterranean. The problem here isn’t the sun and heat, it is the high moisture and humidity, which turns silver-leaved plants to mush and breeds fungus.

To combat this problem, try to give herbs lots of breathing space between plants so that what little breeze may be blowing will help dry them out. A clever gardening practice I learned while volunteering in a historic public herb garden is to mulch closely-branching herbs, such as rosemary and lavender, with coarse gravel or bright white rock to reflect heat and light into the undersides and interiors of the plants. This is a perfect application for either decorative white rock (which is less than ½-inch in size) or washed pea gravel.

All herbs need excellent drainage. Though that isn’t usually an issue for gardeners with sandy soils, those of us with clay-based sites must raise and amend herb gardens with organic matter to encourage drainage and open up the porosity of the soil for good root development. Black Gold® Garden Compost Blend offers a mixture of peat moss and aged compost to improve soil moisture retention, aeration, and drainage. This top-quality garden amendment is OMRI Listed for organic gardening.

For sandier soils that dry out too quickly, try Black Gold Garden Soil, which enriches the soil with needed organic matter to increase moisture retention and promote aeration and drainage.

Growing Herbs in Containers

Growing herbs in containers may be the best choice for gardeners with limited space or sunlight. I have successfully used Black Gold® Natural & Organic Potting Soil with RESiLIENCE® for my potted herbs and was pleased with the results. I credit the earthworm casting fertilizer for the lush growth, even in summer, when most plants slow down in the heat.

Basil

1-IMG_5868 - Copy
The variegated basil ‘Pesto Perpetuo’ never bolts and produces tasty leaves all summer long. (Image by Jessie Keith)

The first annual summer herb that most gardeners can’t wait to get started is basil (Ocimum basilicum) in all of its many forms from various large-leaved sweet basils to the exotics like African blue, Thai, and Indian holy basil (O. sanctum). Varieties of our favorite herb for spaghetti sauce, pizza, and Caprese salad keep being introduced into the gardening trade, including teeny tiny-leafed globe basil, columnar basil, and this year, I have seen more white variegated ‘Perpetual Pesto’ basil offered at garden centers.

Basil loves it hot. It sprouts quickly from seed started directly in the soil, and is only 6-15 weeks to harvest. Keep picking your basil leaves throughout the summer for the bushiest plants, and be sure to keep the endless supply of basil flowers pinched for the best-tasting leaves.

Borage

Borage is another annual that can be started from seed, even when soil temperatures are up into the ’80s. The signature sky-blue, star-shaped flowers of borage (Borago officinalis) can be sugar-coated, dried, and eaten; but, the young leaves add a hint of cucumber taste to salads. Once the fuzzy leaves mature, they are best cooked. Keep planting them throughout the summer for continuous harvesting.

Cilantro

1-corriander
Eat the leaves and cilantro and the dried seeds as coriander.

Southerners may be more familiar with the fresh leaves of cilantro than we are with the nutty seeds of the same plant, which are called coriander (Coriandrum sativum). An ancient plant mentioned in the Bible, this herb has been relished throughout history in cultures across the world.

Though usually planted by seed in the early fall in the Southeast United States, coriander left too long in the garden will scatter seed that will pop up everywhere the next spring. Keep cutting and using this plant when it is fresh, as it bolts easily, then vanishes.

Dill

Nothing perfects a potato salad, deviled egg, or pickle like the addition of dill (Anethum graveolens). Dill’s ferny leaves are fragrant and astringent, so the perfect complement to heavy rich foods and anything made using vinegar. This is a plant to keep seeding into your garden every few weeks. Like cilantro, it bolts quickly in the heat, so be prompt to pick it and replace it.

1-IMG_5827
Dill flowers are just as tasty and pungent as dill leaves. (Image by Jessie Keith)

Epazote

Newer to the culinary scene is epazote (Chenopodium ambrosioides) a wild plant that is essential in Mexican bean dishes, soups, and mole sauce. Once treated as an aggressive weed, gourmet cooks are now searching for its fresh young leaves. Your local Latin market may have some viable seed available, otherwise, check organic seed catalogs.

Nasturtium

We love the colorful flowers of nasturtium (Tropaeolum majus), not forgetting that both the fresh blossoms and its rounded leaves can be peppery additions to salads, and that nasturtium flower buds can be pickled like capers. Plant nasturtium early in the summer in very well-drained, moderate to poor soil for the best flowering. Remember that unlike others in this list, these annual plants don’t thrive as well during our dog days of summer but perform better in fall.

Of course, there are cool-season annual herbs, biennial herbs, and plenty of perennial herbs to cultivate in the Southeast, but I hope that this sampling of summer annual culinary herbs will inspire you to keep planting something special through the hottest days ahead.

A to Z Natural & Organic Rose Care

The new rose Take it Easy™ is highly disease resistant, and a great choice for organic rose growing. (Photo Courtesy of © Weeks Roses)

Roses have a bad rap when it comes to pests and diseases—causing ecologically minded gardeners to avoid growing these seemingly needy, unsustainable garden beauties. But this need not be so. With the dawn of more resilient rose varieties and better rose-care products, it is easier than ever to successfully grow roses naturally.

There are four rules of thumb for sustainable rose cultivation: 1. Choose resistant roses; 2. Follow good rose cultivation techniques; 3. Establish an IPM regime (monitor your roses); 4. use OMRI Listed products to manage pests and diseases.

Choose Resistant Roses

The golden blooms of Julia Child® shine through summer. (Photo Courtesy of © Weeks Roses)

Newer roses are bred to withstand all the most common rose problems in addition to having good fragrance and old-fashioned appeal. Sometimes older varieties are also surprisingly tough and resistant. Here are top selections for resistance, habit, and good looks:

  1. A new introduction for 2015, Take it Easy™ is a beautiful floribunda rose that bears many clusters of velvety dark red flowers throughout the season. Hybridized by Christian Bédard, Research Director at Weeks Roses, this tough rose is described as having a “naturally self-maintained habit.” Its shiny dark green leaves are said to remain attractive and unhindered by foliar disease.
  2. Old-fashioned looks and good disease resistance make the Romantica® Roses by Star Roses great selections for gardeners seeking classic garden roses for modern gardens. Many, such as the palest pink, fully double Colette™, also boast exceptional fragrance as well as highly disease-resistant foliage.
  3. An AARS-award-winning floribunda rose with old-fashioned looks, Julia Child® is another Weeks introduction that bears fragrant double roses of palest amber. Its ultra-glossy leaves have excellent disease resistance, and the vigorous plants keep blooming all season long.
  4. The compact heirloom polyantha rose ‘Gabrielle Privat’ (1931) is a top performer in my garden. It becomes covered with fairy-pink clusters of small double roses that bloom most vigorously in early summer.
  5. Named for the famed English garden designer, Gertrude Jekyll® is a rich double pink David Austin rose with outstanding fragrance and disease resistance. The classic English shrub will add effortless heirloom charm to any garden.
  6. A great hybrid tea is Hypnotized!®, the Jackson & Perkins 2013 Rose of the Year®. Its highly fragrant flowers are bright shades of pink with streaks of white and stand above very disease-resistant glossy foliage.

Follow Good Cultivation Techniques

A plant with Rose Rosette Disease (RRD), an incurable viral disease that requires plants to be removed to stop the spread.

Good site selection and pruning are at the heart of smart rose care. Choose a planting location with full sun and soil with good drainage and ample organic matter. Roses grow best in slightly acid to neutral soil (6.5 to 7.0), so check your pH before planting. Amend with Black Gold Canadian Sphagnum Peat Moss at planting time as well as a fertilizer formulated for rose growing. I suggest alfalfa meal.

There is an art to rose pruning. First, time it right. Prune in spring right before branches have begun to leaf out. Forty-five-degree angle branch cuts should be made with clean, sharp bypass pruners. Cut stems around ¼ to ½ inch above outward-facing buds to encourage strong outward branching. Keep a bucket of water with 10% bleach on hand to clean pruners between plants, to protect against potential cross-contamination of diseased plants. Also, be sure to invest in a good pair or rose gloves to keep thorns from your hands and arms.

Start by removing any dead or unhealthy looking branch material. Next, cut back any crossing or large, ungainly branches that negatively impact the overall shape of the plant. Finally, promote airflow by pruning out any small, densely arranged branches. Good foliar airflow will helps keep foliage dry, which helps protect plants from certain foliar diseases. Read more about good rose pruning techniques by clicking here.

Establish an IPM Regime

Gertrude Jekyll® is a double pink David Austin rose with outstanding fragrance and disease resistance. (Photo courtesy of David Austin Roses)

Catching early signs of pest and disease damage can help you tackle small problems before they become big problems. Powdery mildew (white spots on leaf tops), downy mildew (purple, red, or brown spots on leaves), black spot (black spots on leaf tops and bottoms), rust (orange bumps on leaf bottoms and tops), and anthracnose (red or brown spots that turn gray or white in the center) are the most common foliar diseases cause by fungi. The best practice is to remove disease foliage immediately, in addition to removing foliage that may have fallen to the ground. Keeping plants physically clean will do wonders. The application of safe, OMRI Listed rose fungicides is also recommended (see below).

Viral diseases are a different matter. Leaf and branch distortions, leaf line streaks, unexplained leaf curl, and mosaic patterns are the surest signs that your roses carry a virus. Unfortunately, viral diseases cannot be cured, so the best action is to remove infected plants entirely. This is most imperative with rose rosette disease, which spreads and kills roses fast. It is also smart to choose “virus-free” plants at planting time.

Most insect pests love roses as much as we do. Some of the most common and destructive pests include Japanese beetles (skeletonize foliage), rose aphids (suck leaf juices from new growth and flowers), spider mites (suck leaf juices from mature leaf undersides), and thrips (attack flowers in bud causing bloom distortion). Several organic solutions are available for their management (see below). Native leafcutter bees are also known to cut rounded notches from rose leaves, but these friendly pollinators don’t do serious damage and don’t require management.

Nutrient deficiencies are common in roses but easily remedied with recommended doses of a good, OMRI Listed rose fertilizer.

Learn more about common rose diseases here, common rose pests here, and Japanese beetles here.

Choose the Right Products

The hybrid tea is Hypnotized!® was Jackson & Perkins 2013 Rose of the Year®. (Photo courtesy of Jackson & Perkins)

There are lots of effective, environmentally friendly rose-care products to choose from. For fungal foliar fungal diseases, there are lots of OMRI Listed options (see the full list here). I recommend GreenCure® for powdery mildew and Garden Safe Brand Fungicide 3® for all other foliar fungal diseases. Both are reliable and safe.

Early applications of insecticidal soap, dormant horticultural oil, or neem oil will help tackle problems with aphids, spider mites, and even thrips. As a protective measure, it is always wise to treat roses with dormant horticultural oil early in the season before plants leaf out. Neem oil and insecticidal soap can be applied through the season as needed. Larger pests, like Japanese beetles, are best picked off by hand and squashed or thrown in a bucket of water. In years when populations are high, smaller roses can be protected with summer-weight insect row cloth.

Follow these rose care guidelines, and you will have a beautiful rose garden. Your roses may still have thorns, but they will look and smell sweet through the season.

Growing Tomatoes from Seed to Harvest

Nothing is more gratifying than a big tomato harvest in summer!

Homegrown summer tomatoes simply taste better. That’s why they’re the most popular warm-season crop. They are inexpensive to grow and offer big payloads of delicious fruits, which are pricy at farmers’ markets and grocery stores. It pays to grow your own from seed because they are easy to start, and if you grow organically it’s the best way to know that your stock is pesticide-free. And, there are loads of wonderful tomato varieties only offered from seed.

Tomato Basics

  • Common Name: Tomato
  • Botanical Name: Lycopersicon esculentum
  • Days to Harvest: 65 to 85 days after planting, depending on the variety
  • Planting Time: After the last frost date
  • Light: Full sun
  • Soil: Rich, porous, well-drained loam
  • Water: Regular water for even moisture
  • Temperature: Fruiting is best with 78 -92ᵒ F days and 70ᵒ-80 F nights.
  • Fertilization: Quality fertilizer formulated for tomatoes
  • Pests: Tomato hornworms and Colorado potato beetles feed on foliage and fruits, causing significant damage.
  • Diseases: Plant wilt, leaf damage, fruit damage, or poor performance can be caused by many tomato diseases, including early and late blight, fusarium wilt, tomato mosaic virus, and verticillium wilt.
  • Disorders: Blossom end rot (caused by calcium deficiency), splitting/cracking (caused by excessive water or temperature fluctuations), and fruit toughness, cat-facing, and reduced productivity (caused by cool temperatures) are the most common disorders.

Days to Harvest Steps for Tomatoes

'Pomodoro' is a fantastic all-purpose tomato for fresh eating and cooking.
‘Franchi’s Italian Pear’ is a fantastic all-purpose tomato for fresh eating and cooking.

Starting Seeds

It takes around six to eight weeks to grow tomatoes from seed to ready-to-plant seedlings. Start seeds indoors for the best results. Sow seeds in cells filled with OMRI Listed Black Gold Seedling Mix and lightly sprinkle a bit on top to cover. Gently moisten the cells with water, and then place the trays right under the warmth of grow lights. Keep the mix moist but never wet. In 5 to 12 days, your tomato seeds should germinate. Germination is best when temperatures are warm  (68°-75° F (20-24° C)). A heat mat for seed starting will dramatically hasten germination. (Click here for more detailed seed-starting instructions.)

Tending Seedlings

Tomato seedlings are delicate and have two lance-shaped seed leaves when they first emerge. The true leaves, which are feathery and divided, appear in 2 to 3 days. At this point, feed seedlings with diluted, water-soluble tomato fertilizer. Keep the soil moist but not wet. Wet soil can encourage fungal diseases that cause seedlings to rot or “damp off.” To avoid leaf burn, lift grow lights up as plants get closer to the bulbs.

Tending Small Plants

Happy tomato seedlings

Tomato plants should be around 8- to 10-inches tall and garden-ready after eight weeks. Indoor grown seedlings are tender, have weak stems, and need time to adjust to full sun. If directly planted outdoors, they will develop leaf burn and may die. To avoid this, they need to be hardened off for at least a week before planting. Hardening off means acclimating seedlings from their cushy indoor growing conditions to the windy, sunny outdoors where temperatures fluctuate.

To harden seedlings off, place the potted plants in a protected spot that gets a few hours of sun per day. Each day move them to a new location where they get a little more light and wind each day. After a week or so, they should be tough enough to plant in the garden.

'Matt's Wild Cherry' is a delicious, tiny cherry tomato with big flavor.
‘Matt’s Wild Cherry’ is a delicious, tiny cherry tomato with big flavor.

Garden or Container Planting

Choose a good spot for your tomatoes. They require at least 8 hours of full sun and well-drained soil that’s fertile. Vining (indeterminate) types need caging or trellising, while bush (determinant) types need staking; both types benefit from summer pruning.

Before planting in the garden, amend beds by digging and turning the soil deeply and adding rich Black Gold Natural & Organic Compost Blend and an OMRI Listed tomato fertilizer. Plant tomatoes around 4 feet apart and mulch with another 2- to 3-inch layer of Black Gold Natural & Organic Compost Blend. Young plants can be planted deep, with only several leaves above ground–just be sure to gently remove the leaves from all stem parts that will be covered with soil. Water regularly to keep root moist. As plants grow, they will demand more water.

Tomatoes are such aggressive feeders and water hounds that you have to give serious attention to container-grown plants. Start with a really large pot. Determinant tomatoes are best, but indeterminates will also work if you keep them well caged and pruned. A good, water-holding potting soil is perfect for container culture. I recommend Black Gold® Natural & Organic Potting Mix, which also contains Resilience™ for stronger stems and better root development. Container-grown tomatoes need to be watered daily and fed more frequently, but if you give them ample attention, they should thrive and produce beautifully. (Click here to watch a video about how to grow tomatoes in containers.)

Harvest

Tomato fruits develop the best when days are warm (between 78 and 92 degrees Fahrenheit) and nights are warm (at least 70 degrees Fahrenheit). Tomatoes can be harvested green for fried green tomatoes and green tomato chutney, but they are best picked when they are fully ripe (well colored, slightly soft to the touch). Some tomatoes are naturally easy to pull from the vine when mature, while others cling. I always keep a pair of pruning sheers on hand for clingers. If you accidentally harvest a few fruits with a bit of green, let them stand on a sunny windowsill for a couple of days, and they will ripen up right away.

Pruning

Tomatoes can be cut and shaped to keep them from overtaking a trellis or container. Use sharp, clean pruners to cut whole branches back to main stems as needed. Try to maintain productive fruit and flower-laden branches, if at all possible. As a precautionary measure, it’s wise to dip pruners in a 10% bleach solution when pruning from plant to plant, just to avoid the possibility of spreading disease. Dip and wipe the pruners after pruning one plant and going to another. (Click here for a video about how to prune cherry tomatoes.)

Tomatoes to Try

'Gold Medal' is one of the best-tasting, prettiest beefsteak tomatoes.
Gold Medal’ is one of the best-tasting, prettiest beefsteak tomatoes.

Tomatoes come in all colors, shapes, and sizes and their flavors are surprisingly variable. In my garden, I always choose several slicers, sauce tomatoes, salad tomatoes, and cherries each year. Some of my favorite pickings include the heirloom red and yellow slicer ‘Gold Medal‘, the French salad tomato ‘Crimson Carmello‘, and orange beefsteak ‘Kellogg’s Orange Breakfast‘. My favorite sauce tomatoes are the Italian powerhouses ‘Red Pear‘, ‘San Marzano Redorta‘ as well as the salad-sized ‘Principe Borghese‘, which is touted as the best tomato for sun drying. My cherry tomatoes of choice are the sweet, golden ‘Sun Gold‘, tiny red ‘Matt’s Wild Cherry‘, and delectable yellow and red ‘Isis Candy‘.  All are beautiful and have exceptional flavor.

Enjoy Your Tomatoes

This is the easy part. Lavish burgers with big, hearty tomato slices, eat them fresh in salads or make homemade tomato sauce and salsa. To extend the season, freeze whole tomatoes and sauce for winter. (This generally requires at least ten healthy tomato plants to provide enough to store through winter.)

Growing tomatoes is gratifying if you follow the proper steps and give them the best care. If you do it right, you should have more than enough tomatoes to enjoy and share. I wish you the best tomato season!

Follow these instructions and you'll have enough tomatoes for storing and sharing with friends.
Follow these instructions and you’ll have enough tomatoes for storing and sharing with friends.

Mighty Marigolds for Organic Gardening

The marigold that combats root knot nematodes best is the French Marigold (Tagetes patula).
The marigold that combats root knot nematodes best is the French Marigold.

A single flower crops up time and again in vegetable gardens, old and new.  Our grandparents may not have known why they were included, but they carried on this tradition “to keep bugs out”. But marigolds don’t control pests that bedevil foliage, so why did this practice become so ingrained in the home garden?  Agricultural studies have finally revealed the reasons for marigold planting in organic vegetable gardens and how they actually contribute to plant health. Continue reading “Mighty Marigolds for Organic Gardening”

When To Fertilize Your Plants

Supertunia Royal Magenta, Salvia Leucantha and Lantana Camara - Jessie Keith
Feeding fall beds is important. This fall garden of Supertunia Royal Magenta, Salvia leucantha and Lantana camara is well fertilized and glowing!

It always pays to know when to fertilize your plants. Remember to use fertilizers only as directed. Avoid over feeding your plants, adding a little extra fertilizer is not a good thing. Always follow the directions!

ALL PURPOSE FERTILIZER

Plant Type

Application Rate

Frequency

Vegetables, Annual Flowers and Perennials

New Plantings: 4 cups per 50 sq. ft. 2 cups per 25 foot row

Fertilize at time of planting and every 6-8 weeks throughout the growing season.  For perennials, feed at first bloom and then every 6-8 weeks.

Established Plants: 3 cups per 50 sq. ft. 1 ½ cups per 25 foot row

Fruit Trees and Vines, Ornamental Shrubs and Trees

New Plantings: 2 cups per 16 sq. ft. ½ cup per 1 gallon pot 2 cups per 5 gallon pot

Fertilize at time of planting, and every 8 weeks throughout the growing season.

Established Plants: 2 cups for every inch in trunk diameter (measured at 4-6 inches above the soil line). Mix thoroughly in the soil just inside the drip line of the plant.

Container Plants

New Plantings: 1 tablespoon per quart of soil or 1 cup per cubic foot of soil

Fertilize at time of planting and every 6-8 weeks throughout the growing season.

Established Plants: 2 tablespoons per gallon of potting soil or ½ cup per 5 gallon container


ROSE & FLOWER FERTILIZER

Plant Type

Application Rate

Frequency

Roses and Flowering Shrubs

New Plantings: 2 cups per 16 sq. ft. 3 ½ cups per 25 foot row ¼ cup per 1 gallon pot 1 cup per 5 gallon pot Mix thoroughly in the soil to a depth of 6-8 inches

Fertilize about every 8 weeks throughout the growing season – first, at time of planting, or in spring before bud break, then again as first blooms fade, and then again in midsummer.

Established Plants: 1-2 cups per plant depending on size 5 cups per 50 sq. ft. 1 3/4 cups per 25 foot row Mix thoroughly in the soil to a depth of 6-8 inches, just inside the drip line of the plant

Annual Flowers and Perennials

New Plantings: 4 cups per 50 sq. ft. 2 cups per 25 foot row Mix thoroughly in the soil to a depth of 6-8 inches

Fertilize at time of planting, after first bloom and every 8 weeks throughout the growing season.  For perennials, feed at first bloom and then every 8 weeks.

Established Plants: 2 cups per 50 sq. ft. 1 cup per 25 foot row Mix thoroughly in the soil to a depth of 6-8 inches

Container Plants

New Plantings: ¼ cup per gallon of soil, or 1 cup per cubic foot of soil

Fertilize at time of planting, and every 8 weeks throughout the growing season.

Established Plants: 2 tablespoons per gallon of potting soil or ½ cup per 5 gallon container


TOMATO & VEGETABLE FERTILIZER

Plant Type

Application Rate

Frequency

Tomatoes & Pepper

New Plantings: 3 cups per 50 sq. ft. 1 ½ cups per 25 foot row

Fertilize at time of planting and again at first bloom set.

Established Plants: 1 cup per 50 sq. ft. ½ cup per 25 foot row

Other above ground vegetables: Lettuce, Bean, Squash, etc.

New Plantings: 4 cups per 50 sq. ft. 2 cups per 25 foot row

Fertilize at time of planting and in the middle of the growing season.

Established Plants: 4 cups per 50 sq. ft. 2 cups per 25 foot row

Root Crops: Carrot, Beet, Radish, Potato, Onion, etc.

New Plantings: 4 cups per 50 sq. ft. 1 cup per 25 foot row Use half rate for carrots

Fertilize at time of planting and in the middle of the growing season. Feed carrots only at time of planting.

Established Plants: ½ cup per 50 sq. ft. 1 cup per 25 foot row

Container Vegetables

New Plantings: 4 tablespoons per gallon of soil, or 1 2/3cups per cubic foot of soil

Follow guidelines listed above for the specific vegetables.

Established Plants: 4 tablespoons per gallon of potting soil or 1 ¼ cups per 5 gallon container


ALFALFA MEAL

Plant Type

Application Rate

Frequency

Vegetables, Annual Flowers, Perennials

New Plantings/Established Plants: 5 cups per 50 sq. ft. 2 1/2 cups per 25 foot row

Fertilize at time of planting, and every 6-8 weeks throughout the growing season. For perennials feed at first bloom and then every 6-8 weeks.

Roses, Ornamental Shrubs, Trees, Fruit Trees, Vines

New Plantings: 2 1/2 cups per 16 sq. ft. 1/2 cup per 1 gallon pot 2 1/2 cups per 5 gallon pot


STARTER & TRANSPLANT

Plant Type

Application Rate

Frequency

Vegetables, Annual Flowers and Perennials, Groundcovers (includes plants and direct seedling)

1.5 cups per 10 sq. ft. 3.5 cups per 25 foot row

Fertilize at time of planting.

Ornamental Trees and Shrubs, Fruit Trees and Vines (includes transplants)

2 tablespoons per 4″ pot 1/4 cup per 1 gallon container 1 1/4 cup per 5 gallon container

Fertilize at time of planting.

Container Plants (includes plants and direct seedling) 2 tablespoons per quart of soil, or 1 cup per cubic foot of soil, mix thoroughly Fertilize at time of planting.


CITRUS, AVOCADO & VINE FERTILIZER

Plant Type

Application Rate

Frequency

Citrus and Avocado Trees

New Plantings: ½ to 1 cup for the fill-in soil, then 1-½ cups in the area around the tree

Fertilize established plants in February and again in late May and August.

Established Plants: 2 cups for every inch in trunk diameter (measured at 4-6 inches above the soil line). Mix thoroughly in the soil just inside the drip line of the plant

Container Plants

New Plantings: 1 tablespoon per quart of soil or 1 cup per cubic foot of soil

Fertilize every six weeks from January to April and then again in July.

Established Plants: 6 tablespoons per gallon of potting soil or 1½ cups per 5 gallon container

Berries and Ornamental Vines

New Plantings: ½ cup for the fill-in soil

Fertilize established plants when growth begins in spring and again when flowers form.

Established Plants: 1 cup around each plant. Mix thoroughly beneath drip line.


“Weed” is a Four-Letter Word


1-DSC_0036
Reusing cardboard can add new life to the garden, if properly applied.

Ever notice how many challenges in the garden are four-letter words? Wind, hail, rust, mold, cold, vole, mole, deer, bugs, ouch, and weed conjure up stressful garden situations, which must be immediately addressed, leading to even more work (another four-letter word). How we deal with the cursed weed that pops up here and there in our little corner of Eden usually involves back-breaking hoeing, tugging, digging, or spraying. What if there were easier, more organic ways to eliminate weeds before they even sprout? This is where using effective mulches can help clean up both your garden and your vocabulary.

Continue reading ““Weed” is a Four-Letter Word”

Hot Summer Vegetables That Beat the Heat

Most Americans experienced one of the hottest summers on record last year, and die-hard summer vegetable gardeners were more intimately tuned into the heat — spending untold hours watering and nurturing crops through the worst of the weather. This year, wise gardeners will enter the season prepared with proven heat-tolerant summer vegetables able to produce even through the worst heat waves.

Even among warm-season vegetables, some are more resilient to harsh, hot growing conditions than others. For example, not all tomatoes and peppers continue producing fruit once temperatures exceed 95° Fahrenheit, while others seem made for hot days and nights. Likewise, some bean and squash species are better adapted to heat than others.

Over the years, researchers and trial gardeners across the country have tested many vegetables for heat tolerance, with some varieties showing exceptional resilience. Then there are those popular southerly vegetables that everyone knows make good in the heat.

Summer Vegetables for Heat

Here are some “hot,” reliable favorites to consider adding to your midsummer garden this season.

Amaranth

Amaranth leaves and seeds are nutritious, and the plants are pretty!

The unique red leaf vegetable amaranth (Amaranthus tricolor) is like most amaranths, tough and resistant to both high heat and moderate drought. Its tender green leaves have reddish-purple inner markings and a flavor comparable to spinach. Young leaves can be eaten fresh in salads or sautéed like spinach or Swiss chard. It is a must-have green for the sustainable vegetable garden.

Yardlong Bean

Yardlong beans produce for far longer than average green beans, and their beans are huge.

Beans are favorite summer vegetables, but the vigorous, vining asparagus or yardlong bean (Vigna unguiculata ssp. sesquipedalis) grows particularly well when daytime and nighttime temperatures are high. Asian in origin, it is widely cultivated in both temperate and tropical Asia. Its tender pods grow to great lengths of 16 inches or more, and vines begin to produce very quickly in warm weather—usually only two months after planting. When picked young and tender, the beans are wonderfully crisp and flavorful, and well-harvested vines produce longer-than-average pole beans, even in scorching hot, humid weather. The purple-podded form is particularly high-performing, tasty, and loaded with nutrients.

Asian Eggplant

Southeast Asian Eggplants, such as ‘Ping-Tung Long’, are wonderfully heat-resistant!

Similarly, the sweet, non-bitter, Southeast Asian eggplants are some of the most delicious and best adapted to high heat. Two of the finest varieties for flavor and performance are the tender, long-fruited ‘Thai Long Green’ (8-10” long green fruits) and Taiwanese ‘Ping-Tung Long’ (12-16″ long purplish-red fruits). Both are mild, thin-skinned, and produce reliably in sweltering weather.

Peppers

The AAS award-winning peppers ‘Orange Blaze’ (left) and ‘Holy Moly’ (right) seem made for hot summers. (Photos courtesy of All-American Selections)

Peppers, sweet and hot, are always good for a very warm warm-season garden. Hot peppers are especially reliable in the heat; three highly recommended varieties include the super spicy classic jalapeno ‘Tula’, wonderfully flavorful pasilla-type pepper ‘Holy Molé’ (2007 AAS Winner), and classic spicy-sweet red bell pepper ‘Mexibell’ (1988 AAS Winner). Of the sweet bell peppers, nothing beats the tough, disease-resistant ‘Orange Blaze’ ( 2011 AAS Winner) and its crisp, bright orange peppers.

Okra

The prolific okra ‘Annie Oakley’ is one of many great okras that thrive when it’s hot.

Okra (Ablemoschus esculentus) is the poster child for deep southern cooking and hot, humid summer weather. When choosing an okra variety, it pays to choose a spineless variety with pods that remain tender. Two winning cultivars are the very tall (5 to 8’), high-producing ‘Emerald’ and the compact, high-performing ‘Annie Oakley’, which bears loads of tender green pods.

Sweet Potatoes

Sweet potatoes grow best where summers are really hot.

Sweet potatoes are another southern favorite that won’t flag when the temperatures rise. Space-saving bushy (rather than vining) varieties tend to be most desirable for home gardeners, and of these, ‘Carolina Bunch’ and ‘Vardaman’ are two of the best. The disease-resistant ‘Carolina Bunch’ is highly productive, offering loads of pale-orange-fleshed tuberous roots, or “potatoes.” The equally productive ‘Vardaman’ has deepest orange sweet potatoes with award-winning flavor. If planted along berms amended with Black Gold® Garden Compost Blend, both varieties will bear loads of roots, even in the worst summer heat.

Tomatoes

The deliciously sweet cherry tomatoes “Jasper” (left, Photo courtesy of All-American Selections) and ‘Sungold’ ( center, right) will forge on through the heat.

When it comes to tomatoes, a few perform exceptionally when summer days exceed 95 degrees Fahrenheit and nights remain warm, while most simply stop growing until scorching days subside. A great classic red slicer for heat is ‘Heat Wave II’, which bears meaty, flavorful, medium-sized tomatoes, even in 100 degrees Fahrenheit heat. And luckily, the finest tasting cherry tomato, ‘Sungold’, just happens to be a top performer in hot weather. Its bright orange, super sweet, highly flavorful fruits resist cracking and are produced in profusion. The 2013 AAS award-winning cherry tomato ‘Jasper’ has also been shown to perform well under stressful summer weather conditions.

Zucchini and Summer Squash

Summer squash yields fruit quickly and grows well in heat.

Summer isn’t summer without summer squash, and the best-of-the-best for taste and heat tolerance, high yields, and good flavor is Zucchetta Rampicante Tromboncino (Cucurbita moschata ‘Tromba d’Albenga’). The vines are large and rambling, but they produce delicious, long, curved summer squashes all summer — through hot and cool weather — up until frost. Towards the end of the season, let a few hang on the vines until their skin hardens. These can be saved and eaten as winter squash.

Caring for Summer Vegetables

For best plant health and yields, be sure to feed all your vegetables with organic fertilizer early in the season. Amendments such as Garden Compost Blend and Earthworm Castings Blend will also ensure your plants thrive by maintaining proper soil moisture and aeration. Doing this will encourage vigorous root growth. Double–digging is another great way to optimize health, deep root growth, which enables plants to better withstand moderate drought and high heat.

Get this summer’s crop started off right with a well-prepared garden by planting tougher, heat-tolerant summer vegetables, and this year’s yield is sure to beat the heat.

Janet’s Lettuce Windowbox

Nerd Night Lettuce - Mike DarcyWhen I visit other gardens I am often intrigued by things I see other gardeners do. Janet Livesay, in Lake Oswego, Oregon, had a planter that fit over the railing of her deck. She used Black Gold Natural & Organic Potting Soil and planted lettuce from seed.

Since the deck is by a door to her kitchen, she could easily cut the lettuce whenever she was making a salad. She was innovative with wanting to harvest lettuce over a long period and so she also planted seeds in small nursery pots at various intervals throughout the summer. When the lettuce in the planter was past its prime, she simply replaced it with new plants. And with the planter being off the ground, she did not have to worry about slugs eating the lettuce.