Articles

What Is Causing Spots on My Bromeliads?

What Is Causing Spots on My Bromeliads?

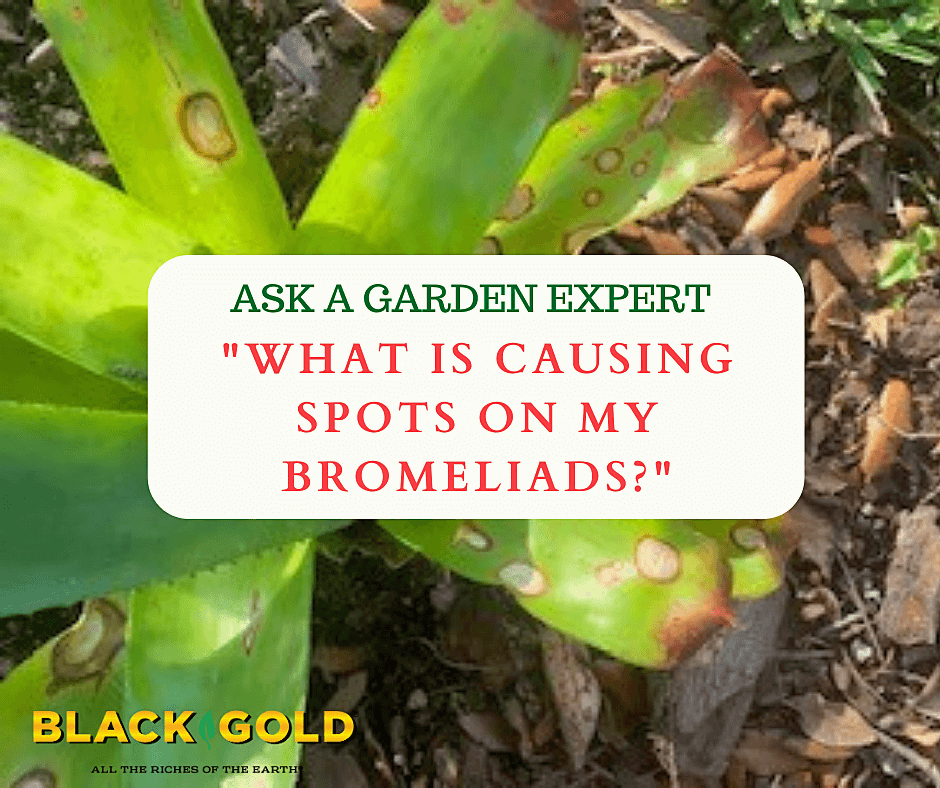
“I have several beautiful outdoor bromeliads that sit well under a large tree.  But about two months ago, they started developing white circle spots all over their leaves.  Like measles.  Not sure if you can help me identify what this is so that I can treat it.” Question from Jorleen Aguiles

Answer: From what I can determine, the fungal leaf spot disease that plagues your bromeliads is Helminthosporium (formerly Exserohilum) leaf spot. It can be managed with reduced watering, cleanup, and fungicide, but without management, the disease can invade the central plant and cause decline and eventually death.

Reduce Watering

Overwatering encourages the disease, so reduce any supplemental water you might give your plants. If it has been an unusually wet season, try to protect the plants from excess rain. Wet foliage encourages the movement and spread of fungal spot diseases. Keeping the leaves dry helps a lot.

Clean Up

Cut off badly damaged and infected leaves with clean, sharp shears. Dip the shears in a sterilizing 10% bleach and water solution between cuts to refrain from spreading the disease further. I also recommend removing the dead leaves below the plants and cleaning up the area, just in case they harbor fungal spores. Pebbles, rock, or pine straw do not encourage fungal growth and would look attractive at the base.

Consider Fungicide

The only fungicides I would recommend for bromeliads are systemic products containing propiconazole. Avoid any copper-based foliar fungicides as these are not good for bromeliads and have even been known to kill them.

I hope that your bromeliads recover!

Happy gardening,

Jessie Keith

Black Gold Horticulturist

How Do I Stop Peach Leaf Curl?

Peach leaf curl (Image by Giancarlo Dessì)

“What is the best way to keep curly leave off of my peach trees?” Question from Craig of Big Bar, California

Answer: Peach leaf curl is caused by the fungal disease Taphrina deformans. It causes infected peach leaves to thicken, turn shades of pale green, yellow, and red, and become curled and distorted. Eventually, the leaves will drop prematurely. On occasion,  flowers and fruit will show curling and spotting. Badly infected peach trees can also exhibit stem dieback.

Wet springs are sure to cause serious leaf curl symptoms on infected trees. There are several cultural and safe chemical means of controlling peach leaf curl disease. These include:

  1. Apply a dormant oil fungicide spray in late fall, in late winter before the trees leaf out, and again after they begin to leaf out in spring. If the spring is unusually wet, apply an additional copper-based fungicide spray through spring during a dry spell. (Click here to read more about dormant oil sprays.)
  2. Moist spring air between the temperatures of 40 degrees F and 86 degrees F encourages the onset of the disease. Watch for leaf-curl signs when weather conditions are favorable, and spray with a Bordeaux mixture fungicide of copper sulfate (CuSO4) and slaked lime (Ca(OH)2) as soon as they appear.
  3. During the growing months, continue to spray with a Bordeaux mixture fungicide. This fungicide is effective and approved for organic growing.
  4. Remove badly infected or dying stems with clean shears or loppers as you see them.

Repeat treatment yearly as needed, especially in moist years, to overcome this common fungal disease of peaches.

Happy gardening,

Jessie Keith

Black Gold Horticulturist

Why Does My Aloe Have Black Spots?

“We live in South Florida (Miami). My daughter-in-law has planted an aloe plant in the ground.  It’s growing nicely but has black spots on it.  Should she be concerned?” Question from Brenda of Miami, Florida

Answer: Florida rains are too much for succulent Aloe (Aloe vera). It is a dryland plant from the Arabian Peninsula that is best suited for cultivation in Southern California and the American Southwest in the US. It requires dry, fast-draining soil, once established. Too much moisture stresses aloes and invites fungal disease. Black spots on the leaves are due to fungal disease, but there are several things you can do to stop its spread.

To grow aloe well where you live, it should be potted. Before potting up your aloe, remove the worst of the infected leaves; just cut them off. Choose a pot big enough to accommodate its root system that has drainage holes at the bottom. Your aloe will need very fast-draining soil, such as Black Gold Cactus Mix. When you are ready to transplant, dig the aloe from the soil, remove the excess soil from its roots, and plant it in the pot with fresh mix. Finally, water it in lightly, and once its foliage is dry, spray it with a natural & organic, copper-based fungicide (click here for an example).

Place your potted aloe in a sunny to partially sunny spot under an eave or covered patio where it will not get rain. This will allow you to water it as needed. I recommend watering no more than twice a month, and water it from the base while being sure to keep its foliage dry.

From there, your aloe should thrive!

Happy gardening,

Jessie Keith

Black Gold Horticulturist

How Can I Prevent Damping Off When I Sow Seeds?

“How can I prevent damping off when I sow seeds?  That is my problem.” Question from Bev of Philadelphia, Pennsylvania

Answer: This is a problem that I have faced many times starting seeds in university greenhouses, professional greenhouses, and at home. Thankfully, the solution is pretty simple, and it all involves keeping everything clean. Let’s start by covering the sources of damping off disease.

What is Damping Off?

Damping-off is a disease of sprouting seeds and seedlings that is primarily caused by two soilborne fungi, Pythium and Phytophthora spp. They cause rot and death in developing seeds and seedlings, usually at the roots or base of tender developing stems. Damping-off is a problem when growers keep the soil too moist and the disease is present.

To keep damping-off from taking hold you need to start with good soil, clean pots, and follow up with smart care.

Sterilizing Mix and Pots

Disease-carrying mix is the biggest concern. I used to work in large-scale greenhouses where they used big heater/steamers to sterilize mix at a temperature just high enough to kill any soilborne diseases (around 180°F). This is essential for growers that reuse mix, but careful growers sterilize new mix, too. Why? Because the airborne spores of damping-off fungi can be practically anywhere –especially in places where plants are being grown.

Additionally, unused seed-starting mix, like Black Gold Seedling Mix, is typically produced in clean facilities and bagged pathogen-free. But, if bags tear in transport and/or bags are not stored properly, Pythium and Phytophthora spores can infiltrate. Bags of seedling mix should be lightweight (meaning no water from the outside has seeped into the bag) and without tears. Improperly stored open bags at home can also be a danger. If you are not certain of your mix’s cleanliness, then it’s time for home sterilization.

I sterilize seed-starting mix using this fast and easy method.

Ingredients: Seed-starting mix, a 9″ x 13″ cake pan, 1/2 cup water, aluminum foil, and an oven.

Directions: Preheat your oven to 180°F, fill your pan with seedling mix, sprinkle it with the water, cover the pan with the foil, and bake it for 30 minutes. After baking, remove the pan from the oven and allow the mix to cool before using.

These diseases can also hang out on dirty old pots, so in the greenhouse, we’d also wash used pots and trays really well in hot water with good dishwashing liquid and sometimes a dash of bleach. I do this at home as well.

Seed and Seedling Care

Aside from starting with clean soil and pots, it is essential to discourage wet soils when starting and growing seedlings. I generally keep newly planted seeds gently sprinkled with a bottle waterer (see video below), so the soil is never over saturated. Once my seedlings pop up, I bottom water by adding 1/4 to 1/2 inch of water to the water-holding trays every two to four days, depending on seedling size. It also helps to encourage airflow, to help soil surfaces dry more quickly, and keep trays warm with a heat mat.

These cultural practices will definitely kick your damping-off problem away for life!

Happy gardening,

Jessie Keith

Black Gold Horticulturist

Why are My Rosebuds Dying Before They Bloom?

“I have a beautiful pink rose bush, but the flowers are starting to look like they are dying as soon as they open.  What can I do?” Question from April of Dresden, Tennessee

Answer: I bet you have had a cool, wet spring because this is when rosebud problems appear. Climatic changes can roses to turn brown on the stem, but fungal disease is the most common cause. In general, the common name for this phenomena is called rose balling.

Climatic Causes for Rose Balling

If your flower buds looked normal, but then developed dry, papery outer petals and healthy looking inner petals, the cause could be due to a physiological response to weather changes. When weather is rainy and cool and then is quickly followed by hot, sunny weather, the water-saturated outer petals can fuse to one another and dry on the outside–disabling the flowers from opening normally.

Fungal Causes for Rose Balling

Fungal rose browning/rot is caused by Botrytis Blight (Botrytis cinerea). In most severe cases, the buds will turn brown before opening. You may even see signs of grey mold on them. In less severe circumstances, the flowers will open with brown petals or brown patches on the petals. This is most likely your problem, especially if your weather has been consistently cool and moist and you see signs of mold.

Managing Botrytis Blight in Roses

Here are three easy, all-natural steps to managing botrytis blight in roses.

  1. Remove all dead or dying flower buds, being sure to remove all the brown parts. This will reduce the spread of the disease. Be sure to sterilize your pruners after cutting any diseased plants. Dipping them in a 10% bleach solution works.
  2. Increase airflow via pruning. Dense bushes with too much foliage can encourage fungal disease by discouraging air flow. By selectively removing overgrown branches or young suckers, you can really reduce fungal disease problems on your roses.
  3. Use liquid copper fungicide sprays, which are OMRI Listed for organic gardening. These are safe to use and will help prevent further rosebud attacks.

I hope that this helps!

Happy rose growing,

Jessie Keith

Black Gold Horticulturist

My Heirloom Tomatoes Rot on the Vine Before Ripening!

“I have planted heirloom tomatoes and they rot on the vine before they turn red. Why?” Question from Susan of Lexington, Kentucky

Answer: There are several reasons why this can happen, but the most common is a physiological disorder called blossom end rot. This is most likely your problem, especially if your plants look fine. You can see an example of this disorder in the photo. As tomatoes develop, the base of the fruits turn from brown at the green stage. As they turn red, the bases turn black. Look familiar?

Managing Blossom End Rot

Fortunately, this is a very easy disorder to manage. It is simply caused by a calcium deficiency, and big, old-fashioned heirloom tomatoes can be especially susceptible, especially if your soil is nutrient poor and low in calcium.

To get your soil where it needs to be, amend your soil with a quality amendment, like Black Gold Garden Soil with added fertilizer. This will enrich your soil with needed organic matter and nutrients. It also has a pH between 6.0 to 6.8, which is perfect for tomatoes. Next, feed your tomatoes with a fertilizer formulated just for tomatoes and then add extra calcium-rich bonemeal as an added precautionary measure.

Keep your tomatoes well fed and watered, and they should give you good fruit with no end rot. One caveat: Some older tomato varieties are really end-rot sensitive, and even with fertilization the first couple tomatoes of the season may show end rot, but the remaining fruits will not.


How Do You Keep Spring Bulbs from Rotting?

“How do you keep spring bulbs from rotting?” Question from Pam of Fort Worth, Texas

Answer: There are several reasons your spring bulbs could be rotting. Here are a few possibilities and solutions.

Warm Zone Spring Bulbs

Your USDA Hardiness Zone 8 location is just on the edge of spring bulb-growing country. Most old-fashioned, cherished spring bulbs, like standard crocus, daffodils, hyacinths, and tulips, won’t survive in zones warmer than 8. This is because they require the chill of winter over a certain period of time to complete their life cycle. If winters are too warm and short, spring bulbs can decline and eventually rot.

Thankfully, there are some great classic spring bulbs sure to grow really well at or above Zone 8 without prechilling. These include specific tulips, like Apricot Impression Darwin hybrid tulipRed Emperor tulip, and Yellow Golden Apeldoorn tulip (click here to read more about growing and planting tulips), as well as Narcissus ‘Ziva’Peruvian scilla, Spanish bluebells, ornamental onions, and poppy flowering anemones.

Soil for Spring Bulbs

Bulb soils must be fertile, raised, and amended with quality soil amendments, like Sphagnum peat moss and compost. Larger bulbs are generally planted 6-8 inches deep, and they will not tolerate excess moisture at the root zone. Too much moisture will encourage bulb rot.

Bulb Diseases

Certain fungal and bacterial diseases will also cause bulb rot. Be sure that the bulbs you plant are firm, healthy, and show no signs of damage or rot. Cool, wet weather and saturated soils encourage these diseases.

I hope this information helps!

Happy bulb growing!

Jessie Keith

Black Gold Horticulturist


Unproductive Pumpkins

“I’d like some info on why my pumpkin seeds didn’t produce pumpkins. There were lots of leaves and flowers, but no pumpkins. I planted them plenty early enough, and there wasn’t any frost. The leaves just started dying out by mid-September.” Question from Kimberly of Vancouver, Washington

Answer: Sorry to hear your pumpkin vines did not produce pumpkins! First, make sure that all of their growing requirements are met. Pumpkins need to be planted in spring, after the threat of frost has passed, for fall harvest. Full sun, summer warmth, and space (a 12’ x 12′ to 15 x 15’ patch) are essential for vining varieties. It pays to plant them on berms (click here to read all about berming) amended with lots of organic matter. Feed them with a fertilizer formulated for vegetables, and be sure they get plenty of moisture (probably not a problem in Vancouver).

If all their growing requirements were met, there are four more possible reasons why your pumpkins did not develop.

1. Lack of pollinators

Pumpkins have two flower types, male and female, and these are bee-pollinated. The male flowers are produced first, followed by the female blooms, which have small, underdeveloped pumpkins at the base of each flower. If you see female blooms on your plants, and no bees, this could be the problem. Without pollination, the developing fruits just shrivel and drop. If you think this is the cause of your troubles, try a hand-pollination method. Simply use a small brush to move pollen from a newly opened male flower to a newly opened female flower. It’s fast, easy, and will yield pumpkins!

2. Time

Lots of pumpkin varieties require good growing conditions for more than 100 days to produce. Early pumpkins are a good choice for those living further north. The varieties ‘Flatso‘ (85 days to harvest), ‘Chucky‘ (85 days to harvest), and ‘Cinnamon Girl‘ (85 days to harvest) are all early to produce.

3. Disease

Some fungal diseases and disorders will cause the fruit to shrivel up at various stages of development if you don’t think pollinators are your problem. (Click here to read a great article from Purdue University about pumpkin diseases and solutions.)

4. Squash Vine Borers

These pests bore into the stems of pumpkins and other squash and cause whole vines to die back because they are cut off their water. Usually, with vining pumpkins, some of the vines survive because they root along the ground and survive, so this is often less of a problem. Nonetheless, click here to read a great Q&A about squash vine borers to determine if this is your problem.

Better luck with your pumpkins next year!

Jessie Keith

Black Gold Horticulturist