“Help! My 4-year-old Adenium has always thrived. Last year it put out 6 seed pods and this year the blooms were massive overpowering any green. When the blooms finally stopped all the older leaves turned yellow and dropped. But new ones were coming out. Now the new ones are all curling and while green on the top the bottoms have brown spots. It’s in the sun all day long and while we had a wet spring (before the blooms) the summer has been dry and hot. When the leaves started turning yellow (over a month ago) I noticed spider mites so I sprayed them with an insecticide soap for 2 weeks and they are gone but now the leaves are all curled and brown spots on the underside only. How can I save this plant?” Question from Julie of McKinney Texas
Answer: The good thing is the succulents like Adeniums have lots of stored energy, so once you totally rid them of the spider mites, they will bounce back quickly. To truly eradicate the mites, you will have to spray more than just the foliage.
How to Treat Plants for Spider Mites
Here are the steps I would take to completely remove spider mites from an Adenium.
Remove damaged, yellowing leaves.
Wipe down the base of the plant and stems.
Wipe down the pot.
Remove the top 2 inches of potting mix, and replace it with a quality cactus mix, such as Black Gold Cactus Mix.
Fertilize with a water-soluble fertilizer formulated for flowering plants.
Spray all plant parts with insecticidal soap or Neem oil.
The white-paper test is my favorite way to further test for mites. Take a clean piece of white paper, hold it beneath the leaves, then tap the leaves onto the paper. If you have mites, tiny specs will fall, and eventually, they will start crawling around. These are spider mites. Continue to do the tap test and gently wipe down leaves and stems and spray them until healthy new growth appears and remains undamaged. It may take time, but you can overcome spider mites.
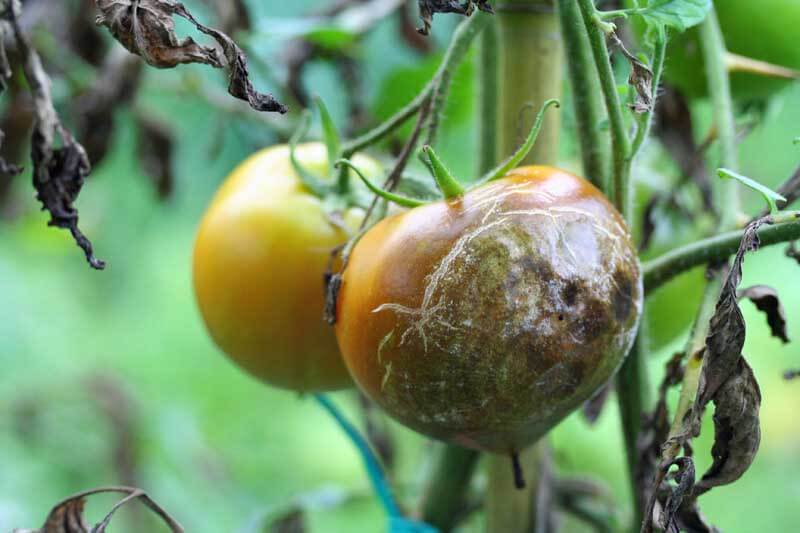
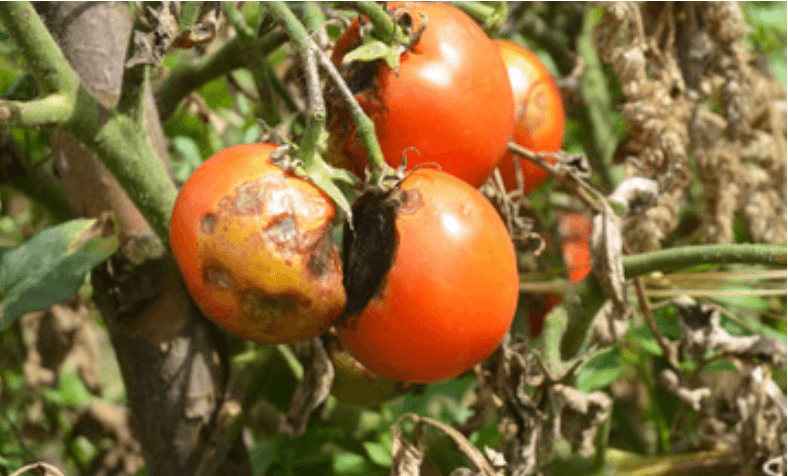
Why Are My Tomatoes Wilting and Showing Black Spots?
“I’m having trouble identifying the disease(s) that is affecting my ‘Black Krim’ tomato plant (and now may have possibly spread to the ‘Rutgers’). In late June I noticed significant leaf curl of some vines of the ‘Black Krim’. June was a dry month, so I thought it might be physiological, but watering did not seem to help. By early July, rains had returned and the leaf curl did not go away. I then started seeing healthy lower leaves turning grey-black in just days, often starting at the outside edge of the leaves. Most recently, however, I’ve starting seeing leaves covered in black spots with possibly light-grey centers (these are leaves 18-24” above ground). Petioles have similar elongated grey/black spots and some fruit stems (that produced no fruit) have turned completely black. Some leaf lesions are larger and could be the small spots merging. The main stem is not solid green and shows some grey-black coloration. There seems to be no correlation between the vines that exhibit wilt and the vines that have spots. I removed the wilted vines. Some had small dark markings on the interior of the stem while some looked healthy. So far, the fruit, which is still green, has not shown any spotting or discoloration.
The leaves do not turn yellow and brown, like you see with alternaria and septoria. Plus, it this just doesn’t look like the normal problems I get on my tomato plants every year. I’m thinking Stemphyllium or possibly TSWV (or both?), but neither seems to fit those symptoms entirely. I’ve looked at the lesions under a macroscope and no fruiting bodies of fungi are apparent. Plus, the lesions don’t have any mold-like fuzziness. The scattered small lesions and the wilting point towards TSWV, but no spotting/discoloration of the fruit is apparent (even on infected stems) and the leaf lesions don’t seem to show circular rings.
I’ve been using B. subtillus spray since transplanting, and liquid copper sulfate spray more recently. Neither seems to be having much effect. This plant was also treated with Trichoderma harzianum strain T-22 to prevent Fusarium wilt (a problem I’ve had in previous years). I realize that plants don’t all exhibit the same symptoms to the same diseases every time. It’s also possible that both diseases are at work here. Any thoughts you have here would be greatly appreciated.” Question from S Saving of Kansas City, Missouri.
Answer: Nothing is worse than experiencing debilitating tomato diseases when all a gardener wants is a successful crop. Unless a gardener plants the most disease-resistant tomato hybrids and has the most aerated raised beds and dry weather, diseases are to be anticipated–especially those of the fungal and bacterial flavor. You’re asking about at least two at once, so I will piece away at your question in an orderly fashion, starting with the photos that you shared of leaves and stems showing signs of black spotting and sootiness.
Black Spots on Tomato Leaves
When black spots like these do not cause leaves to turn yellow and die (or senesce) it usually indicates a surface mold rather than a systemic one. Your spots do not appear to be caused by grey leaf spot of tomato (Stemphylium spp.) or tomato spotted wilt virus (TSWV). Bacterial speck was another pathogen that I considered, but the small, black spots caused by this disease should have a yellow halo. The specks also do not tend to form clusters on leaves like yours.
It looks more like a light infection of sooty mold or related surface fungi. Sooty mold tends to take hold in the presence of sucking insects and the honeydew they produce. Have you observed any aphids, leafhoppers, whiteflies, mites, or the like, on your tomatoes? Even a small population can encourage sooty mold. Moreover, the fruiting bodies can be difficult to see with so little of the disease on leaves, even under a macroscope. Spraying and dry weather conditions will also discourage the development of fruiting bodies and mold spread.
Sooty mold is easily treated. Mix one teaspoon of gentle detergent to 1 gallon of warm water. Dip a clean cloth or sponge into the mixture and wipe down infected leaves and stems. The black mold should come off. Let me know if this is what you observe.
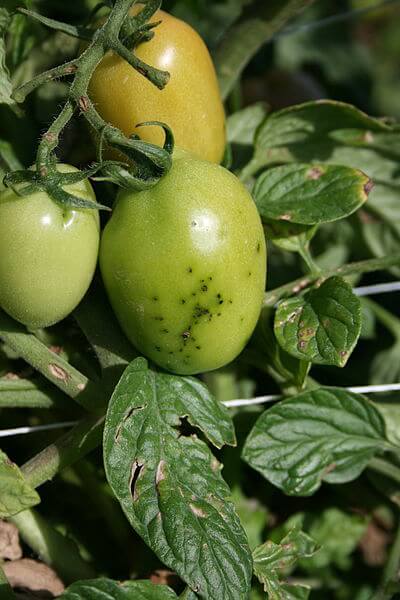
Tomato Leaf Curl
Without seeing a photo, it is difficult to determine what could have caused the significant leaf curl, wilt, and death on your tomatoes. It is certainly not tomato yellow leaf curl virus (TYLCV) because this disease causes leaves to turn yellow and contort over a longer period of time. Herbicide damage and dramatic temperature changes can cause leaf curling and fast necrosis. Herbicide damage is the most common cause. It can appear on old or new growth, depending on what tissues came in contact with an herbicide (click here to see an image of glyphosate drift on tomato.) Broad mites (Polyphagotarsonemus latus) are sucking insects that can cause leaf curl and death of tomato foliage when populations are high. The sucking insects also create honeydew, which can encourage sooty mold.
To determine whether mites are present, do the white paper test. Take a clean piece of white paper, hold it beneath the leaves, then tap the leaves onto the paper. If you have mites, lots of tiny specs will fall, and eventually, they will start crawling around. These are spider mites. Spraying the tops and bottoms of leaves with insecticidal soap and wiping them down will remove spider mites quickly. Multiple applications will be required.
Disease Resistant Tomatoes
Just for future reference, here are some tasty tomatoes with excellent disease resistance. They may not have the allure of unique heirlooms like ‘Black Krim’, but they are tough and tasty.
‘Galahad’ (F3, GLS, LB, N, TSWV): The new, 2020 All-America Selections Winner ‘Galahad’ is a big, red, slicing tomato with excellent flavor that resists five diseases!
‘Granadero’ (F2, PM, TMV, V, N, TSWV): Sauce tomato lovers should try this super disease-resistant paste tomato with uniform, red, well-flavored fruits. It is also an AAS award winner.
‘Mountain Merit‘ (F3, LB, N, TSWV, V): Lots of large, red tomatoes with good, sweet flavor are produced on this compact bush tomato.
‘Toronjina’ (F2, LM, TMV): Highly disease-resistant plants produce lots of sweet and tart, orange cherry tomatoes on shorter indeterminate vines.
‘Sakura‘ (F2, LM, TMV, N): Red cherry tomatoes are produced early and in abundance on this long-vined, highly disease-resistant tomato.
Please follow up! I would like to know if any of these potential assessments are correct. For a more definitive analysis, send some of your diseased leaves to your local extension agent. (Click here to learn more.)
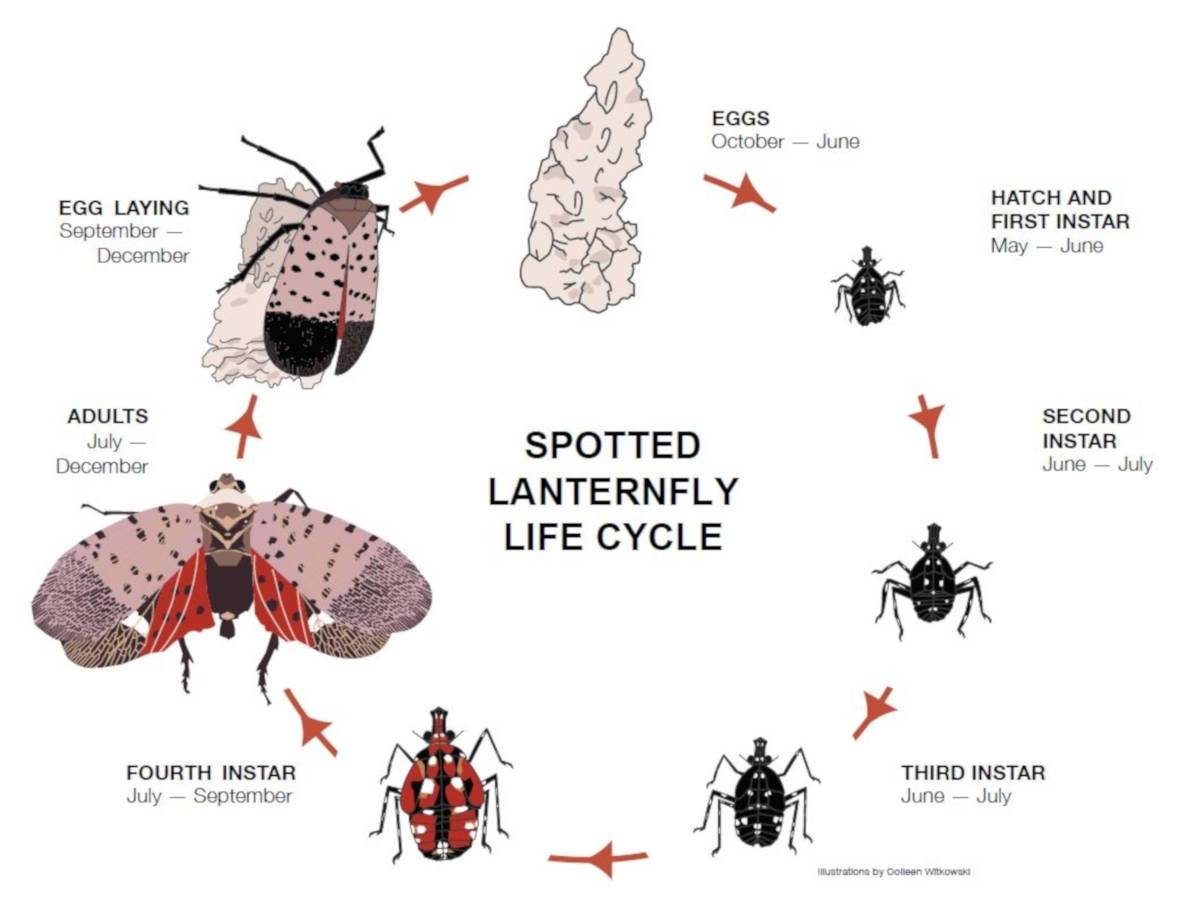
How Do I Stop the Spotted Lanternfly in My Garden?
“How Do I Stop the Spotted Lanternfly in My Garden?” Question from Tulip Tramp of Wilmington, Delaware
Answer: Oh, you asked the right question. Spotted lanternflies (Lycorma delicatula) first appeared in my garden this year, so I am getting firsthand experience trying to manage them, and they are a nightmare. They are prolific, large, and cluster and suck the juices out of trees in very high numbers–enough to kill. They are lightning-fast, hard-to-kill, and nasty. In my yard, they attack black walnut (Juglans nigra) and willow trees (Salix spp.). They’ve also been hanging out on my dahlias and cardoon. For whatever reason, these fruit-tree pests have yet to attack my peach trees, apple trees, and fig–likely because they favor black walnuts. But, I am also on a quest to lower their numbers and keep them away from my garden.
Spotted Lanternfly Origins
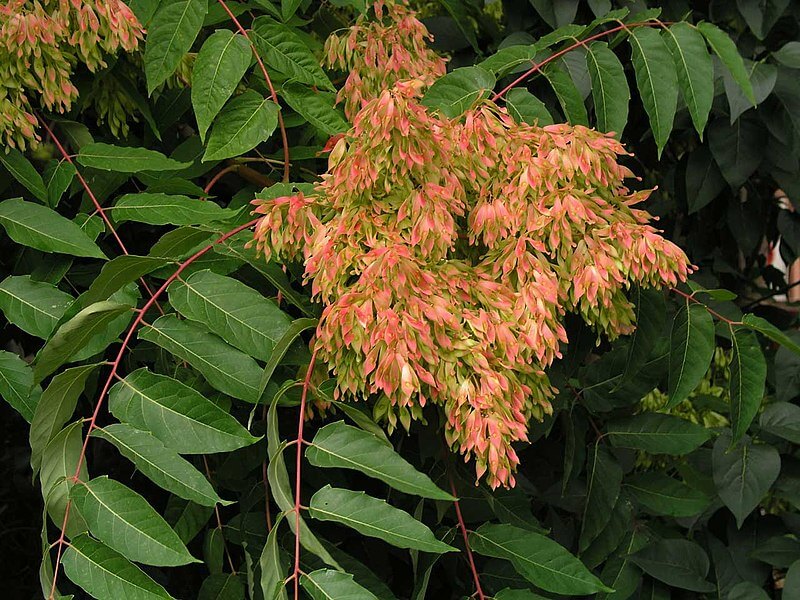
Tree of Heaven is the favorite tree of spotted lanternflies, but they also attack fruit trees, grapes, and black walnuts. (Image by Luis Fernández García)
Spotted lanternflies are highly destructive insects that originate from China, India, and East Asia. Their preferred host is tree-of-heaven (Ailanthus altissima), a Chinese tree that was first brought to the United States in 17 84 and quickly became a common weed tree across much of North America. Tree-of-heaven contains chemicals that make spotted lanternflies bad-tasting and inedible–giving them natural protection from predators that would eat them.
Aggressive spotted lanternflies are newcomers to our shores. They were first discovered in the United States in eastern Pennsylvania in the fall of 2014. Since then, they have taken over areas across Delaware, Maryland, Pennsylvania, New Jersey, and Virginia, where they have caused huge economic damage to the forest, orchard-fruit, and grape industries as well as home landscapes and gardens and the businesses that serve them.
Thankfully, these insects can be somewhat cold-sensitive. “The researchers found that bark temperature of about 14 degrees Fahrenheit is the limit at which the beetle can survive (Frank Kummer, The Philadelphia Inquirer, 2018).” That means they will be limited to regions with milder winters, maybe as cold as USDA Hardiness Zone 5.
Spotted Lanternfly Life Cycle and Management
When you know an insect pest’s life cycle, it provides more knowledge to work with when sorting out ways to kill it. A spotted lanternfly female lays many eggs on branches (or practically anything else when populations are high). One female can lay one or two rows of 30 – 60 eggs. The egg masses are camouflaged with a layer of a protective substance that looks like mud. If you can find the eggs, scrape them off and smash them on sight (see the video below).
The first-hatch, or first-instar, nymphs emerge in May or June, and at this time, they are most vulnerable to pesticides. The nymphs begin to suck at the stems of trees, secreting honeydew as they go. The honeydew then encourages the growth of black mold, another negative side effect of these pests. As the lanternflies grow, they shed their skins and develop new features–including wings. Adults are much harder to kill.
Spotted Lanternfly Management Methods
I favor organic gardening, so I try to work with OMRI Listed pesticides, but spotted lanternflies can be hard to destroy. From what I have read, effective insecticides that are approved for organic gardening include Stoller’s Golden Pest Spray Oil and insecticides containing pyrethroids, among others. These have also been shown to kill nymphs quickly up to the third instar. More powerful insecticides are needed to efficiently kill adults, so it is best to try to kill lanternflies early on.
Initially, I tried to use insecticidal soap on first and second instar nymphs in my yard, but it was not powerful enough to kill them all. Now, I am moving to Safer pyrethrin spray, which is stronger. It should work better. I have also invested in a sprayer that will allow me to target higher tree branches where I see the pests in masses. Pyrethrin spray can also kill beneficial insects and pollinators, so I am just going to target the spotted lanternflies that are on my black walnuts and willows and keep the spray away from any garden flowers. If you can reach them, early instar lanternflies are also easy to kill by just dropping them in soapy water. They cannot swim and die quickly. Hopefully, a combination of these steps will make an impact.
Penn State is also working on a potential bio-insecticide (derived from a native fungus) for lanternflies (click here to learn more). Let’s hope this research will offer an easier, natural way to kill the beasts.
For more information about research and possible management ideas, contact your local extension agent and let them know that you have found lanternflies on your property. Visit U.S. Department of Agriculture (USDA) extension website to find your local agent.
Happy spotted lanternfly hunting. Maybe if we all work to manage them in our yards, we can reduce their populations for the good of all.
Jessie Keith
Black Gold Horticulturist
I also could not resist adding this very clever trap method devised by a very smart teen in my area!
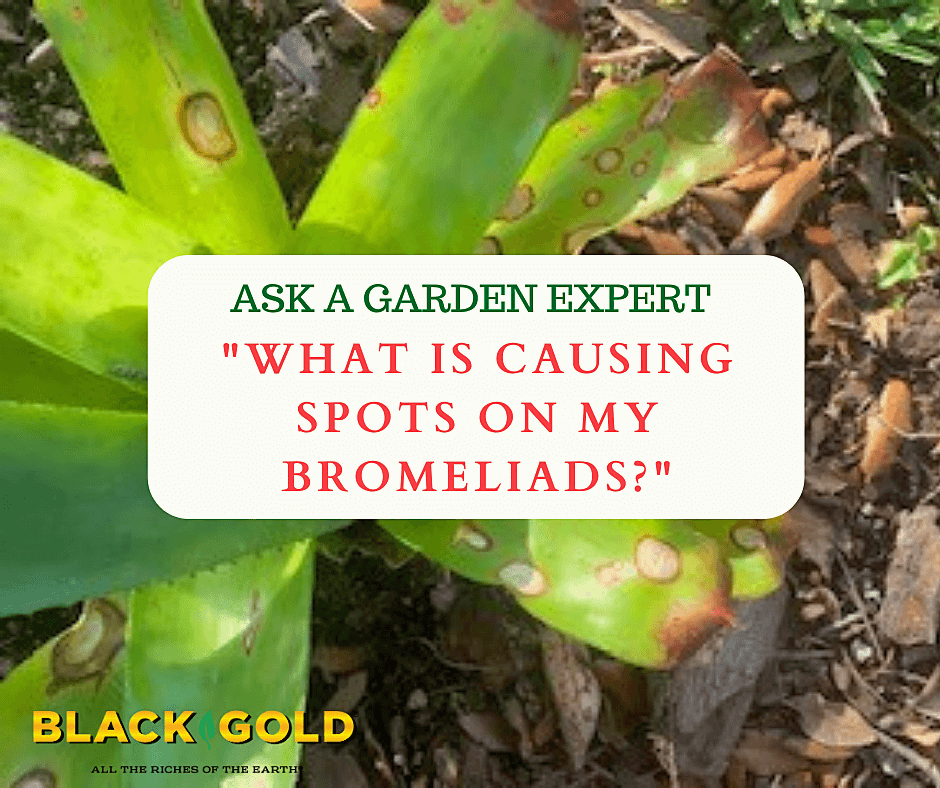
“I have several beautiful outdoor bromeliads that sit well under a large tree. But about two months ago, they started developing white circle spots all over their leaves. Like measles. Not sure if you can help me identify what this is so that I can treat it.” Question from Jorleen Aguiles
Answer: From what I can determine, the fungal leaf spot disease that plagues your bromeliads is Helminthosporium (formerly Exserohilum) leaf spot. It can be managed with reduced watering, cleanup, and fungicide, but without management, the disease can invade the central plant and cause decline and eventually death.
Reduce Watering
Overwatering encourages the disease, so reduce any supplemental water you might give your plants. If it has been an unusually wet season, try to protect the plants from excess rain. Wet foliage encourages the movement and spread of fungal spot diseases. Keeping the leaves dry helps a lot.
Clean Up
Cut off badly damaged and infected leaves with clean, sharp shears. Dip the shears in a sterilizing 10% bleach and water solution between cuts to refrain from spreading the disease further. I also recommend removing the dead leaves below the plants and cleaning up the area, just in case they harbor fungal spores. Pebbles, rock, or pine straw do not encourage fungal growth and would look attractive at the base.
Consider Fungicide
The only fungicides I would recommend for bromeliads are systemic products containing propiconazole. Avoid any copper-based foliar fungicides as these are not good for bromeliads and have even been known to kill them.
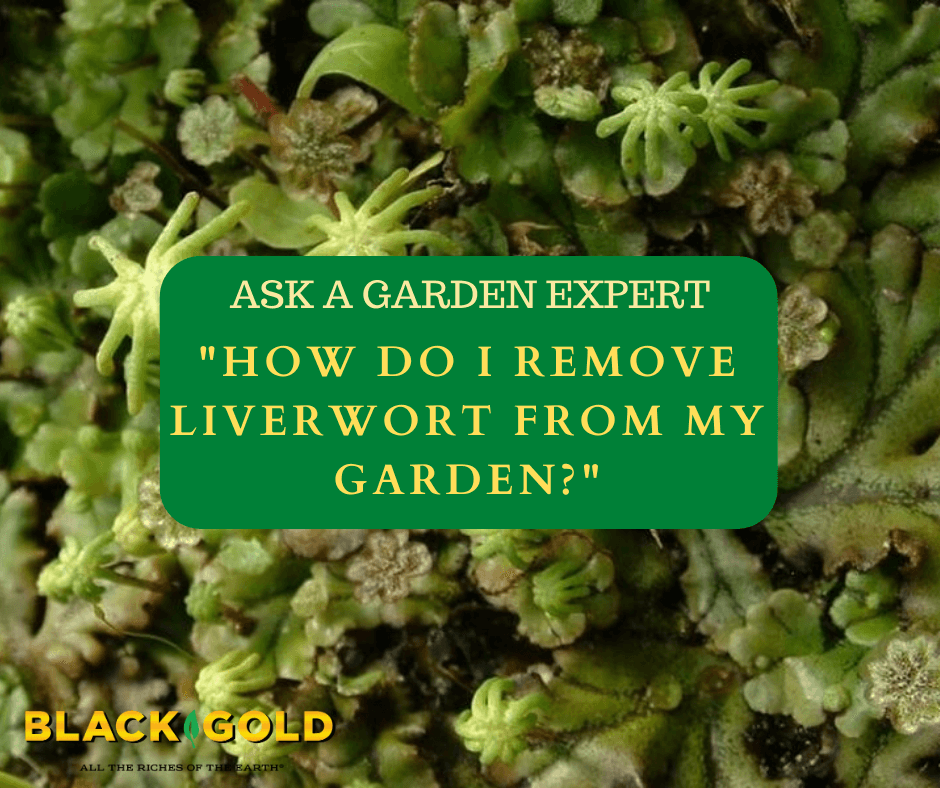
“Can I get rid of Liverwort by burying it in the ground?” Question from Russ of Berkley, California
Answer: It depends on the site’s soil, soil level, and moisture level. Admittedly, I kind of like the common liverwort (Marchantia polymorpha). Sorry! But, they’re kind of cool. The funny little non-vascular plants are close relatives of mosses and a sign of a very moist, shaded, nutrient-rich garden area. With that said, I dislike it when they grow in containers, so I understand why you don’t want them in your garden. Here are some different options for liverwort removal.
Change the Soil and Soil Level
The number one way of ridding liverwort from an area is to reduce moisture and fertility, increase soil drainage and aeration, and increase light if you can. (They can’t tolerate dryness or high sunlight.) You can do this by lifting your garden soil in the area where they are causing trouble and adding aggregate to the soil to improve drainage.
Replant With the Right Plants
Another option is to dig up the liverwort, lift the soil, and plant the area with garden plants for your area that will tolerate moisture and shade. Here are a couple of options.
Wood strawberry (Fragaria californica): The California native wood strawberry produces fruit, likes shade to partial shade and grows well in moist soils. It forms an edible groundcover, which might appeal to you.
Idyllwild rock flower (Heuchera hirsutissima): Here is an upland California wildflower that can tolerate moist and dry planting areas as well as partial shade, and it’s very pretty.
Pigsqueak (Bergenia crassifolia): Though it is not native, Bergenia is a pretty evergreen perennial for the shade that produces clusters of pink flowers in late winter and early spring. It likes moist, well-drained soil.
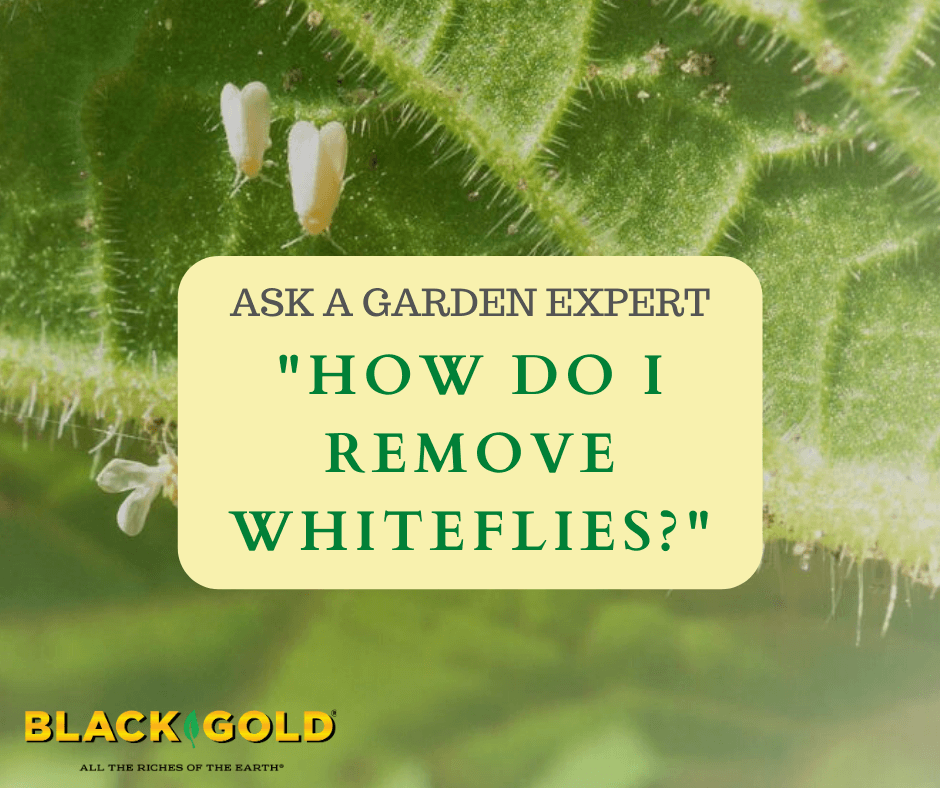
“What can I use for whiteflies on Jatropha plants?” Question from Susan of Pembroke Pines, Florida
Answer: I recommend physical methods of removal for whiteflies followed by the use of an insecticide approved for organic gardening.
What are Whiteflies?
Whiteflies are fast-to-produce sucking insects that remove the juices from plant leaves and stems. Tiny whiteflies can be very destructive when populations are high–causing leaf drop and decline. When plants are badly infested, the undersides of leaves will become covered with clouds of tiny white flies and clusters of their small, round, white egg masses.
How to Remove Whiteflies
Start by spraying the plants off with a sharp spray of water from the hose. Focus on the undersides of leaves. Then look beneath the leaves for clusters of small, white egg masses. Leaves thickly covered with egg massed should be removed, tightly bagged, and thrown away. Next, wipe the small numbers of egg masses off of the remaining leaves. Make sure no eggs remain. Finally, spray the plants with insecticidal soap or Neem oil. (Click here for an overview of horticultural oils for organic insect control.) Continue to check for whiteflies and wipe and spray leaves as needed.
It may take a little work, but this method is effective.
From upper left: blossom end rot, late blight, and tobacco mosaic virus.
Tomatoes are the roses of vegetables–everything attacks them. So, gardeners can count on experiencing any number of tomato diseases in their growing experience. It pays to grow disease-resistant tomatoes, but lots of the best heirlooms don’t fall into this category. That’s why tomato growers need to be armed with knowledge and IPM (integrated pest management) tools to keep harvests high. Learning how to spot the most common tomato diseases is a start.
Plant diseases are typically either fungal, bacterial, or viral. Some cause quick plant death, but others can be managed–allowing gardeners to eke out a harvest until the end of the season. But avoidance is the best starting point.
The four keys to avoiding tomato diseases are:
Start with healthy plants.
Choose a disease-resistant variety.
Plant them in disease-free soil.
Give them the best care.
Starting with healthy plants, a healthy environment, and keeping plants stress-free will help keep them disease-free, but pests or diseased weeds, or even wind can still bring disease into the garden. People can, too. Gardeners need to stay watchful.
If you have never experienced serious tomato diseases in your garden, you can feel confident planting heirlooms or family favorites with less resistance. But, always choose disease-resistant varieties if you have experienced diseases in the recent past. You might also consider growing tomatoes in containers to ensure that soil-borne diseases are not a problem. (Click here to learn how to grow tomatoes in containers.)
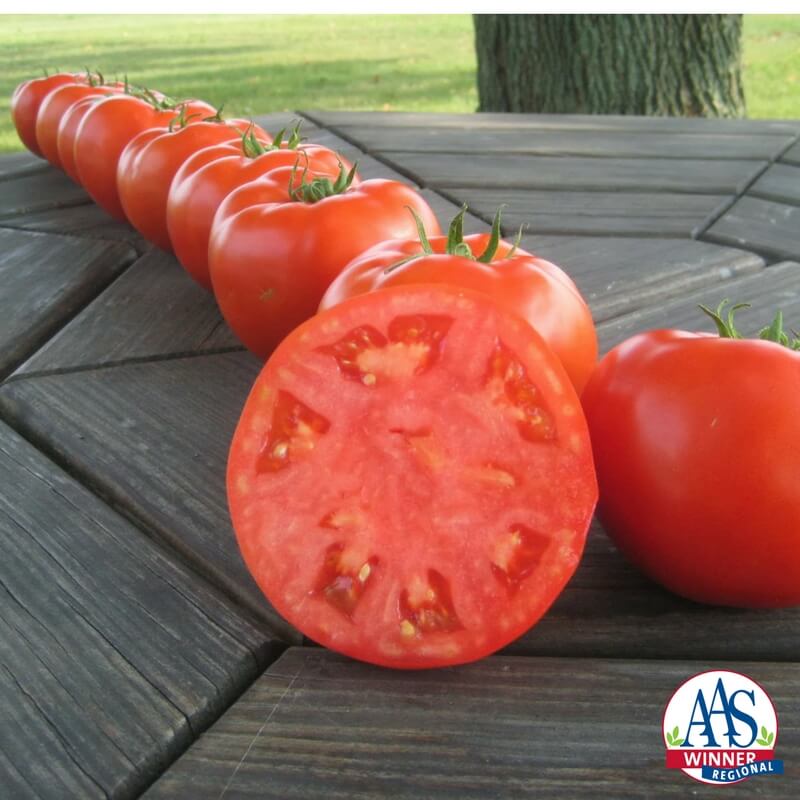
Top Disease-Resistant Tomatoes
Mountain Merit is an All-America Selections Winner that resists five common diseases. (Image care of AAS)
Before reading the depressing litany of common tomato diseases, feel encouraged by the power of super disease-resistant tomatoes. Plant breeders constantly work hard to create new and wonderful tomato varieties able to beat diseases and produce high yields of delicious tomatoes. When identifying a disease-resistant tomato, refer to the Tomato Disease Resistance Code list below to better understand the code system. Here is an example of five good, tough tomatoes that resist multiple diseases.
‘Galahad’ (F3, GLS, LB, N, TSWV): The new, 2020 All-America Selections Winner ‘Galahad’ is a big, red, slicing tomato with excellent flavor that resists five diseases!
‘Granadero’ (F2, PM, TMV, V, N, TSWV): Sauce tomato lovers should try this super disease-resistant paste tomato with uniform, red, well-flavored fruits. It is also an AAS award winner.
‘Mountain Merit‘ (F3, LB, N, TSWV, V): Lots of large, red tomatoes with good, sweet flavor are produced on this compact bush tomato.
‘Toronjina’ (F2, LM, TMV): Highly disease-resistant plants produce lots of sweet and tart, orange cherry tomatoes on shorter indeterminate vines.
‘Sakura‘ (F2, LM, TMV, N): Red cherry tomatoes are produced early and in abundance on this long-vined, highly disease-resistant tomato.
Good cultural practices will also help tomatoes fight disease. Plant them in very well-drained, aerated, raised beds amended with Black Gold Garden Soil, and keep plants strong and vigorous by feeding them with a tomato & vegetable fertilizer. It also helps to encourage air-flow by spacing plants well (3 to 4 feet apart, or wide enough to walk around) and keeping them pruned (click here for a tomato pruning tutorial). Drip irrigation helps keep plants drier up top, which can reduce the spread of diseases. Remove and discard infected plants as you see them, and at the end of the season, clean all plant material from your vegetable garden for good measure. Then at planting time, mulch tomatoes with a layer of straw or Black Gold Garden Compost Blend to help keep disease-carrying weeds at bay. (Click here for more tips on how to grow robust tomato plants from seed to harvest.)
Tomato Disease Resistance Codes
Tomato late blight (Phytophthora infestans) damages foliage, causes stem cankers, and destroys fruits.
When seeking out a disease-resistant tomato, you will see these codes indicating resistance. The most common diseases are covered in this piece. (Adapted from Johnny’s Seeds Growers’ Library)
HR = High Resistance IR = Intermediate Resistance
A | Anthracnose | Fungus
AS | Alternaria Stem Canker | Fungus | Alternaria alternata f. sp. lycopersici
V | Verticillium Wilt | Fungus | Verticillium albo–atrum
Tomato Foliage Diseases
These are the first tomato diseases that you will see and experience. All leaf spot diseases start from the bottom up–beginning with older leaves. Here are the top 5 most common types that you will see.
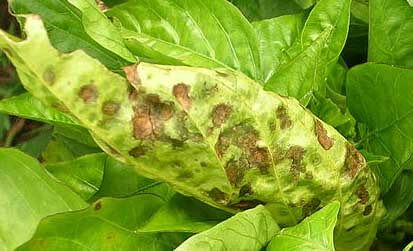
Bacterial Leaf Spot
Bacterial leaf spots are small, brown, and dry.
The common leaf spot (Xanthomonas spp.) results in spots that are small, dry, brown, and often surrounded by yellow halos. It disease intensifies and spreads further with excess rain, overhead watering, and when plants are planted too close together. As it progresses, it can also cause spotting on fruits and cankers on stems.
You cannot get rid of bacterial leaf spot once you have it, but you can slow its damage. To reduce its proliferation, increase airflow by pruning off unnecessary and badly infected branches. Keep it from taking hold in the first place by spacing plants well to encourage airflow. Cleaning up your garden yearly is also essential. The disease is maintained from year to year on infected crops and weeds in the tomato family.
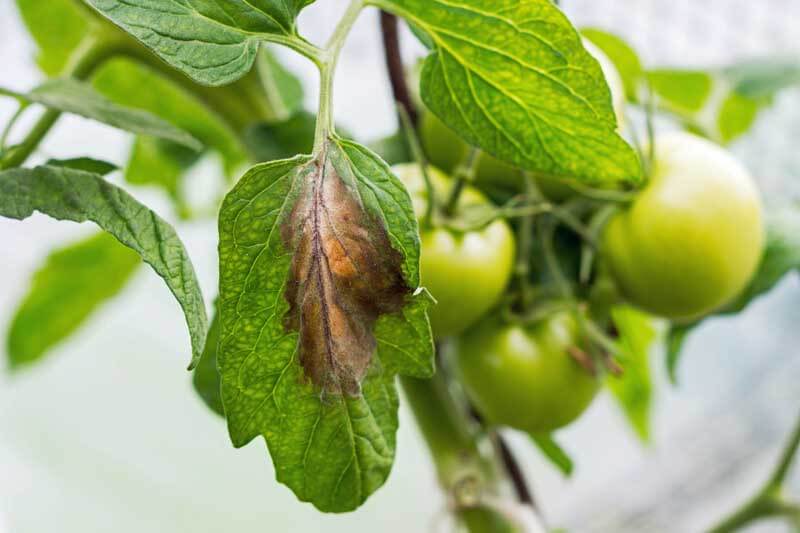
Early Blight and Late Blight
Late blighted leaves show large brown blotches.
These two blights are the most common diseases of tomatoes.
Early Blight (Alternaria tomatophila and Alternaria solani): The leaf spots are pretty distinctive; circular lesions appear, reaching up to a half an inch in diameter with dark concentric circles inside. Early blight can occur at the seedling stage by causing seedling rot (damping-off). At later stages, it causes leaf blight on older leaves, stem cankers, and black fruit rot.
Late Blight (Phytophthora infestans): The deadly disease first causes large brown leaf spots on older leaves, followed by stem lesions, and discolored, oily patches on fruits. It’s the noxious disease that caused the Irish Potato Famine, which is a testament to its severity. It kills tomatoes more slowly, but it destroys fruits and will eventually kill whole plants. Tomatoes subjected to drought stress will die more quickly.
Late blight gives diseased tomatoes an ugly oily look.
Both early and late blight diseases are controlled by avoidance, cleanliness, and rotation. The blights survive and overwinter on infected plant material or in the soil. To prevent tomato blight, plant only healthy plants that you have grown from seed or purchased from a reliable grower. Also, plant only blight-resistant varieties (check out this list from Cornell University). If you find diseased plants, immediately remove them from the garden, and keep them from the compost bin. Bag and toss them instead. Keep beds weeded to remove weedy tomato relatives that can get blight, like nightshade and ground cherry. Next, rotate crops on a three-year cycle to help keep soil disease-free where you experienced blight. That means planting your tomatoes in a new spot each year and allowing three years to pass before planting them in the same spot. The soil should be rid of the disease after this time.
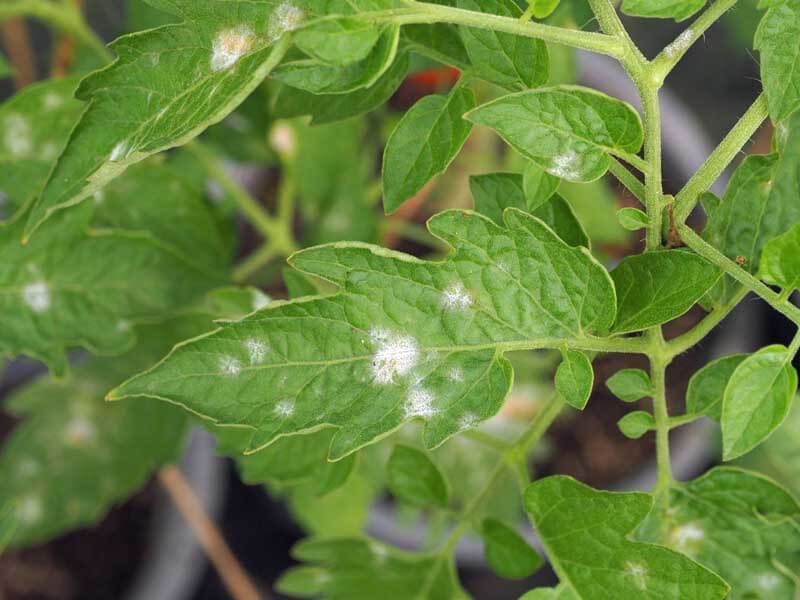
Powdery Mildew
Powdery mildew starts as white, dusty spots on leaves.
Powdery mildew (Erysiphales fungi): The easy-to-identify powdery mildew is a common fungal infection that attacks leaves, causing white, powdery looking surfaces and blotches, particularly from mid to late summer. It is not deadly, but it will cause plants to decline more quickly and put a stop to good fruit production.
To stop powdery mildew, give plants plenty of sun, water, and airflow. Prune off diseased stems as you see them (clean your pruners well after cutting any diseased plant). Finally, apply the organic fungicide Green Cure, which quickly stops powdery mildew. Apply it, at first sight, to stop the disease in its tracks.
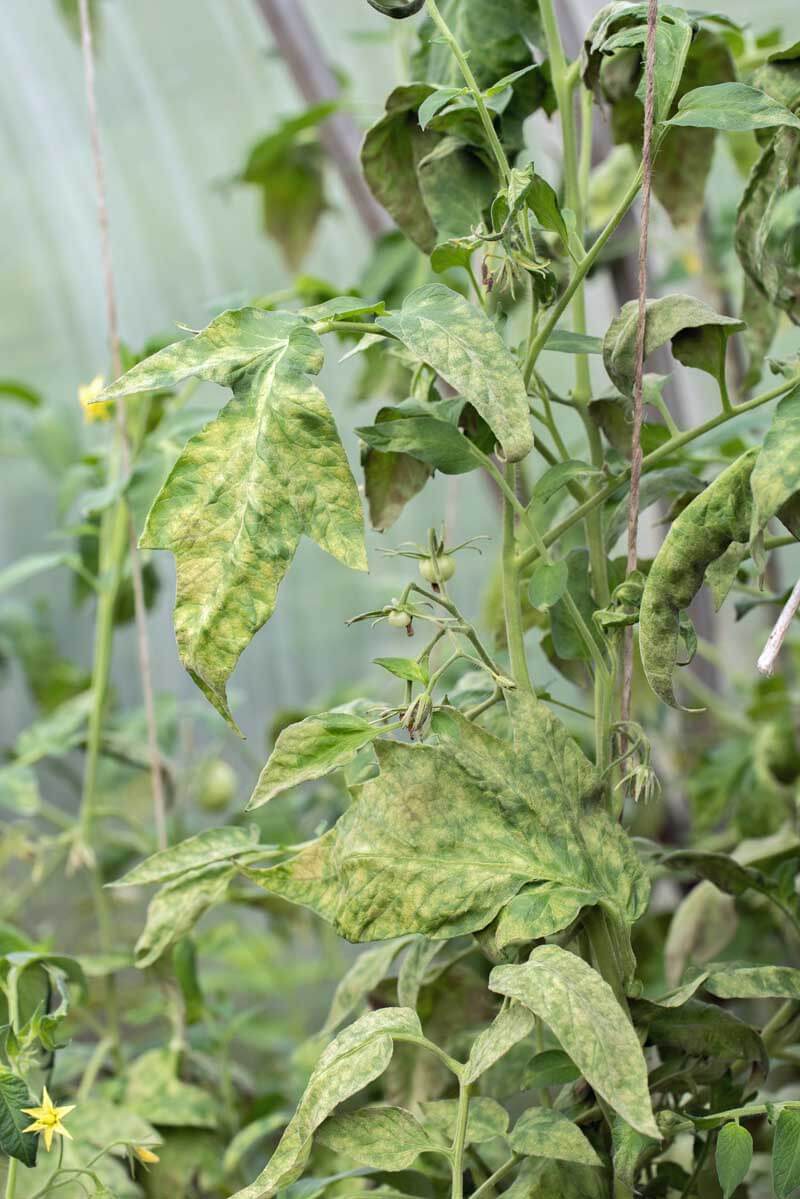
Tobacco Mosaic Virus
Tobacco mosaic virus causes leaves to become disfigured and discolored.
When tomatoes contract tobacco mosaic virus, they develop yellow mosaic patterns across the foliage and leaves often become elongated and almost ferny. Once you have it, or any other virus, the only thing that you can do is quickly remove and dispose of the plants and then rotate your crops. The best means of control is prevention. Grow resistant tomatoes, and make sure you buy seed or purchase plants that are certified to be disease-free.
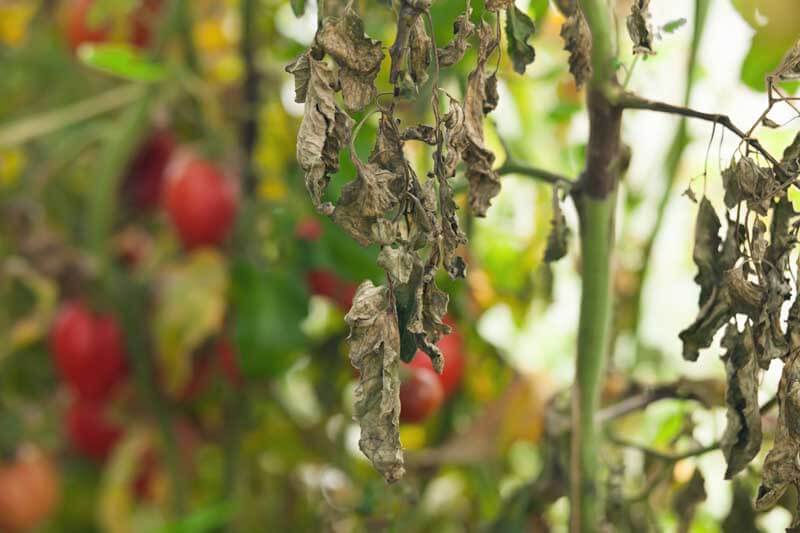
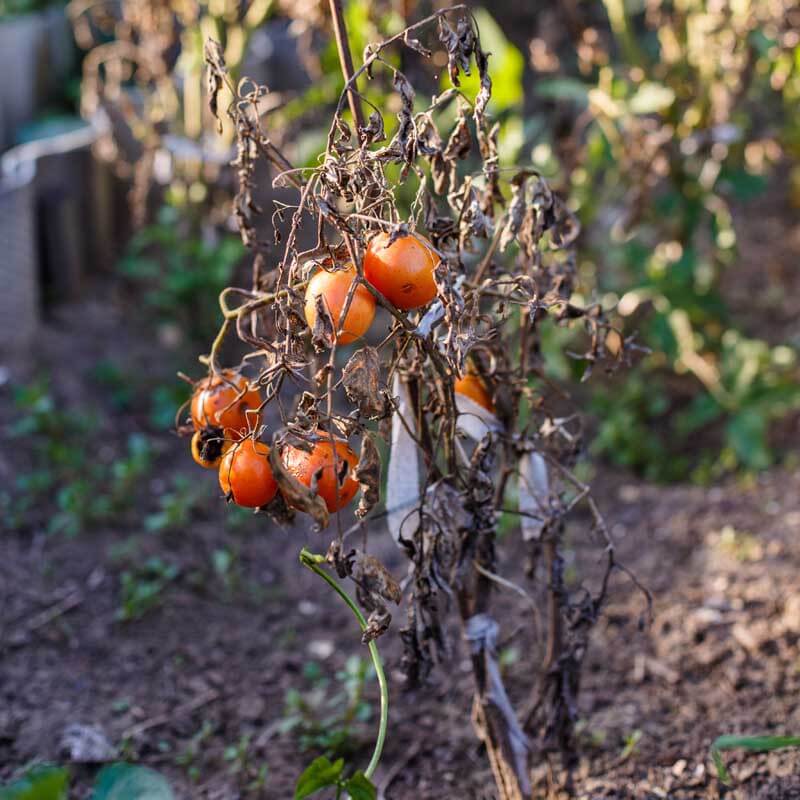
Tomato Wilts
Fruit wilts can kill susceptible plants quickly.
These affect the whole plant causing overall wilt and decline. Both diseases exist in the soil. The best means of beating them is to plant resistant varieties. When susceptible plants become infected, it’s a death sentence. Plants must be removed from the garden.
Fusarium Wilt (F)
Fusarium wilt (Fusarium oxysporum sp. lycopersici) is the most common tomato wilt. At its first signs, older leaves wilt, turn yellow, then brown, and then fall. The stunted plants will eventually die. To beat it, look for resistant varieties, discard diseased plant material, and rotate on a three-year cycle.
Verticillium Wilt (V)
Verticillium wilt (Verticillium albo–atrum) is less common than fusarium wilt and is typically seen late in the season when soils are cooler. Its first symptoms are v-shaped blotches on the lower leaves, followed by browning veins and blotches. Symptoms then spread upwards, causing wilting and leaf damage. If you were to cut into the stem, the internal veins would be brown and discolored from the ground up to 12 inches. Treat it as you would fusarium wilt.
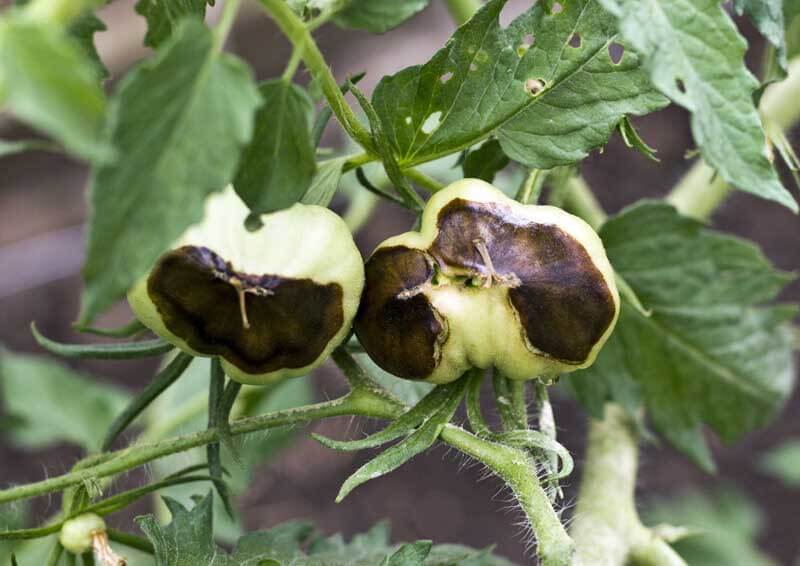
Tomato Fruit Diseases
Aside from the ugly oily patches caused by late blight (above) and the common black-based fruits caused by blossom end rot or irregular bases caused by cat-facing (see below), most other tomato fruit problems are fungal or bacterial.
Anthracnose Tomato Spot (A)
Anthracnose spot has damaged this ripe tomato.
Anthracnose tomato spot is a fungal disease that appears as sunken bull’s-eye marks on ripe fruits. Several steps can be taken to reduce the disease on developing fruit. Refrain from overwatering, which will reduce moisture on the leaves and the spread of the disease. Remove and dispose of damaged fruit, and prune to increase airflow can keep fruits from developing this disease on the vine.
Various Fruit Rots
Various fruit spots and rots can attack fruits.
There is a whole suite of fungal and other fruit rots that can damage good, ripe fruit on the vine. You can always identify a fungal spot on fruit by its bull’s-eye appearance. The center of the eye is where the fungal spore took hold, and the radiating circles show its progressive cycle of infection. The treatment of these diseases is the same as for Anthracnose tomato spot. Good airflow is always key in keeping fungal diseases at bay.
Bacterial Spot and Bacterial Canker
This shows bacterial speck on developing fruit. (Image by Chris Smart)
Some bacterial spot diseases of leaves can impact fruits. Bacterial fruit spots are smaller than those caused by fungal diseases, brown or black towards the center, and often surrounded by rings of yellow or green. In the case of bacterial canker, the spots are ringed in white with a green or dark-brown center. Sometimes the spots are raised. When fruits have bacterial spots, this means that it is time to remove and dispose of the whole plant.
Tomato Disorders
Blossom end rot is a common fruit disorder caused by a calcium deficiency.
Disorders often look like diseases, but they are caused by either nutrient deficiencies or adverse weather conditions rather than disease-causing fungi, bacteria, or viruses. Even better, they can be cured.
Fruit blossom end rot (caused by calcium deficiency), splitting or cracking (caused by excessive water or temperature fluctuations), fruit toughness, cat-facing, and reduced productivity (caused by cool temperatures) are the most common disorders of tomato fruit. Leaves with nutrient deficiencies can show all manner of yellowing or poor pigmentation, but if you feed your tomatoes well with a tomato fertilizer all season, your plants shouldn’t suffer any nutrient deficiencies (unless you have soil with severely acid or basic soil pH). Problem solved. Generally, if you plant your tomatoes in warm conditions, feed and care for them well, you can avoid most tomato disorders.
Can’t find your tomato problem here? Then ask our garden experts on our Ask a Garden Expert page and upload a photo of your plant! We will help you identify the problem and gprovide solutions.
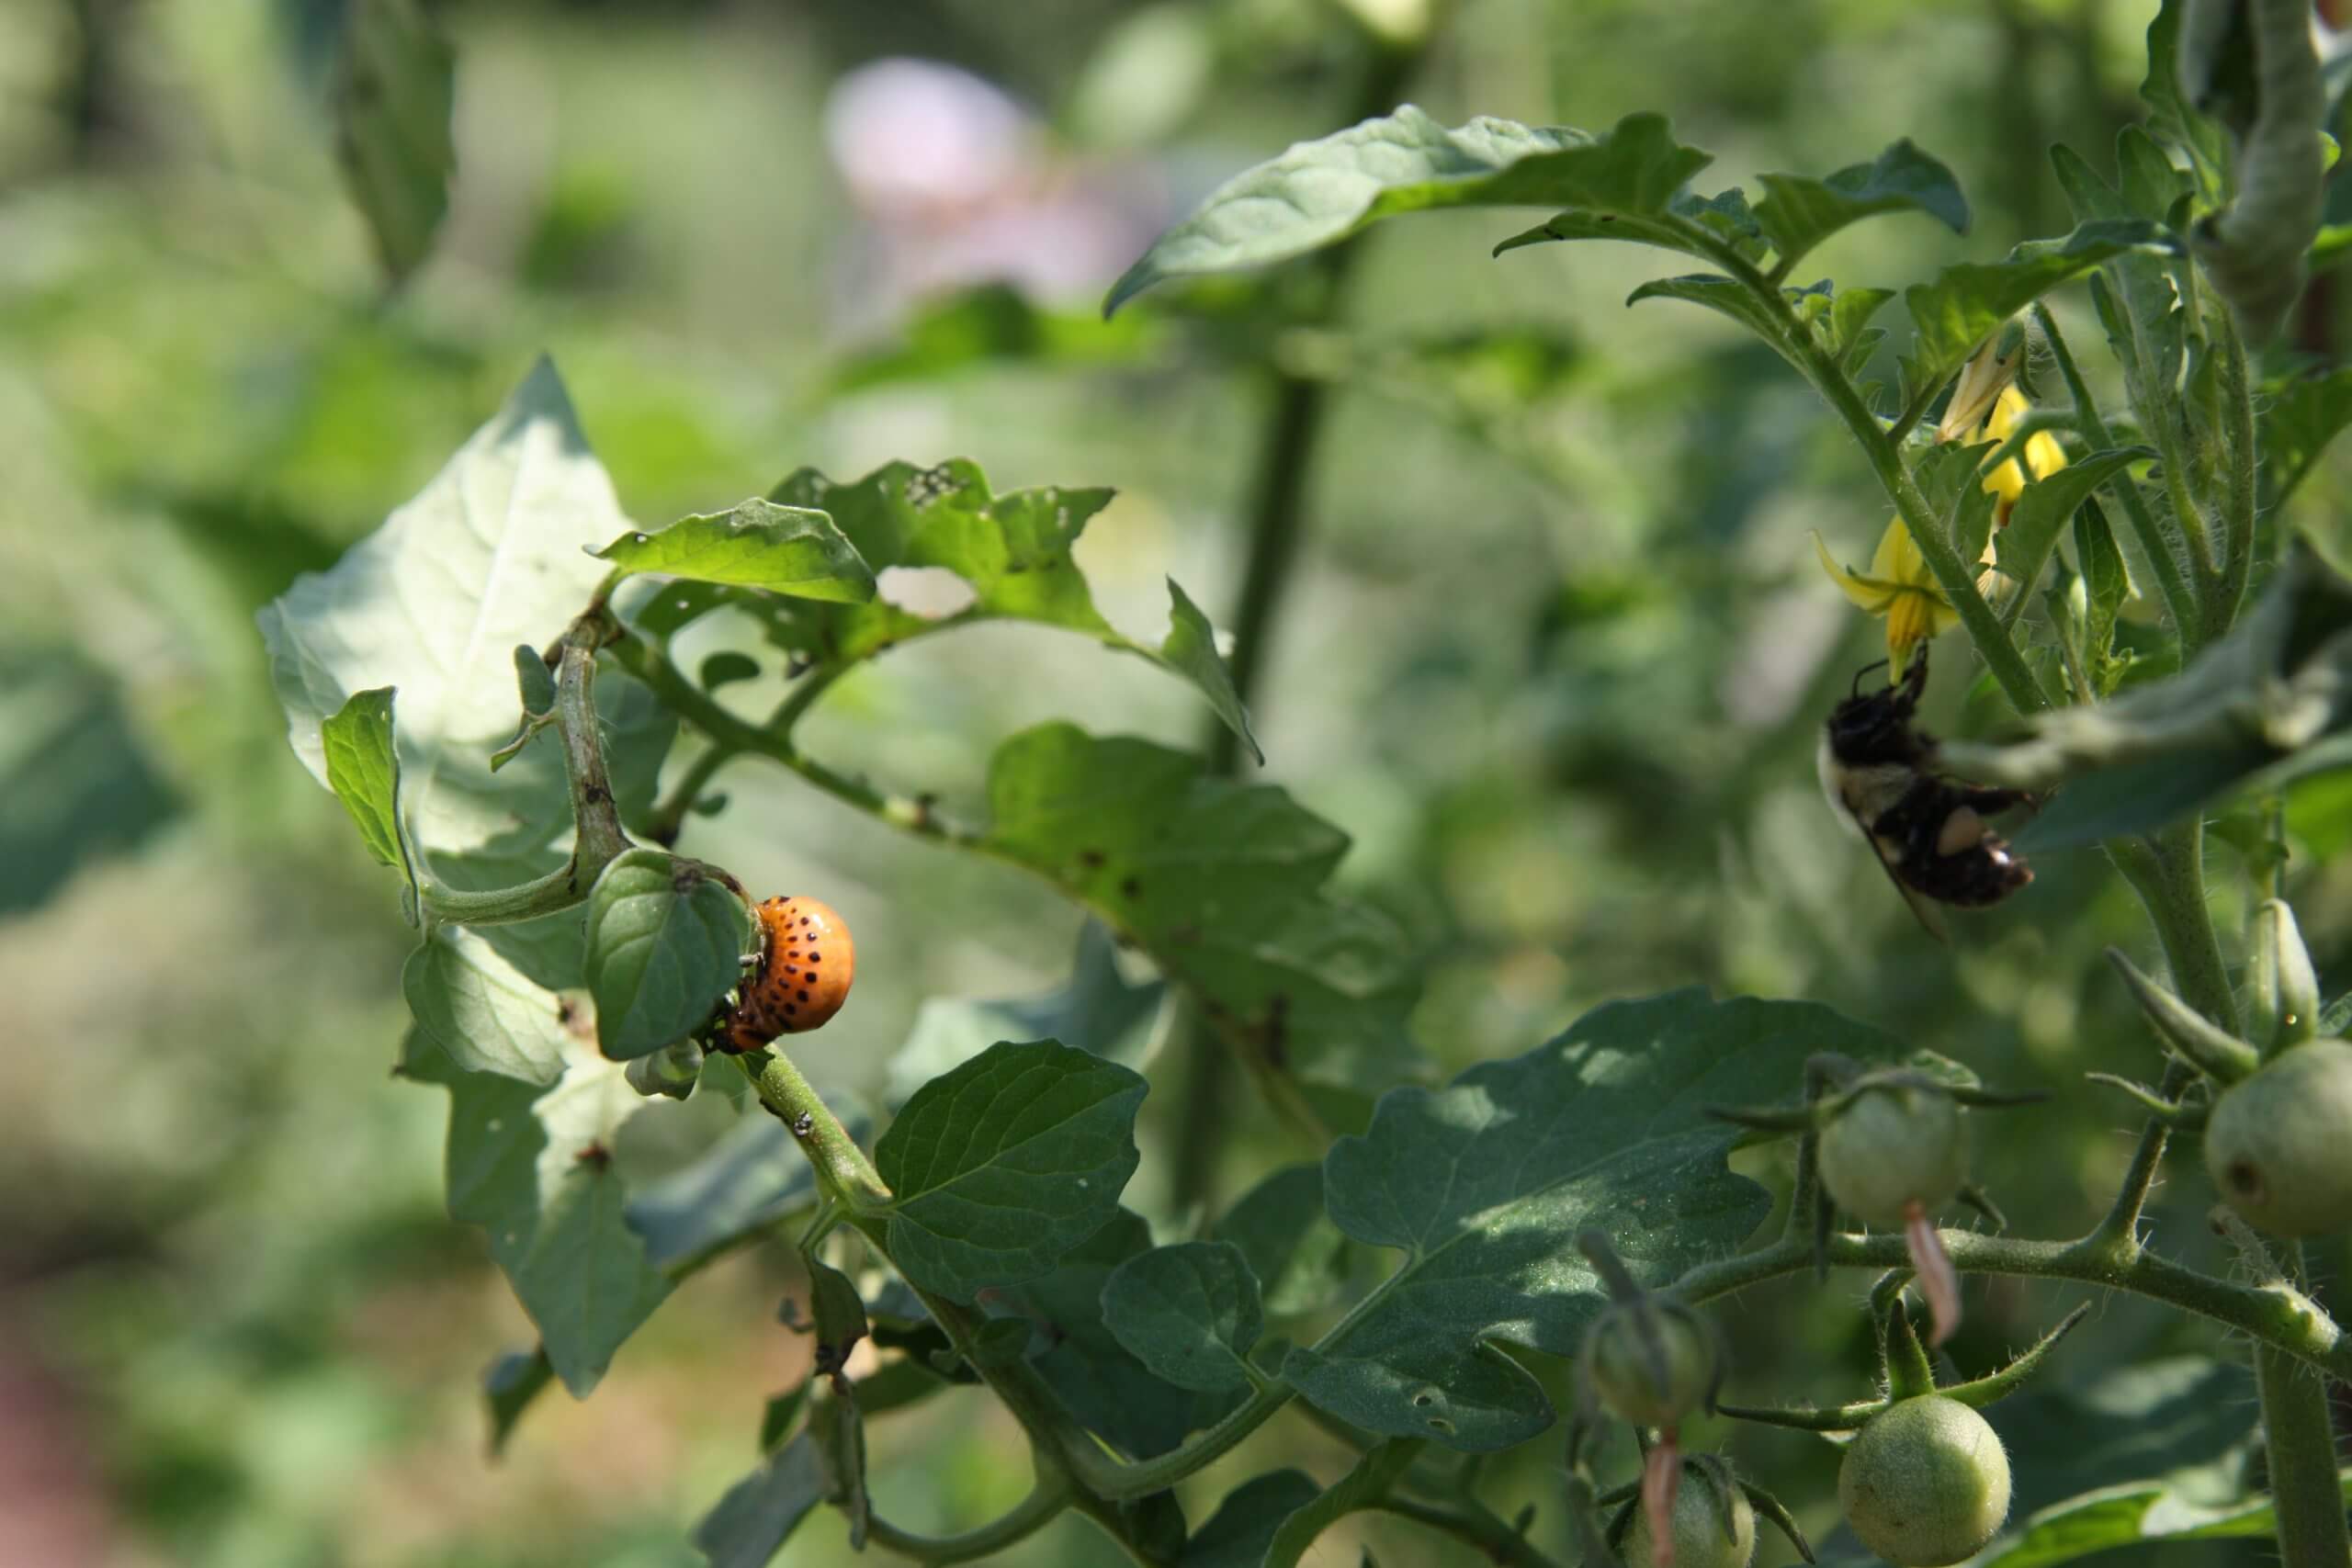
My daughter is picking off Colorado potato beetles from potato plants.
For the past 14 years, I have grown my vegetables in a community garden plot, which has provided a real education in plant pests, diseases, and weeds. Why? Because these mega veggie gardens are pest hot spots, and summer is the worst time of year for the beasties. Bad insects always attack my beans, cucumbers, tomatoes, and eggplants–threatening to destroy fruits and foliage, and sometimes spreading disease as they munch and crunch along. I must use every tool in the toolbox to fight them. And, if they beat my crops, I often start them again, if there’s time and the season allows. Sometimes beating pests is just a matter of retooling planting time.
The five most common vegetable garden pests that I battle in mid to late summer are Colorado potato beetles, striped cucumber beetles, flea beetles, Mexican bean beetles, and harlequin cabbage bugs. (Cabbage loopers and squash vine borers are also a problem. Click here to read about cabbage looper control, and click here to read about squash borer control.) Each return year after year with regularity, but some years are worse than others. The severity of the previous winter usually indicates the severity of my pest problems–the milder the winter, the harsher the pest problem.
Last winter was pretty warm, so this summer, the pests are rampant. Here are some ways that I have learned to overcome them.
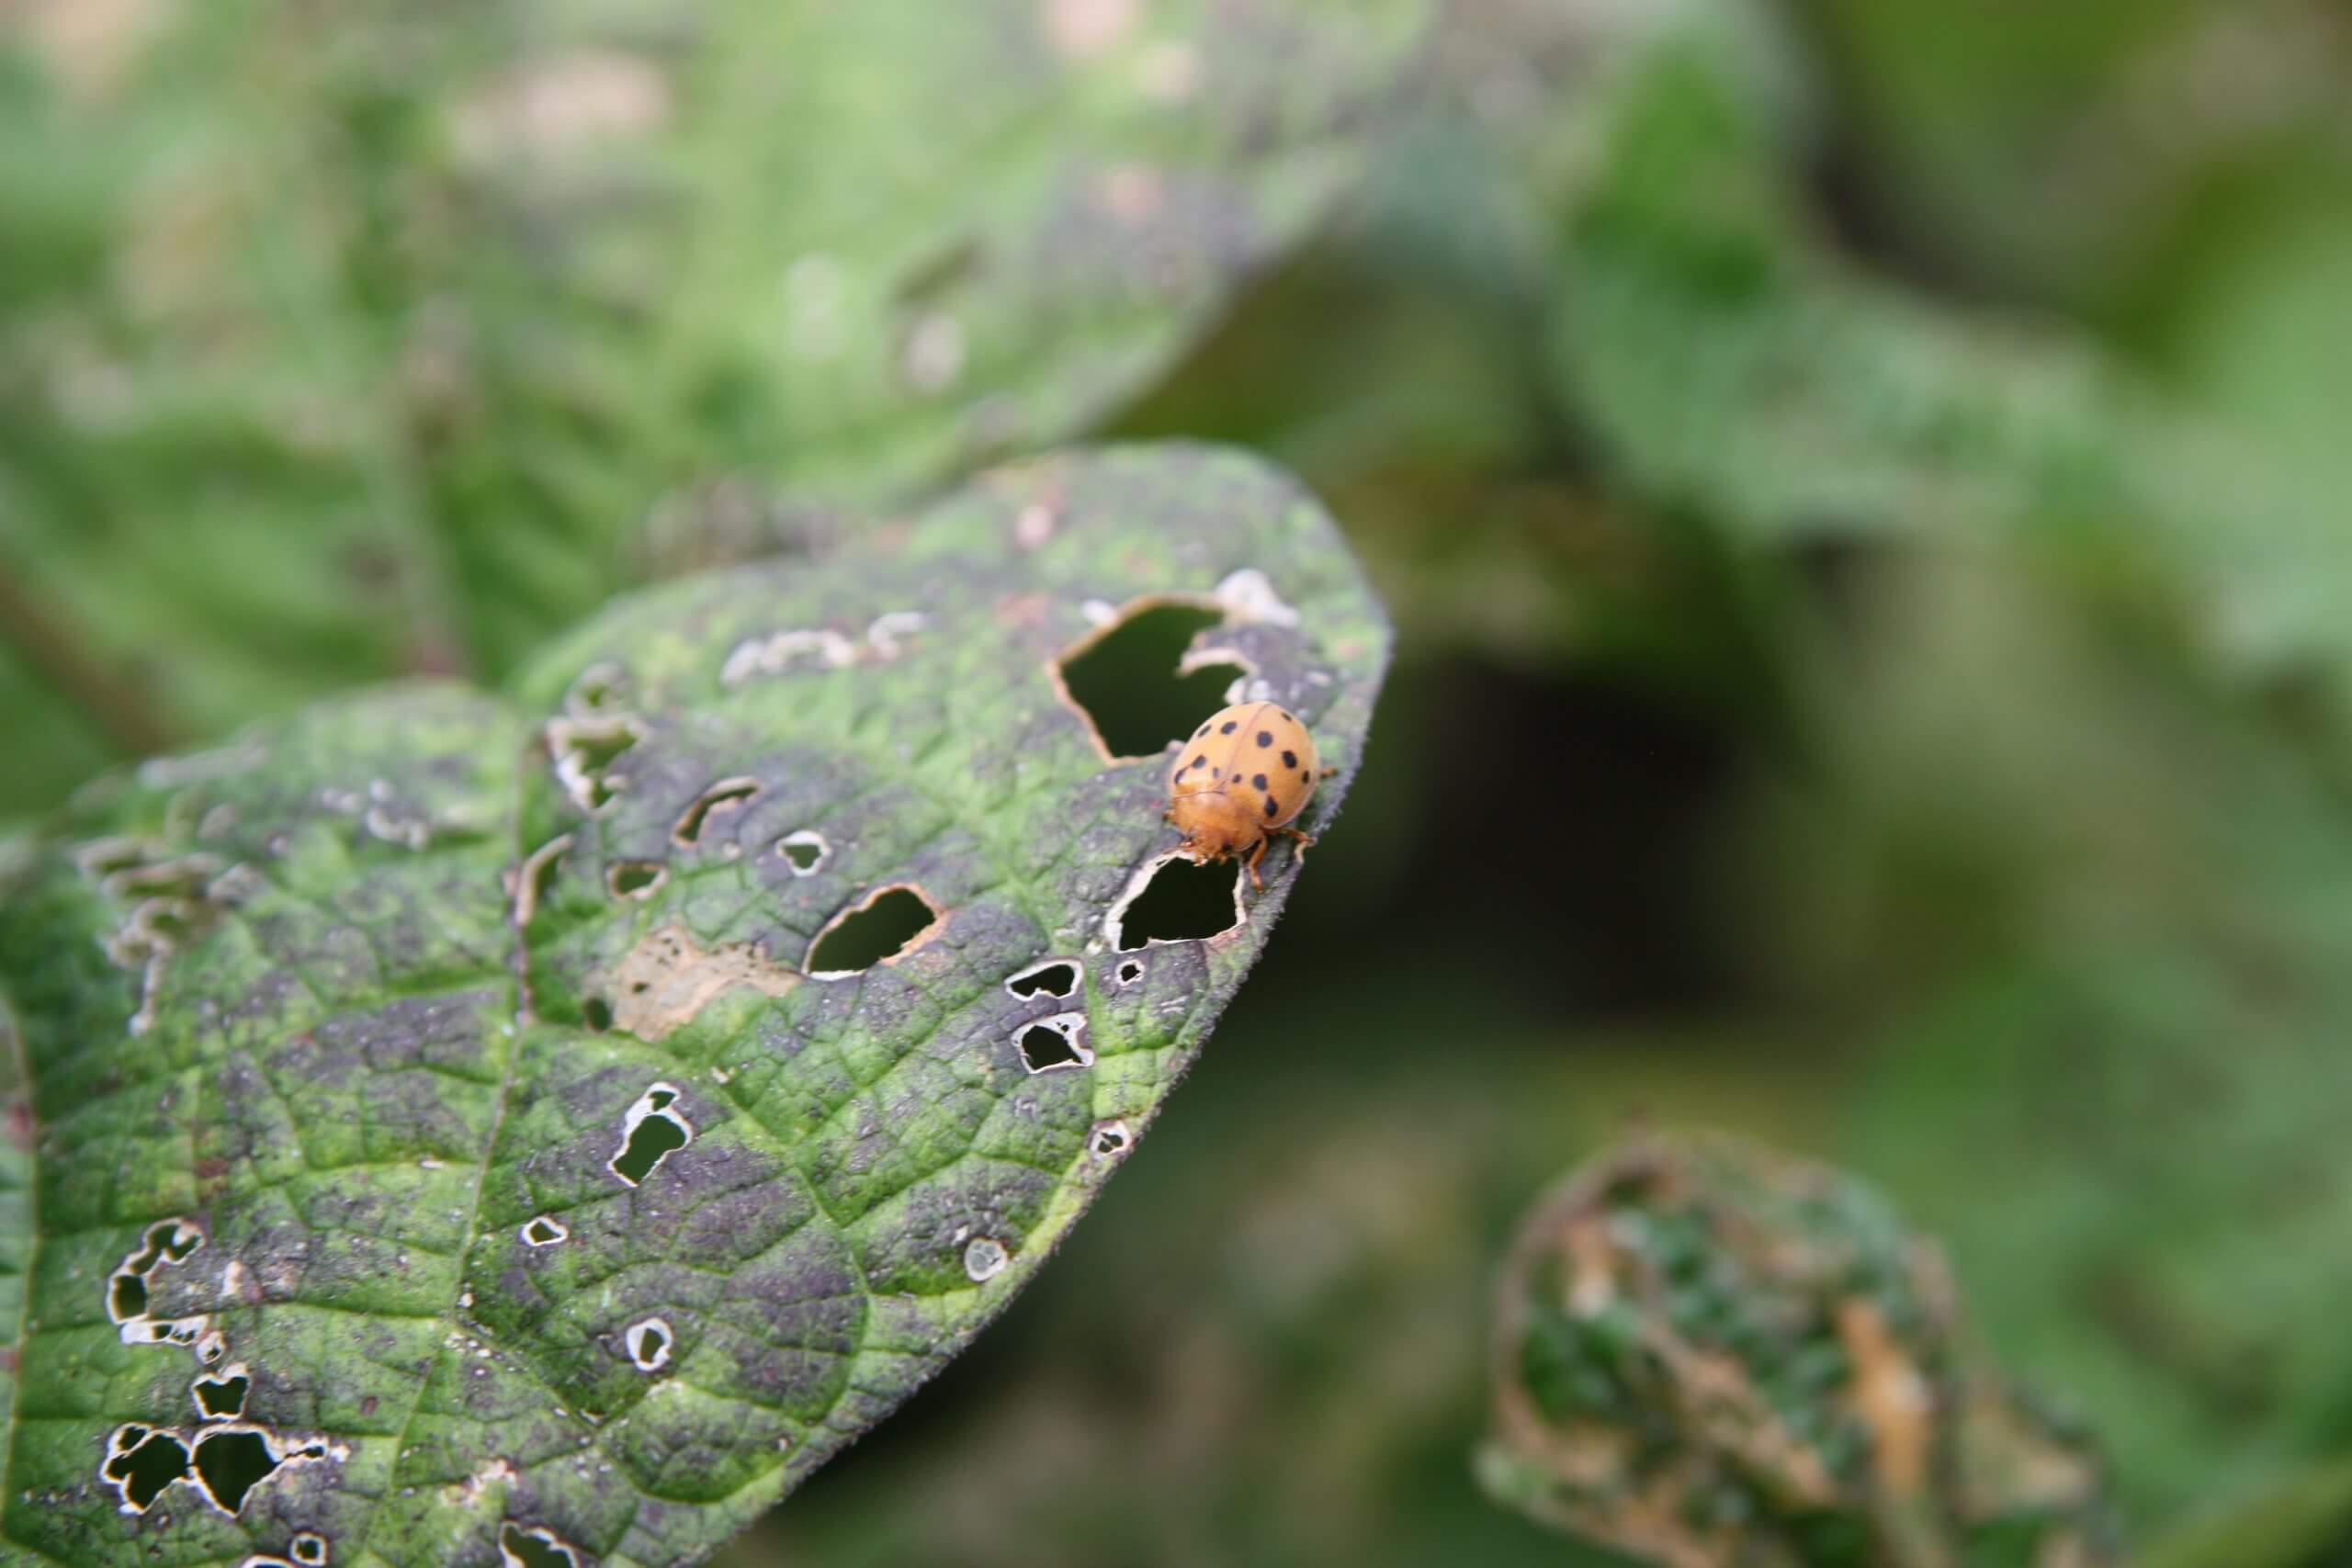
Colorado Potato Beetle
One often sees Colorado potato beetles mating on top of a potato plant.
The surest way to attract Colorado potato beetles to your garden is to plant potatoes, but if you don’t have potatoes, they will go for your tomatoes and eggplant secondarily. (Fortunately, they don’t appear to be attracted to tomatillos.) The fat, striped adult beetles emerge from the soil in late spring to feed on emerging potatoes, and then lay clusters of orange-yellow eggs on leaf undersides. They yield highly destructive little orange larvae that eat foliage nonstop and grow quickly. You can kill the insects at any stage, but it’s easiest to pick off the adults and eggs. (Click here to view the full life cycle of these beetles.) The beetles can complete up to three life cycles in a single season, so once you have them, you generally have to fight them all summer.
A Colorado potato beetle larvae eating tomato leaves.
These insects are highly resistant to insecticides, so it pays to choose non-chemical methods of control. Time and time again, I’ve found that well-timed cultural control and proper winter cleanup are the best means of battling them. Cultural control is essentially picking off the adults, eggs, and larvae and/or pruning off egg- and larval-covered leaves and branches. I generally smash picked specimens, but you can also drown them in a bucket of water. Beetle picking should start in mid to late spring and continue until all signs of these pests are gone. (To learn everything there is to know about Colorado Potato Beetles, visit potatobeetle.org.)
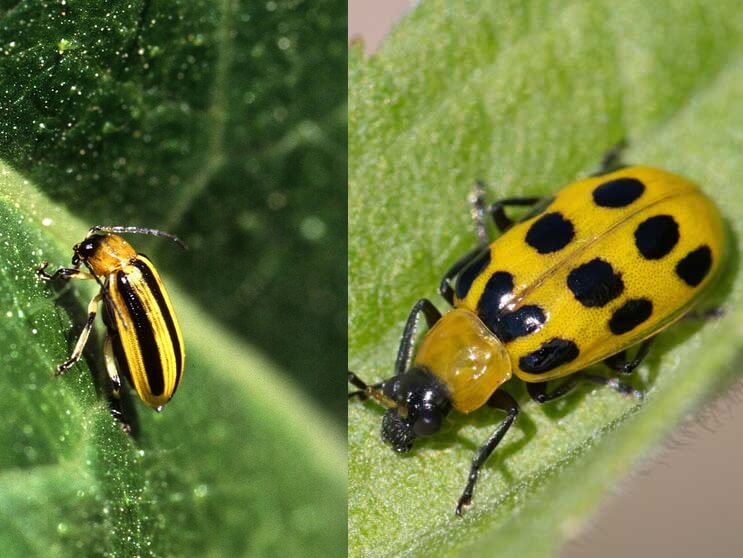
Spotted and Striped Cucumber Beetles
Here are the symptoms of bacterial wilt, which is spread by the striped cucumber beetles.
As their names suggest, striped and spotted cucumber beetles favor cucumbers, but they also attack melon vines. Small, striped or spotted cucumber beetles look so cute and innocent, but they are so destructive. Every year my cucumber crop is a crapshoot. Why? It’s not because of the damage they cause by feeding on plants and fruits. It’s the catastrophic bacterial wilt that they spread from plant to plant. Once cucumber vines get cucumber bacterial wilt, there is no turning back. The leaves will start to show droop, and eventually, whole stems will collapse, and the vine will die.
These pests may have two to three cycles in a season and are next to impossible to control, even with harsh chemical insecticides. Floating row cloth cover can keep them at bay, but it’s a hassle and does not allow pollinators to reach the plants, though some cucumbers are self-pollinating, particularly Beit-Alpha types like ‘Diva’.
Striped and spotted cucumber beetles are similar in size and color.
Tiny jet-black eggplant flea beetles are the smallest summer pests in this list, but they can devastate an eggplant in a matter of days. They attack many other veggies, like radishes, potatoes, turnips, and spinach, but with less ferocity. The small but numerous insects leave little pockmarks all over a host plant’s leaves. Badly damaged leaves barely function, resulting in poor, weak plants that produce puny fruits.
If you want to grow eggplant, you have to protect them from eggplant flea beetles. There are plenty of insecticides that will kill these insects, but only a few non-chemical cultural practices will stop them. The best method that I have found is protecting plants with summer-weight floating row covers that transmit a lot of sunlight while physically keeping insects from the plants. The key is covering plants early and then securing the row covers at the base, so the tiny beetles cannot crawl beneath them. Holding cover edges down with bricks, pins, and even mulch or compost works. The only caveat is that you may need to hand-pollinate plants for fruit set.
Good fall cleanup of infested crop plants will also keep populations down from year to year. On average, eggplant flea beetles will complete up to four generations in a single season. (Click here to learn more about these pests.)
Harlequin Cabbage Bug
Harlequin bug adults will quickly destroy broccoli, kale, cabbage, and other brassicas.
These ornamental stink bugs are the worst enemy of summer kale, broccoli, and other brassicas. They suck the juices from the leaves, causing pockmarks all over them. The most striking destruction I have ever witnessed was with enormous Portuguese kale that I had nurtured to a bold 2′ in height through spring. Once the numerous beetles started to attack in early summer, the plant had no chance.
There are a few management practices that will help stop these bugs. Floating row covers can also be used, as was suggested for the eggplant flea beetles, but harlequin cabbage bugs are big enough to pick off by hand if you have the time and can handle the slightly stinky smell they emit when disturbed. Spraying them off with a jet of water will also help knock them back. Small nymphs are also susceptible to treatment with OMRI Listed®insecticidal soap.
Two to three generations of harlequin cabbage bugs can occur each season. By late summer, they are no longer a problem, so that you can plant your fall cabbages and kales with confidence. (Click here to learn more about these pests.)
Mexican Bean Beetle
Mexican bean beetle larvae do serious damage to bean leaves.
Like Colorado potato beetles, it’s the larvae of Mexican bean beetles that do the harshest damage to bean plants. The adults emerge in late spring, but they rarely cause major problems on bean plants until midsummer. The adults are orange, black-spotted beetles that lay clusters of orange-yellow eggs below the leaves, much like the Colorado potato beetle. The unusual larvae are fuzzy, bright yellow, and devastate leaves as they feed along the leaf bottoms.
You can control these pests as you would Colorado potato beetles with one exception – destructive harvesting. Destructive harvesting is the harvest and total removal of infested plants from the garden. After picking all the beans from an infested plant, the whole plants should be pulled, bagged, and taken far from your garden. (Click here to view a YouTube video from the University of Maryland about destructive harvesting.) Beans can be replanted as late as mid-August for early fall harvest.
A Mexican bean beetle adult on a bean leaf.
In general, regular weeding, good plant care, and excellent garden clean up, in summer and fall, will help keep pest populations down. Clean the ground of all leaf litter and weeds as needed, and amend the soil with top-quality amendments for vegetables, such as Black Gold® Garden Compost Blend and Garden Soil, and your plants will be more robust to resist the many garden pests that threaten to destroy them.
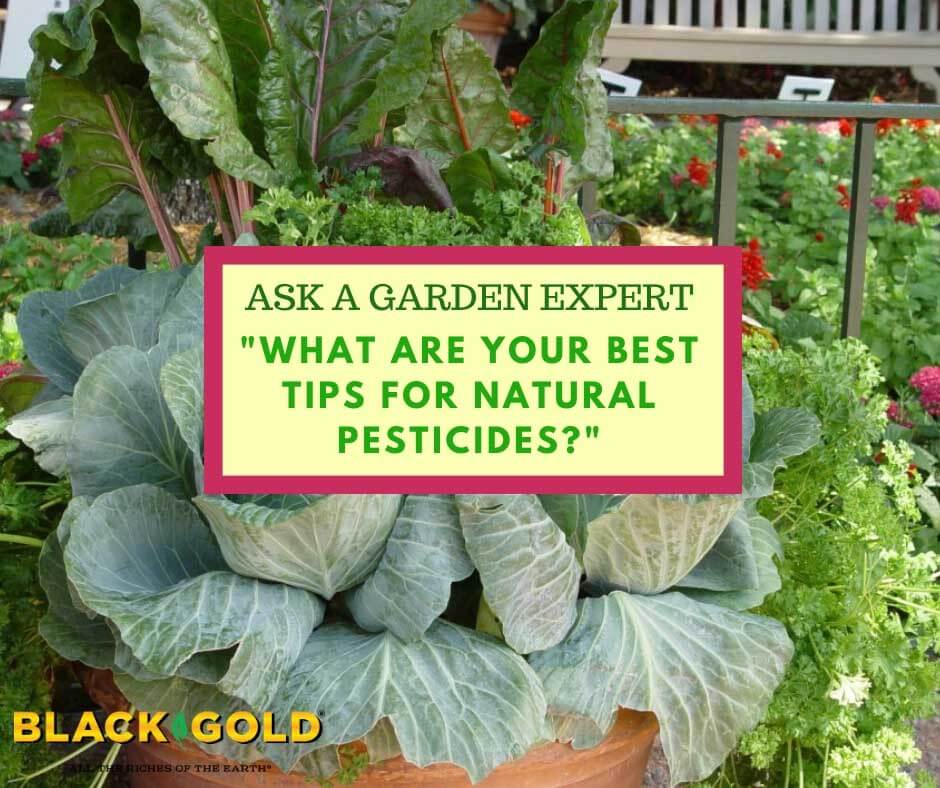
“What are your best tips for natural pesticides?” Question from Jacquelyn O’Neil
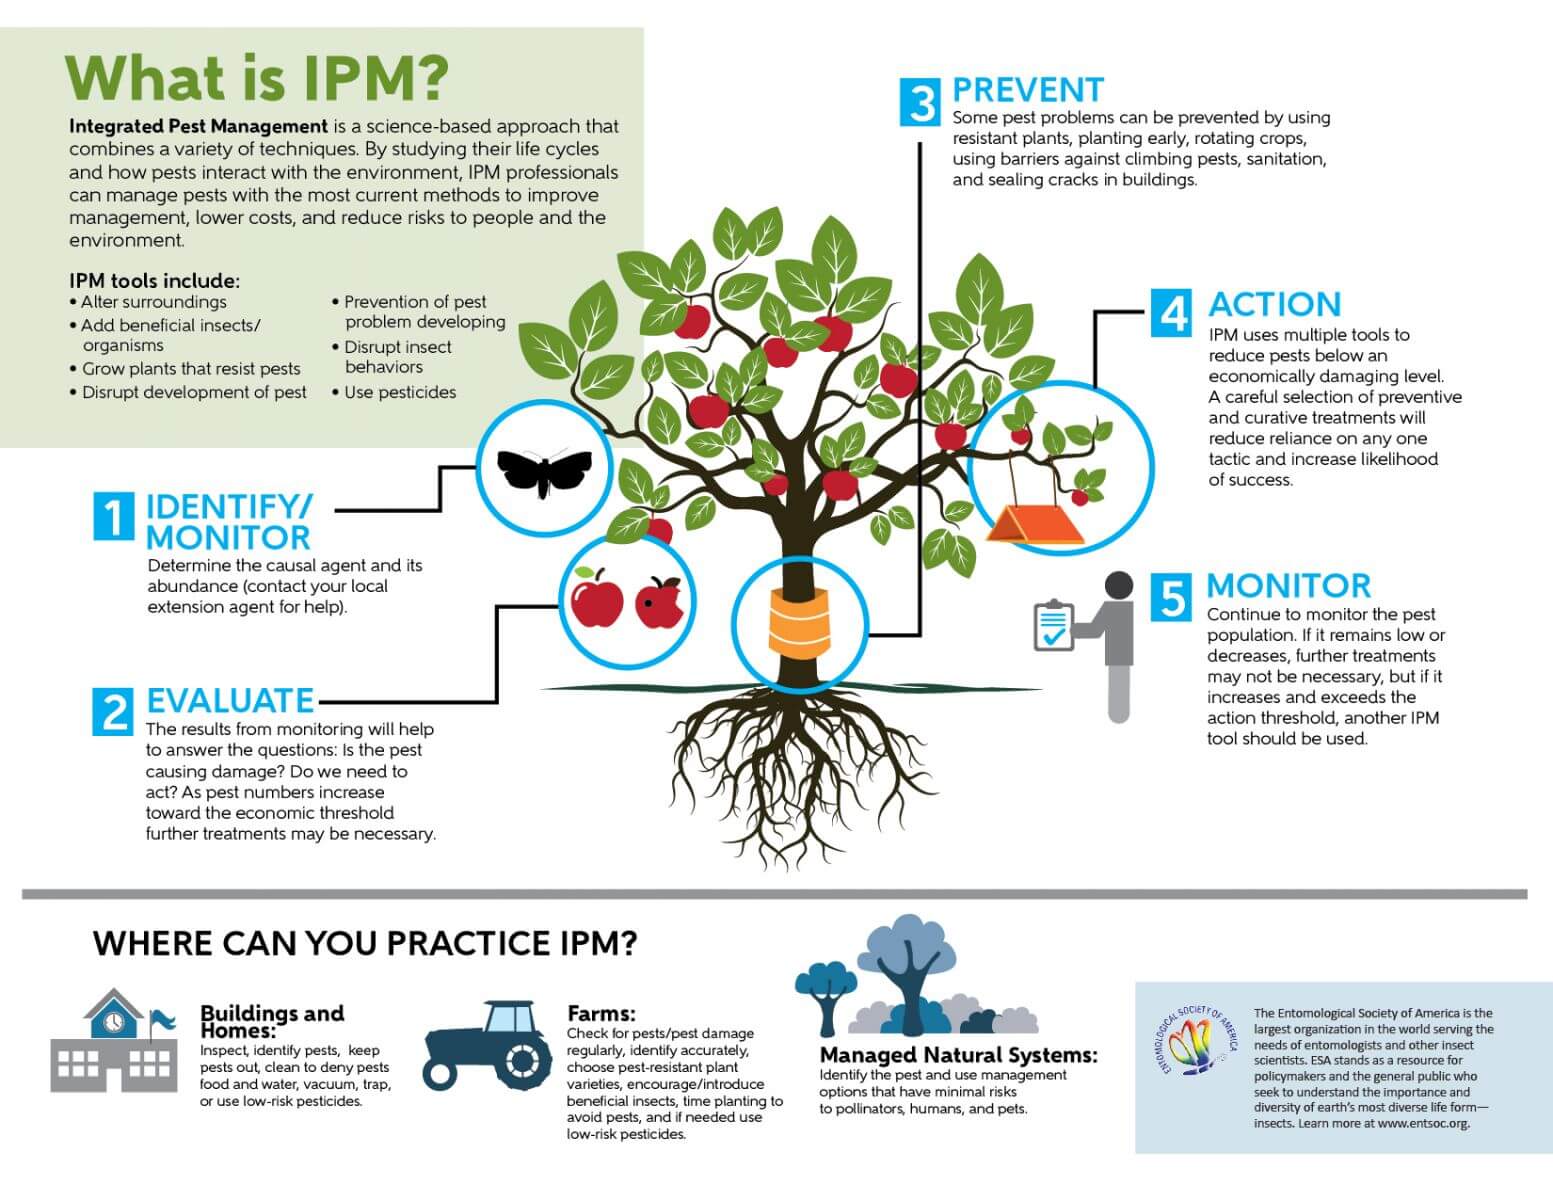
Answer: It depends on the pest. Generally, we recommend purchasing OMRI Listed products approved for organic gardening. But, we also advocate managing pests through IPM (integrated pest management) to keep populations down without the need for harsh chemicals. Integrated pest management employs a variety of tactical techniques for pest control (see infographic below). Monitoring plants, keeping them in good health, and catching pest problems early on will stop pests before they take over.
We also recommend keeping your plants, pots, and topsoil surface clean and refreshed and dead, dying, or infested stems pruned off. It is amazing what a little cleanliness can do to keeping plants pest-free. (Click here to learn how to properly clean house plants.)
We have loads of BG articles on the subject. Here’s are five popular pieces:
“In an effort to keep down the insect population of my indoor veggie garden, I’ve been sterilizing my soil in the oven or microwave. I’ve had whitefly and fungus gnat infestations from using Miracle Gro and other soils right out of the bag, so someone told me to sterilize, and it seems to work. However, if there are beneficial microorganisms in your Black Gold soil, I fear that sterilization may kill them. So, my question is this… should I heat sterilize my Black Gold organic soil before using it indoors? Or is that defeating the purpose of the soil’s ingredients?”Question from Holt of Georgia
Answer: Theoretically, fresh, straight-out-of-the-bag potting mix should be pest and disease-free. Black Gold® gets good grades in this arena, but if a bag gets slashed or torn during transport or is improperly stored, the contents can pay the price. (Only buy Black Gold® bags that are undamaged with contents that are not waterlogged.) Otherwise, you shouldn’t have to worry. Still, if you prefer to play it safe, soil sterilization is certainly helpful with preventing damping-off (click here to learn more), and it would kill any harboring pest eggs, but beneficial microbes will also pay the price.
The chief potting soil beneficials to consider are mycorrhizae and the good microbes in earthworm castings and sometimes compost. Other soil components, like Canadian Sphagnum peat moss and bark, are not particularly rich in any worthy beneficial microbes accessible to plant roots. Currently, we do not add mycorrhizae to any of our Black Gold® soils (unlike some of our Sunshine® mixes), but we do add earthworm castings and compost to quite a few, including our Black Gold® Natural & Organic Potting Mix. Sterilization would certainly kill any soil good guys, but if you are determined to sterilize, it should not impact your growing dramatically. And, you can always beef up your soil after sterilization by adding Black Gold® Earthworm Castings Blend from a well-sealed bag, or dry mycorrhizae spores, which are available at most garden stores.
Even after the sterilization of greenhouse pots, surfaces, and soil, pests may come. Every open door, window crack, or new plant brought indoors is a threat. When it doubt, fight back early using smart IPM. We have lots of blogs on the topic. (Click here to read an article about managing the worst indoor plant pests, and watch our video below about beating fungus gnats.)