Articles

Jade Jewels: Remarkable Jade Plants for Connoisseurs

Golden jade has remarkable sunset-hued leaves. (Image thanks to Mountain Crest Gardens)

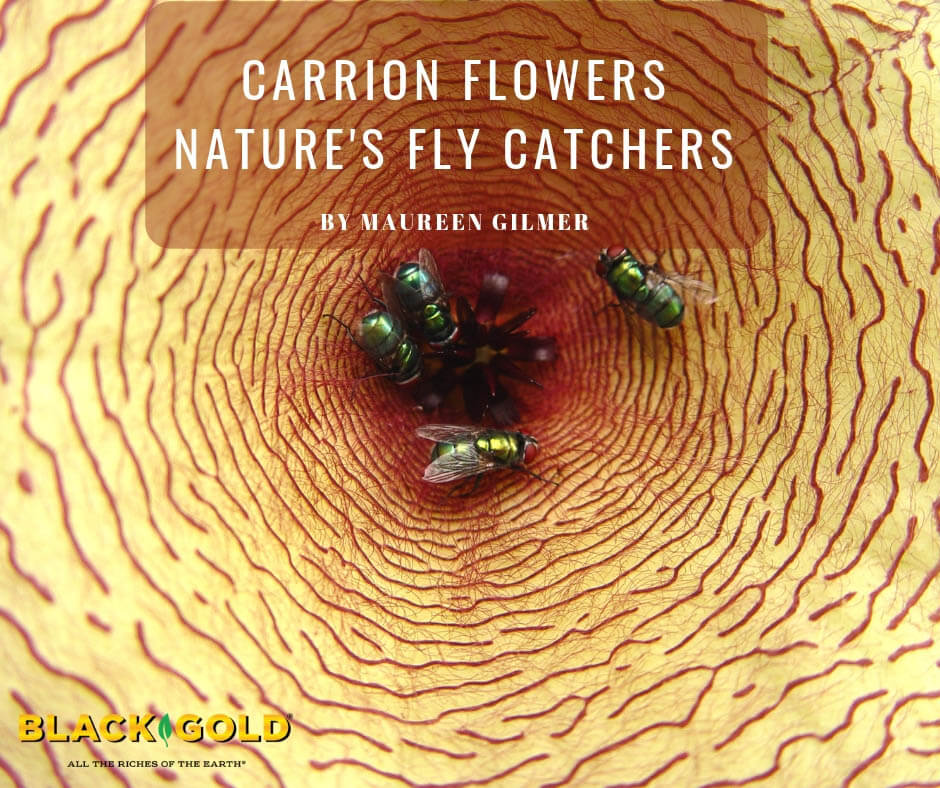
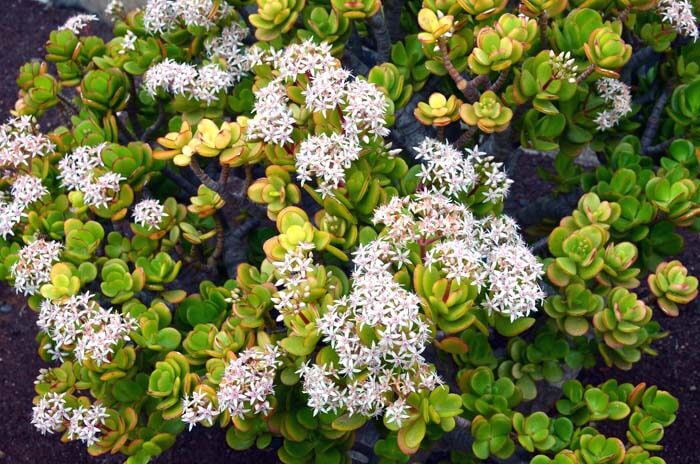
A mature, well-formed jade (Crassula ovata) is an arboreal treasure of a house plant worthy of indoor garden ardor. Its thick, trunk-like stems ascend to a rounded top with glistening clusters of fleshy, jade-colored leaves. In winter, happy plants will do double duty by producing a wealth of starry white flowers. But, succulent connoisseurs know there are other remarkable crassulas that take everyday jades to a whole new level!

Growing Jades

Excess summer heat and sun can cause stress, resulting in orange-brown tinged foliage.

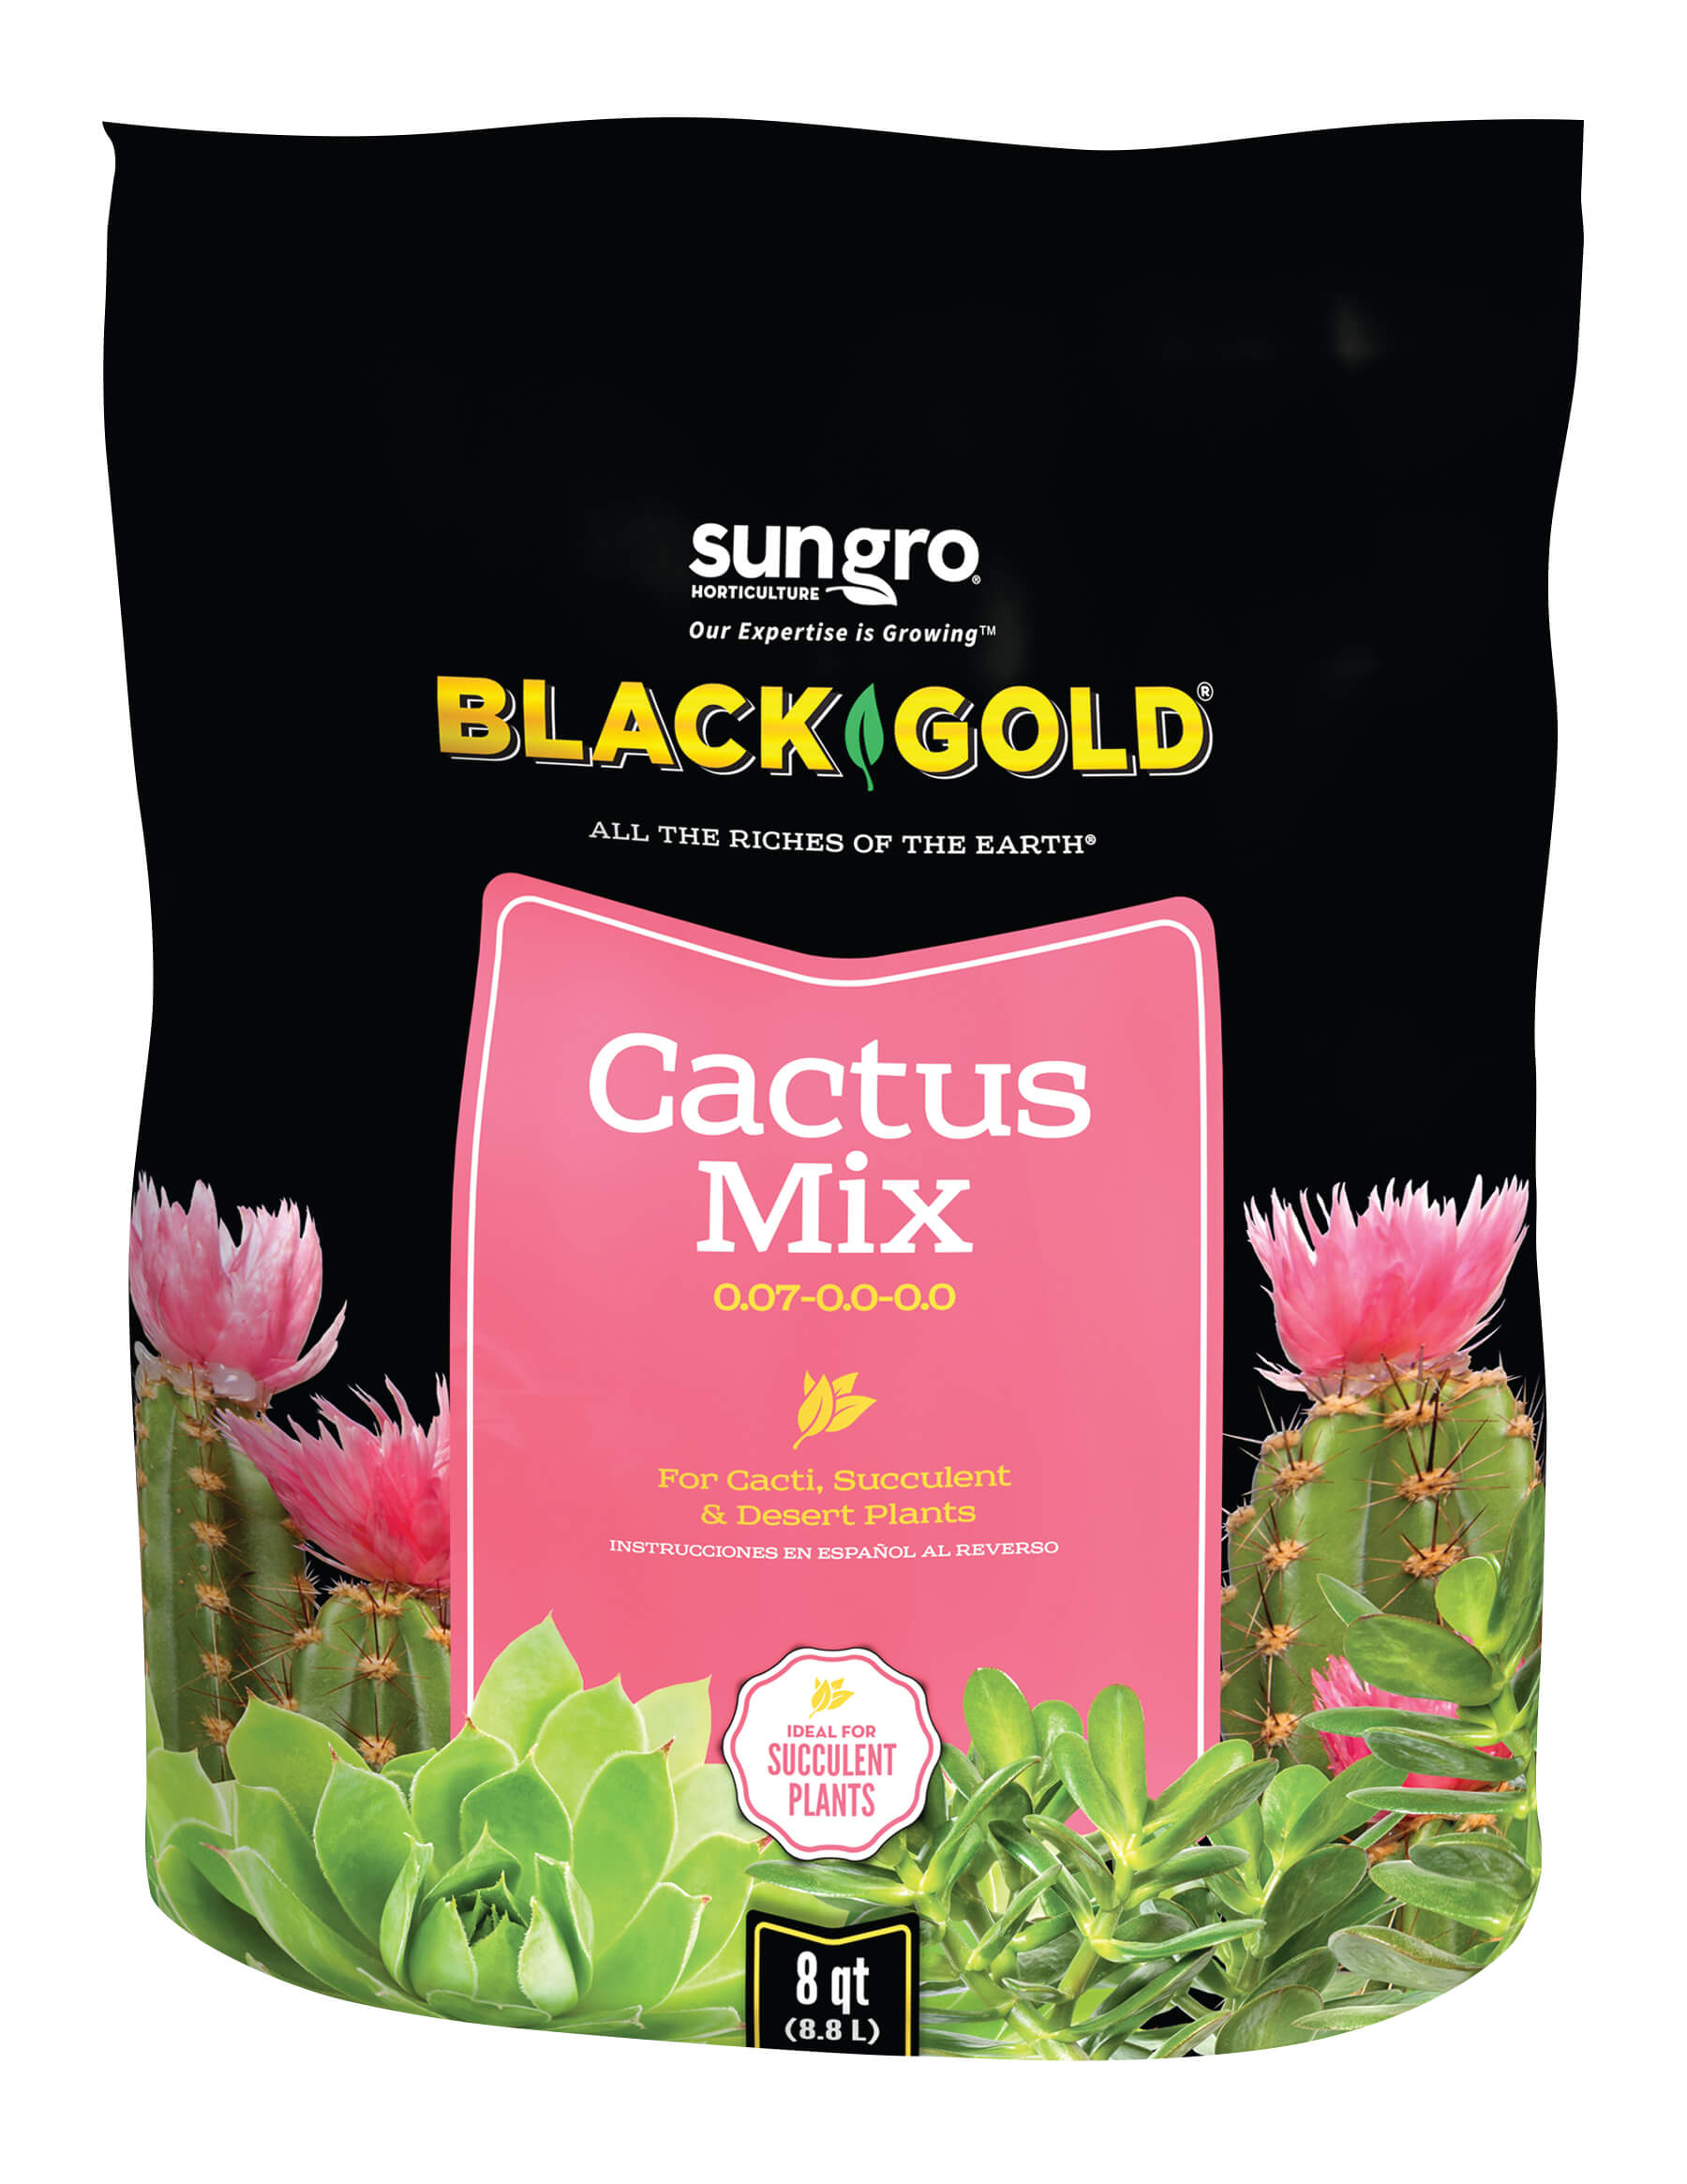
All jades are tough—a testament to their droughty African origins. They grow best in filtered or partial sunlight, and during the winter months, they require low water to mimic the dry winters of their home country. Plant them in pots of porous soil with moderate organic matter and excellent drainage. Black Gold Cactus Mix is the perfect medium for jades to dig their roots into.

In the summer, bring jades outdoors to bask in the natural heat and filtered sunlight. (If you live in USDA Hardiness Zones 9-11, you can grow them outdoors year round). Give them moderate water, and be sure to allow the soil to become quite dry between watering. Avoid placing them in full hot sun, because this can cause sunscald and heat stress, resulting in orange-brown-tinged foliage.

Before bringing them back inside in fall, check them from scale insects and mealybugs. Washing and spraying the stems and leaves with insecticidal soap will help. It’s also good to remove and replace the top inch of potting medium to remove any pests that may be harboring there.

Remarkable Jades

Golden jade

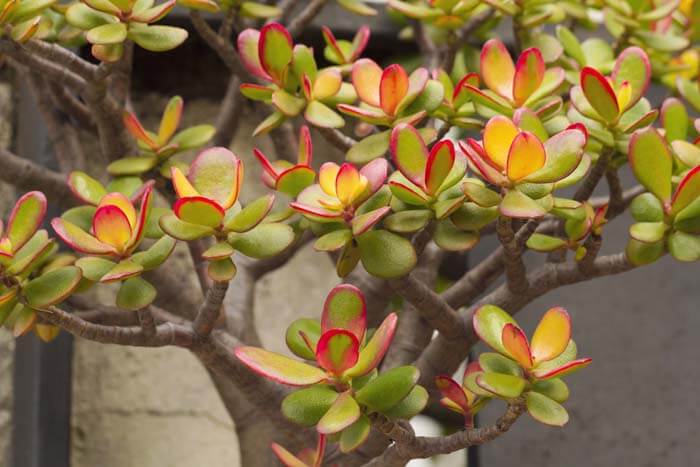
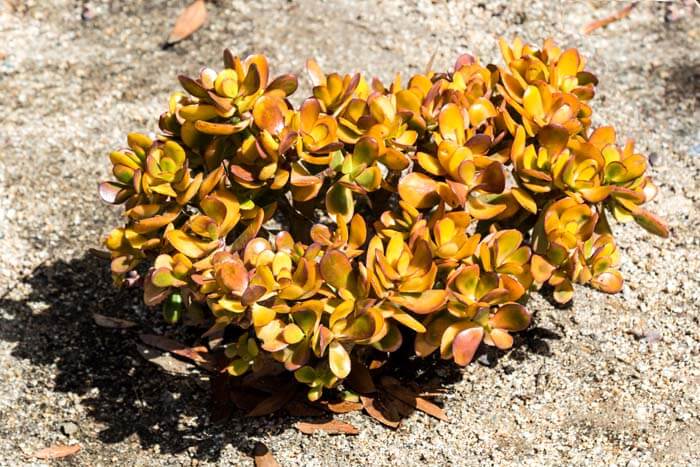
Golden Jade (Crassula ovata ‘Hummel’s Sunset’): You can’t miss golden jade, with its leaves in sunset shades of green, red, yellow, and orange. It reaches two to three feet high when mature, and its leaves are most colorful when placed in bright filtered sunlight. Golden jade is relatively slow growing and has white winter flowers.

Gollum jade

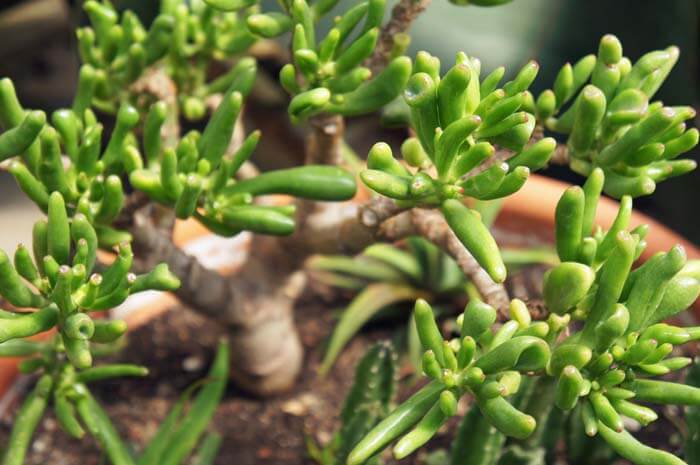
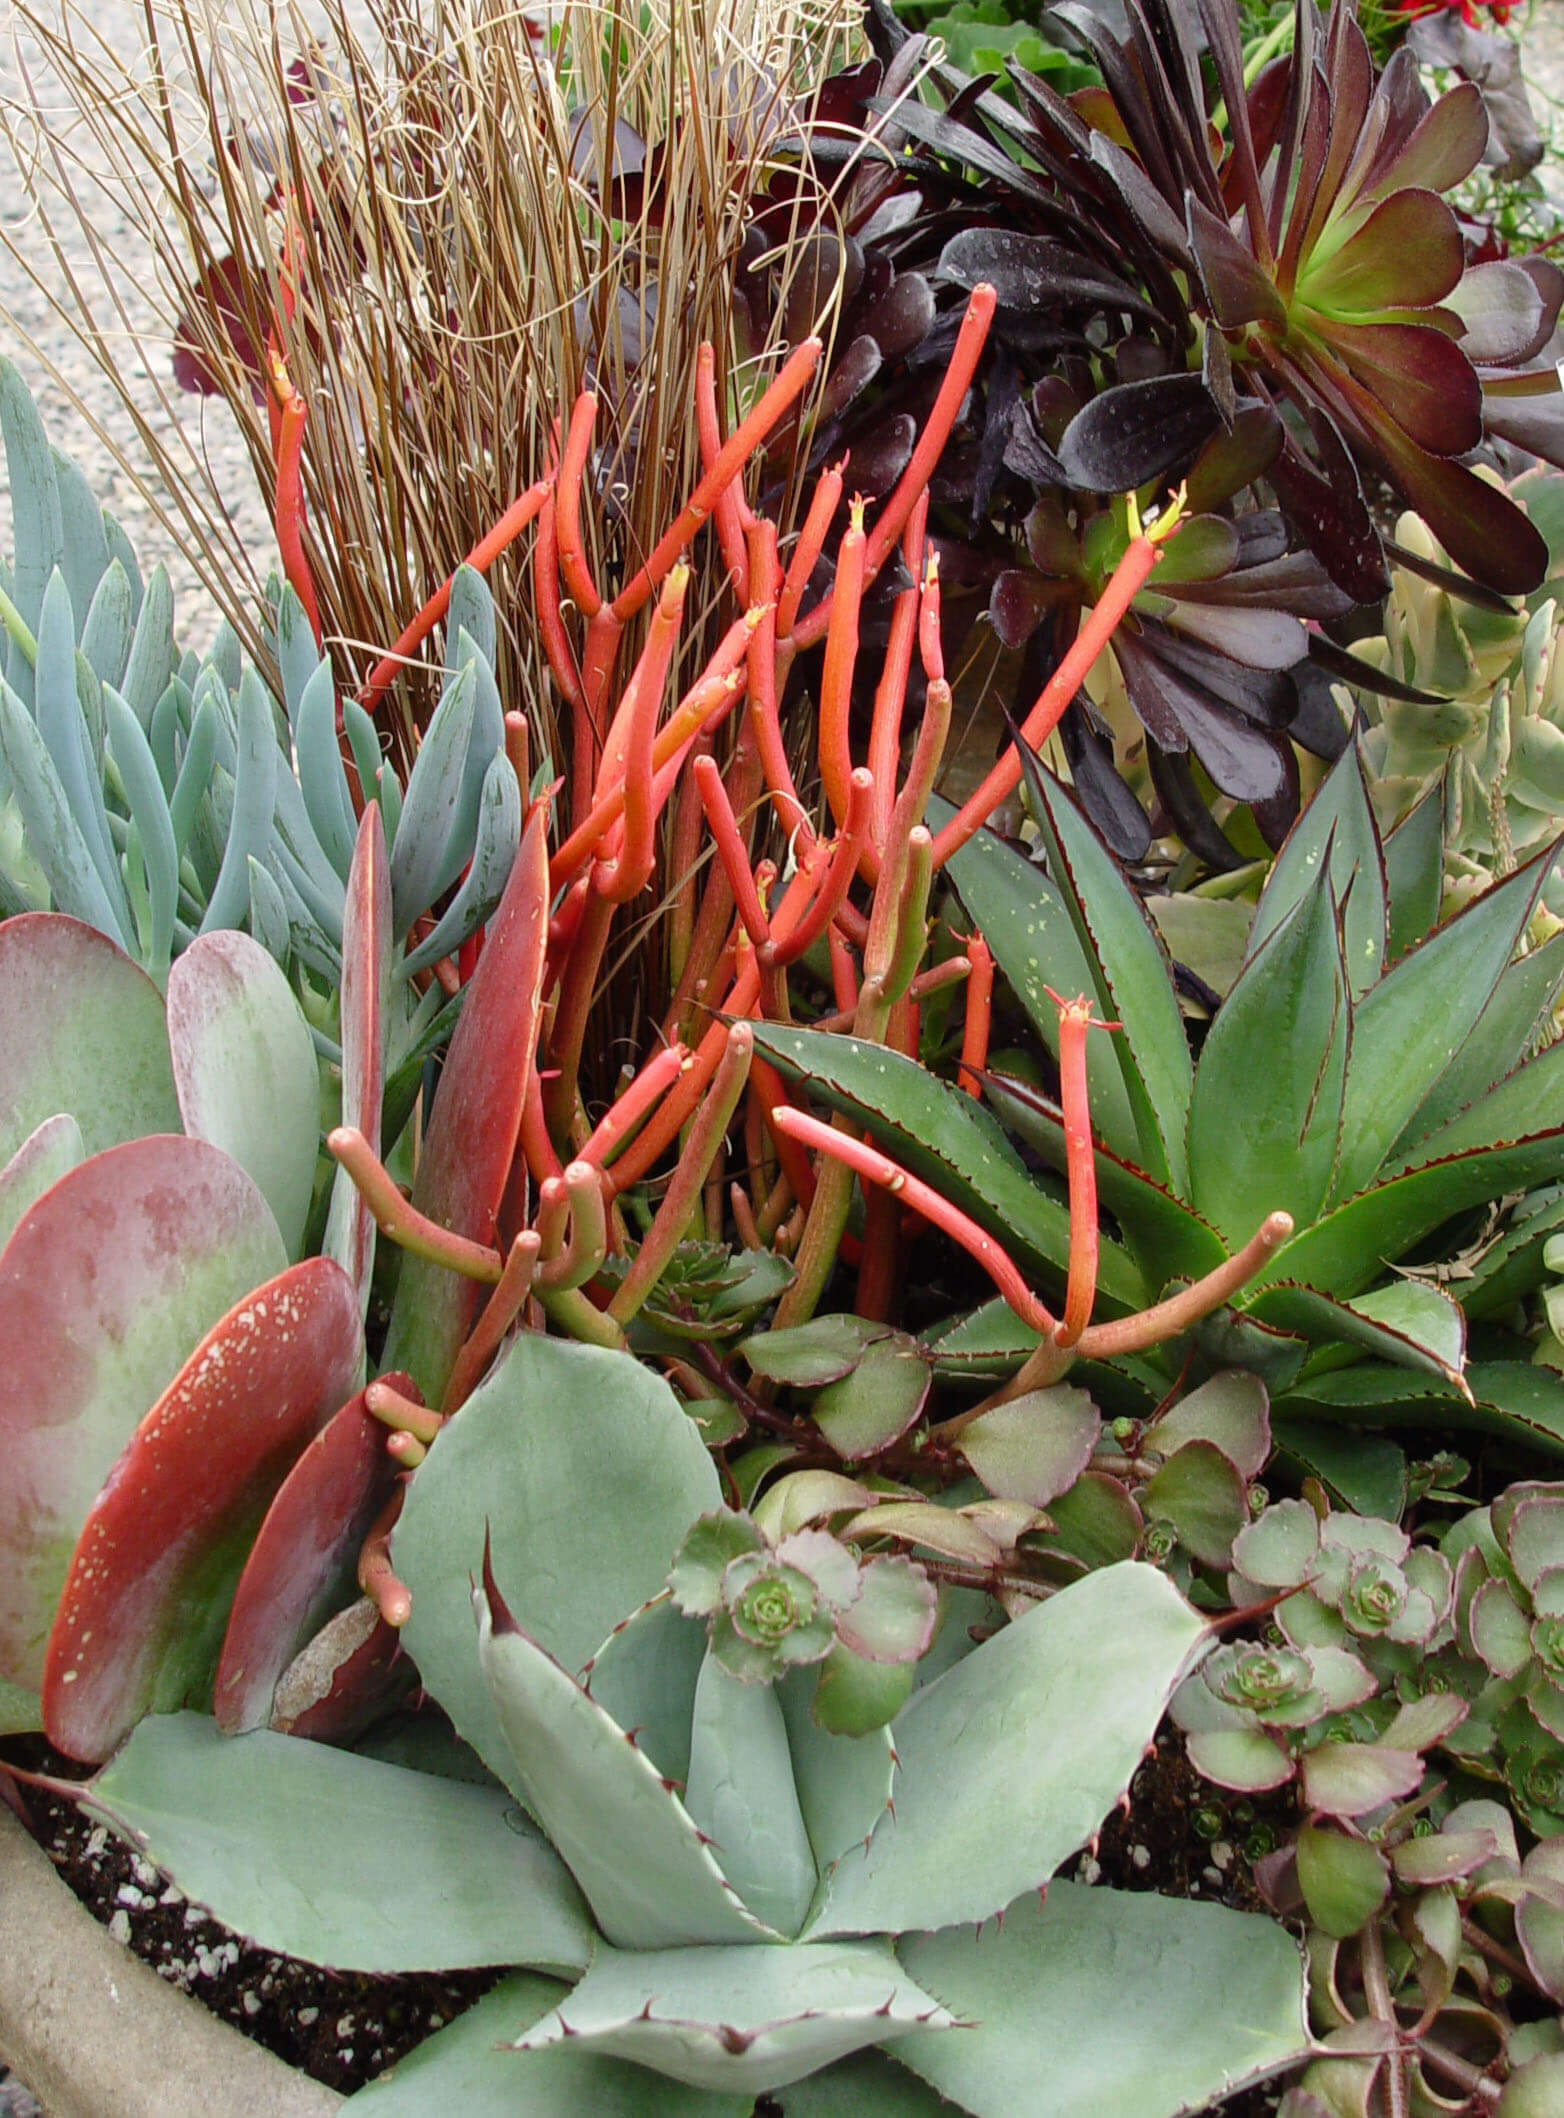
Gollum Jade (Crassula ovata ‘Gollum’): As the name suggests, the leaves of ‘Gollum’ jade look like creepy, tubular, suction-cup fingers of green with red edges. The plants age to a sturdy four feet tall and always receive comments from passersby. If you love jades, you have to grow this one!

Ripple jade (Image thanks to Mountain Crest Gardens)

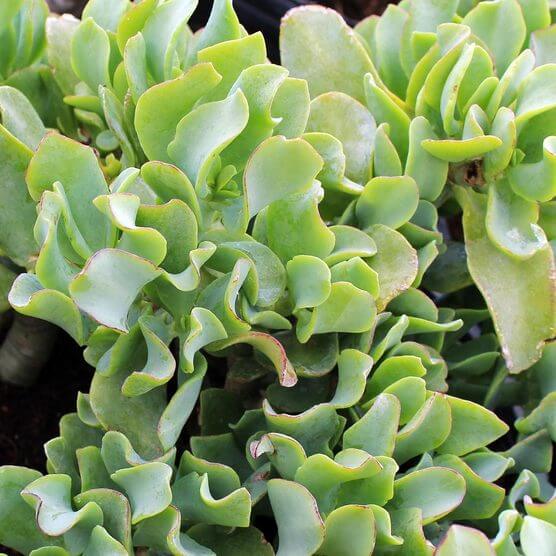
Ripple Jade (Crassula arborescens subsp. undulatifolia): This more compact jade reaches just one foot high and has undulating leaves of bright blue-green. It will grow quickly if placed in bright light and bears starry white winter flowers.

Silver dollar jade

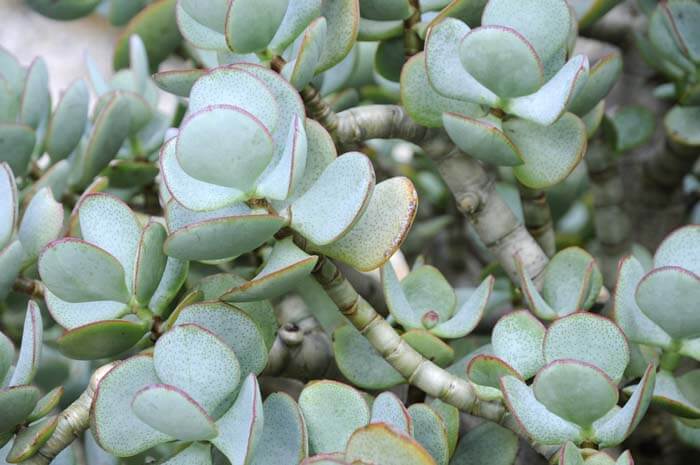
Silver Dollar Jade (Crassula arborescens): The extra-large, silvery leaves of this jade plant are edged in red. Mature specimens reach a bushy two feet high and wide, making them just the right size for potted indoor specimens. Their starry, pink and white winter flowers play off the brightly colored leaf edges.

Tricolor jade (Image thanks to Cologne University)

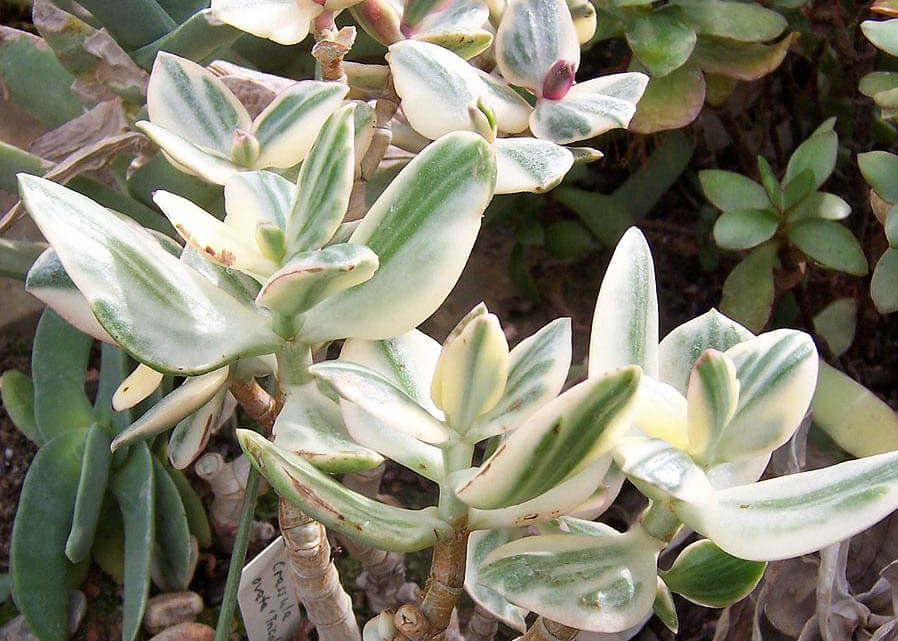
Tricolor Jade (Crassula ovata ‘Tricolor’): Bright variegated leaves of green, yellow, and ivory are the star of this unique jade plant. It reaches over one foot high and bears white flowers in winter. Like most variegated plants, it is slower growing than standard Crassula ovata.

Sources

When in full flower, jade plants look extra pretty.

Mountain Crest Gardens has a wonderful array of jades for online purchase, and their plants always arrive at your door fresh and healthy. You can also check quality garden centers or plant nurseries in your area that carry interesting selections of succulents.

Give your connoisseur jades good care, and they will be with you for a long time. Specimens have been known to live for as many as 100 years! They are true house plant investments.

Growing Carrion Flower: Nature’s Flycatcher

Just imagine if you could grow a drought-tolerant plant that may actually reduce fly populations. One group of South African succulents, carrion flowers (Stapelia spp.), does just that. Unique carrion flowers have evolved very exotic starfish-like blossoms that kill the most ubiquitous insect in Africa: the fly. But death does not come until these insects have first pollinated the blooms. Prey are always prevalent and active, keeping these curious succulent flowers well pollinated.

Carrion Flower Fly Catching

Desiccated maggots (fly larvae) dot the center of this meat-colored carrion flower.

So just how do they kill flies? Let’s look at Stapelia gigantea, which thrives in the high heat and low humidity of the desert. When flies peak in late summer, it comes into bloom with buds like pointed balloons and unique leathery blossoms that actually look like starfish road kill. The largest can be dinner-plate-sized. Some are creamy yellow (puss colored) with hairs while others have smaller flowers that are the color of red meat (these are more commonly available to gardeners). Both share the fetid odor of rotten meat and death that originates at the center of the flower where flies of all types may be found vying for a place to reproduce.

Such activity ensures flower pollination and fly death. Convinced there will be plenty of carrion for their larvae to thrive, female flies lay their eggs beneath the central pistil, where the scent is strongest. But when the larvae hatch out, they have no food and quickly starve to death. Over the life of each flower, hundreds of flies will leave their progeny, the accumulating corpses highly visible to the naked eye. Growing lots of them around the chicken coop or dog run may prove to be helpful biological fly control where it’s too dry for other options. Where it’s cold, grow carrion flowers in pots to move indoors before frost and bring out for the summer.

Caring for Carrion Flowers

Stapelia gigantea is a fine garden plant for arid, warm winter regions of the American Southwest

In general, carrion flowers like dry heat. Wait until they show wilt before watering, unless they are growing in a very fast-draining pot. Beware watering at all in humid heat, during rain, or under any conditions that don’t allow pots to dry quickly. Moisture trapped inside pots is what usually kills them. That’s why they do very well in low wide pots with large or multiple drainage holes. This provides room for them to grow and spread. Ensure superior drainage by planting them in pure Black Gold Cactus Mix.

Carrion flowers bloom on new growth. If you keep them actively growing through summer, and don’t trim, they will bloom far more prolifically. Once blooming season ends,  cease watering through the winter.

Propagating Carrion Flowers

The blood-red variety of carrion flower is popular for dry gardens with shade.

Experience proves carrion flowers ask for different means of propagation than other succulents. After they flower is the best time to take cuttings. Take cuttings at the natural joints. (I like to let them break cleanly at the weakest point.) Don’t sever a stem or cut it in parts as open wounds invite fungal exposure and potential rot.

Stapelia cuttings are highly vulnerable to fungi in the soil, so burial is not advisable. Instead, lay a cutting down onto damp Black Gold Cactus Mix, and snug it into place. Do not cut the stem or cover any part of it because that’s what kills cuttings.

Set the pot in a warm, dry place with bright shade, and roots will quickly form during the fall. Check occasionally for signs of rooting all along the bottom, then transplant once they are deep enough to support the cutting.

Buying Carrion Flowers

You can buy carrions online, but many succulent growers include them in small flats of inexpensive mixed plants. Once you learn to spot them, buy them up. They are great fun to experiment with; each is a surprise when it blooms.

Let carrion flowers remind us that flies are pollinators, too. Curious floral adaptations for fly attraction can become useful, if we collect and cultivate these maggot tricksters.


Create a Succulent Seascape Rock Garden

Well-chosen and placed succulents in picturesque rock gardens can have an underwater, seafloor appeal. The design key is selecting various dryland treasures with anemone-, coral-, and urchin-like forms and textures in shades of blue green, silver, gold and red. When arranged against a setting of bold rocks, lined with a ripple of pebbles and seashells, the effect is cool and inviting.

I created such a garden at my Delaware home to complement a stone and pebble patio being built along the south-facing wall of my 1920s Cape Cod house. The bed was constructed in four steps, and the plants were selected for their seascape appearance.

Most of the hardy succulents I chose for the project were purchased from the online nursery, Mountain Crest Gardens. Not only do they sell lots of hardy hens & chicks (Sempervivum spp.) and stonecrops (Sedum spp.), but they also offer hardy cacti (my favorite for spectacular spring flowers). And their succulents arrive thriving and ready to plant.


Rock Garden Materials

Nestle plants within crevices and gaps, making sure you leaves spaces for spreading succulents. (Sedum SUNSPARKLER® Dazzleberry and Sempervivum ‘Thunder’ shown)

My rock garden required the following materials:

  1. Sharp spade
  2. Trowel
  3. Large plastic tub
  4. Thick garden gloves
  5. Large rocks (my garden is 4’ x 5’ and required 10 rocks)
  6. Black Gold Garden Compost Blend and Black Gold Cactus Mix to amend the garden’s soil
  7. Pebbles and shells for topdressing
  8. Slow-release fertilizer
  9. Succulents


Bed Design and Construction

Once I had my rocks in place, I amended the fill soil and started planting!
  1. Sod and Soil Removal: The first step to preparing my garden was to remove the sod. Thankfully, my soil is high in organic matter, so removing the top layer of grass was relatively easy. I then skimmed a 2-inch layer of natural soil from the new bed layer to use as fill. I put the sod in a wheelbarrow for removal and the fill dirt in a plastic tub to keep the area tidy.
  2. Rock Placement: Then I placed my rocks. The natural dark grey and tan stones I chose are prevalent in my area, so they were a good fit for my yard. They also offered a pleasing color contrast to the plants and pebble. I set the largest rocks high against the concrete and stone base of my home for maximum visual appeal and gradually layered the smaller rocks down to patio level. I placed them close together at the top for a tight fit, so they would hold soil without erosion.
  3. Filling: Once my stones were in place, I mixed a liberal amount of Black Gold Cactus Mix and Garden Compost Blend into my fill. The final fill was pebbly and organic for excellent drainage and good water-holding ability. Then I filled in all the gaps between rocks, leaving enough space for my plantings.
  4. Plant Placement: Finally, I placed my plants, arranging them based on height, texture, and color, and prepared to plant.


Plant Materials

Most of my succulents were purchased online from Mountain Crest Gardens.

Aside from making sure that my plant selections would survive Delaware winters (USDA Hardiness Zone 7), I made sure they met a suite of aesthetic requirements. I chose a few taller textural plants, several cascading stonecrops, and other selections that were mounding and prickly. All are remarkably drought tolerant and tough, able to take the high heat and sun of the garden. My plant picks included:

Hybrid Prickly Pear (Opuntia ‘Coombe’s Winter Glow’, Zones 5-10). This hardy cactus has smooth paddles that lack the large spines of most, but beware those small spines! It has spectacular magenta blooms in late spring, and its paddles turn shades of rosy purple in winter.

Rosularia (Rosularia platyphylla, Zones 5-10): This spreading succulent looks like a tiny hens & chicks and creates a mat of sea-green rosettes.

Hens & Chicks (Sempervivum ‘Bronco’, Zones 5-10): This large hens & chicks has red and green rosettes that turn rich red in winter.

Hens & Chicks (Sempervivum ‘Thunder‘, Zones 5-10): The summer rosettes of this larger hens & chicks are grey-green tinted with lavender. In winter, they turn shades of deep lavender and rose.

Cobweb Hens & Chicks (Sempervivum arachnoideum ‘Pittonii’, Zones 5-8): This small hens & chicks has cobwebbed gray-green rosettes edged in dark purple.

Hens & Chicks (Sempervivum calcareum ‘Greenii’, Zones 5-10): The medium-sized, blue-green rosettes of this sedum have maroon tips.

Tiny Buttons Stonecrop (Sedum hispanicum ‘Blue Carpet’, Zones 5-9): This low, spreading sedum has tiny buttons of blue-grey foliage.

Hybrid Stonecrop (Sedum SUNSPARKLER® Dazzleberry, Zones 4-9): Purplish leaves and summer-long flowers of deep rose make this a winning sedum.

Hybrid Stonecrop (Sedum SUNSPARKLER® Jade Tuffet, Zones 4-9): This small, upright sedum has slender, dark green leaves and summer-long pink flowers.

Chinese Stonecrop (Sedum tetractinum ‘Coral Reef’, Zones 5-9): This pretty sedum has yellow spring flowers and bright green leaves that turn pinkish with age.

Adam’s Needle (Yucca filamentosa ‘Color Guard’, Zones 5-10): The gold-striped leaves of this 18-inch yucca are bright and bold.

My seascape rock garden includes stonecrops, hens & chicks, and other dryland succulents with coral-reef looks.

I put on my garden gloves and started planting the largest plants at the top, then moved down. During planting, I gently loosened the roots of any pot-bound plants, and dug a hole just big enough to ensure each plant’s roots were just at soil level. Then I sprinkled a small amount of slow-release fertilizer into each hole before planting. Once all of the plants were in the ground, I covered the soil with light pebbles and placed seashells here are there for a complete seascape look.


Garden Development

In just a couple of months my bed was blooming and growing, just as anticipated.

Within just a couple of months, my new garden started to take shape. The prickly pear put on new pads, the stonecrops and hens & chicks started to spread, and the SUNSPARKLERS began blooming beautifully. Come next summer, the full seascape effect should be in full sway, adding sunny, succulent interest to my new patio!


Bold Waterwise Container Plantings

Do you need a big accent container plant for the patio or garden that asks for little water? In California, designs resulting from water cutbacks are changing the way we look at potted plants. Now they are a bigger part of the landscape, nestled in the planting or set at crucial spots to please the eye. These are valuable problem-solvers for filling in spots where older plants have died. They also help to make gateways, and other focal points interesting in small spaces.

Trendy southern California water-wise gardens show you how it’s done. Bold, water-wise plantings from top gardens have been hand-picked to show great design with these plants. Note how simple and dramatic each can be in the right setting, and how little care they require. So be inspired to create your own by these four stellar examples.

The Huntington Containers

Earthy green pots planted with single Cape rushes bring needed height to the garden. (Photo by Maureen Gilmer)

Southern California’s botanical garden, library, and art center, The Huntington, shows off some of the best planting ideas for the region. Their new California Garden features pots of fine-textured reeds to define each tier of the gradual grade change. Nestled among in-ground plants, it has earthy green pots planted with single Cape rushes (Condropetalum tectorum). They provide stellar vertical elements in an otherwise low-lying planting scheme. The South African reeds are grown in summer gardens or frost-free regions to provide the dark green fine-textured appearance rare among droughty plants.

Palm Springs Container

Cascading variegated elephant bush thrives in drought and looks spectacular in pots. (Photo by Maureen Gilmer)

In Palm Springs the newest darling of succulent pots is the variegated elephant bush (Portulacaria afra ‘Variegata’). It’s a green succulent variant featuring cream-colored variegation. This gives it a light value against darker pots or backgrounds. Variegation causes this variety to be smaller, less sun resistant, and more pendulous. It’s become a favorite for nesting exotic-looking Agave.

Balboa Park Container

A simple purple wandering Jew adds bold color to a tall pot. (Photo by Maureen Gilmer)

In San Diego’s Balboa Park was a discovery for using an old-fashioned, purple, inch-plant (Tradescantia pallida ‘Purpurea’) is planted as both a house plant and an outdoor summer annual. Fast-growing, tolerant of extreme heat with a lush purple coloring and small pink flowers, this is a new trend for shaded areas of droughty gardens. Widely available at garden centers, the foliage is outstanding in this very tall turquoise pot. Over the summer the long purple tendrils will cascade down the pot edges for a delightfully Art Nouveau feel. Where there’s frost, dig and move them indoors for winter house plants.

California Home Container

A minimalist blue-on-blue pot brings cool elegance to an apartment patio. (Photo by Maureen Gilmer)

For apartment dwellers, another container find along the California coast resulted in an all-blue creation. Blue chalk sticks (Senecio serpens), a lovely cool-hued succulent, makes the perfect companion for this blue Delft-style pot. True blues are rare in the drought-resistant garden, but with the cobalt glaze as an anchor, this blue plant is all you need for eye-popping beauty.

Every one of these containers can be created in a day for instant upgrades to outdoor spaces and for lighting subjects.

Planting Waterwise Containers

To maximize water retention, use Black Gold Waterhold Potting Mix for planting a rush pot provided the container is very well-drained. This reduces watering frequency and leaves moisture deeper down for the reeds. When planting succulents, including the purple Tradescantia, variegated Portulacaria, and blue chalk sticks, use Black Gold Cactus Mix to ensure adequate drainage. For very deep pots, don’t hesitate to keep your plant in a nursery pot and drop it inside the bigger one for quick seasonal changes.

Hot pots can be made any time because they’re not dependent on flowers. Instead, they are beautiful and useful on day one for that party, gathering, or special event. Above all, they ask for little water while flourishing through the heat of the summer happy as clams.

Pots of fine-textured Cape rushes define each tier of The Huntington’s California Garden. (Image care of The Huntington)


Succulent Container Gardening: Potted Xeriscaping

Succulents—a broad group of arid plants that store water in their leaves or stems—are perfect for busy, forgetful, or novice gardeners because they are easy to grow and don’t require much water or maintenance. Some are hardy and others tender, and they come in a myriad of dazzling choices for tough, beautiful container gardens.

So Many Succulents!

A colorful Aeonium is accented by cascading string of pearls (Senecio rowleyanus). (Robin Plaskoff Horton)

With thousands of succulent species across 60 plant families, there are succulents suited for practically all growing conditions. Their aesthetic value is just as vast, with succulents coming in practically all colors, sizes, shapes, and textures. The best garden succulents provide a dazzling palette of hues, not only green but also in brilliant shades of red, pink, orange, yellow, blue and purple. Gardeners can blend and mix up their kaleidoscope of colors and textures as an artist does with paints, to create unique visual effects.

Among the numerous succulent genera, the most common are Agave, Yucca, Aloe, Sedum, Sempervivum, Echeveria (my personal favorite), Crassula, and numerous cacti. The variations within each can be mind-boggling. For example, cacti (with approximately 1750 known species) are all New World succulents and include everything from 40-foot saguaros (Carnegiea gigantea) to 1-inch pincushion cacti. Aloes alone have over 500 species, and when blooming, they attract hummingbirds seeking their sweet nectar.

When choosing succulents for containers, pick smaller varieties amenable to pot culture.

Soil for Succulents

Sun-loving succulents thrive in well-drained soil comparable to the natural dry-climate soils to which they are accustomed. When planting succulents, know your soil and choose wisely. Fast-draining Black Gold Cactus Mix is the perfect choice for potted succulents. It holds enough water while also providing ample porosity and drainage. To maximize drainage, you can also mix with some sand or gravel into the potting mix.

A cheap and easy way to add more succulents to your pallet is to propagate them from cuttings. To propagate succulents, plant the base of a succulent leaf, pup, cactus pad or division in Black Gold Cactus Mix or Black Gold Perlite, and keep the medium very lightly moist. Starts should root in no time. Easy! [Click here to learn more about propagating Agave pups.]

Watering Succulents

Although succulents tolerate long periods of drought, they still need to be watered about twice a month. Be careful not to over water or leave them in standing water as it causes root rot. Succulent containers must have good drainage, so be sure pots have drainage holes for good water flow. During winter months, water monthly as they need less water in the cool season.

Some Like it Hot or Not…

Some succulents, like the Echeveria in this bench container, like it cooler. (Robin Plaskoff Horton)

In general, succulents are opportunistic growers adapted to the hot days and cool nights of their arid regions of origin, but some are less heat tolerant than others. All will actively grow in the right conditions.

Cacti, Agave, and most Yucca are true heat lovers that can take scorching temperatures, while some succulents are more sensitive to high heat. Echeveria and Sempervivum both thrive in milder temperatures, but they differ in cold hardiness. Sempervivum will tolerate winter freezes but need extra care and water in temperatures exceeding 95 degrees F. Very tender succulents like Echeveria will tolerate some cold but can’t handle freezing temperatures. In general, succulents with very thick leaves tend to be more delicate, but don’t do well in temperatures above 95 degrees or below freezing.

Barrel cacti are true heat lovers able to withstand scorching temperatures. (Maureen Gilmer)

As with most plants, succulents do not grow at the same rate year round, and some may even go dormant during periods of extreme heat or cold. As long as they get the necessary amounts of sun and water, succulents will thrive in a wide range of temperatures.

Succulent Seasonality

To every succulent, there is a season. 
In true temperate, four-season regions, warm weather succulents will grow from May to September, slowing down during peak hot temperatures in July and August. Cool weather succulents actively grow best in spring and fall. They can survive the summer heat, but require more water to keep their roots cool. Midday shade may also be welcome.

Succulent Flowering

The flowering Sedum in this upcycled wall container are spring bloomers. (Robin Plaskoff Horton)

Those looking for succulents that flower should keep in mind their various blooming cycles. Sedum produce small flowers in spring, Aloes often bloom sporadically throughout the year, jade plant (Crassula ovata) blooms from late winter to spring, while the century plant (Agave americana) blooms in 10 to 20 years, not every century as the name would imply. True cacti tend to bloom once a year, offering some of the brightest, most beautiful blooms of all the succulents.

Succulent Leaf Attributes

This textural succulent wall, by artist Marc Grañèn of Girona, Spain, shows the foliar variability of these plants. (Robin Plaskoff Horton)

Leafy succulents generally have foliage that varies from long and spiked (Aloe, Agave, Gasteria, and Yucca) to paddle-shaped, tapered, or circular (Crassula, Aeonium, Echeveria, and Graptopetalum). Many form rosettes radiating from the center with a tight cluster of leaves that are either rounded (Jovibarba) or tapered (Sempervivum). Several succulents have a central “mother” plant that produce clusters of offsets (“chicks” for Sempervivum or “pups” for Agave). Offsets may be fast or slow-growing, but their spread helps them become focal points in gardens or containers.

Creative Succulent Container Designs

This cinder block garden succulent garden by Robert Benson is thrifty and attractive. (Robin Plaskoff Horton)

The breadth and variety in succulent texture, shape, and color can be a call to action for you to exercise your creativity and try something new and different. You can literally start small with a tiny pot containing a single succulent or go big with large pots of diverse succulent gems in attractive containers. Grouping together collections of tiny pots of succulents also looks appealing.

Including potted succulents in indoor or outdoor plantings is a no brainer for xeriscaping (gardening with little water). They can also make great accents or companions for other types of low-water plants, so think outside the planter box and mix them up to make your container compositions spectacular.

Practically any container can by upcycled for succulent gardening. (Robin Plaskoff Horton)

Robin Plaskoff Horton is the founder of Urban Garden.

4-Layer Easy Rock Garden Design

Created on a slight incline, this beautiful western rock garden featuring aloes, cacti, and local stones and cobble.

Alpine succulents from the Atlas Mountains flooded into 17th-century England where the climate and soils were totally unsuitable for growing them.  This created a learning curve for English gardeners. Daily summer rains and great soil explains why their gardens are so fabulous, but succulents need high sun, fast draining soil, and occasional watering to thrive. To compensate, English gardeners learned how to build rockeries or rock gardens.

Created along a driveway slot, this layered alpine rock garden shows the adaptability of rockeries to small spaces.

They learned that succulents could survive English winters if the soil was as well drained as a mountain scree.  In the wild, alpine species thrive on mountainsides where elevated natural pockets between the rock keep them high and dry. So, the elevated English rockeries were raised with rock and pebble and created on south-facing inclines. Contemporary rock gardens in the American West use similar techniques, but the plants grown are more tender species from South Africa and Mexico.

American succulent rock gardens are easy to make, sustainable, and demand little water.  Their size can be as small as a rocky trough or cover an entire front yard, but all must be sloped or mounded for increased drainage.  They are easiest to create on a preexisting slope that receives full sun. South-facing slopes are best.

Creating Layered Rock Gardens

Rock gardens are created in four layers.  Allow plenty of time for a thoughtful arrangement of the rocks; placement really matters.  Hand place materials to resemble a natural feature where each stone looks at its best and compliments the plantings. Without careful design and placement, rock gardens can look like rock piles!

Layer 1 – Place Anchors:  Anchors are key boulders and large rocks that are higher than the final garden grade. They provide height, help support smaller stones, and reduce erosion.  Set them within the bed area in a naturalistic, irregular arrangement that’s pleasing to the eye.

Layer 2 – Cobble/Rubble:  Stones on this layer range from slightly larger than your fist to robin’s egg sized.  They can be rounded river rock, cobble, or coarse crushed stone with sharp edges that grab the soil on slopes.  Rounded rock or cobble tends to roll or slide without the structure of supporting anchor stones. Leave gaps between the anchor stones to support and raise the planting layer on top.  Leave deeper pockets for planting larger plants.

Layer 3 – Fill Soil: Pour Black Gold Cactus Mix into all the openings between the cobble/rubble layer. Pack the mix well to avoid washouts.

Layer 4 – Gravel Mulch:   Succulents of all kinds love gravel surface mulch.  It prevents the mix from washing out and reduces slope erosion.  Its addition will result in conditions ideal for both tender and hardy succulents as well as small arid grasses and perennials.

Keep Planting!

A rock garden isn’t static; it’s always changing.  Alpine Sedum will spread into crevices and along stones to create vivid mats of color.  Bright Sempervivum will send up their tall blossoms in late spring.  Gorgeous Echeveria hybrids will prove to be the perfect accent plants for hot summer weather.

Over time, rock garden soils will settle and gravel will erode, but that’s okay.  It’s a natural process.  When soil layers become too thin, add more Black Gold Cactus Mix.  To slow erosion as you add the mix, loosen the soil at the bottom, incorporate the mix, and cover with fresh gravel mulch. If you want to create new planting pockets, just remove some small- to medium-sized rocks, dig a new hole, and add fresh mix.

Locally mined stone is more affordable due to the short hauling distance.  Visit a local rock yard and take a good look at what’s available in your area before you start your rock garden. Visualize what you want, determine the garden’s area and plantings, order the rock, succulents, and bags of Black Gold Cactus Mix, and you’re on your way to a fabulous new succulent rock garden!

Gravel mulch holds soil and is the perfect cover for arid grasses and perennials. (by Jessie Keith)

Planting a Barrel Cactus Safely

The ferocious spines of the golden barrel cactus make them very difficult to pot. (Image by Jessie Keith)

The golden barrel (Echinocactus grusonii) is America’s favorite cactus. All over the Southwest, it has become a coveted living ornament in landscapes. When backlit by the sun, the bright canary-yellow spines literally glow, creating high drama against blue agaves and succulents. A big yellow cactus potted on porch or patio becomes the quintessential year-round focal point that never loses its warm color.

Large golden barrel specimens and other large barrel cacti thrive in big, strong pots if they are planted properly. What folks don’t know is that they are darned difficult to handle, and painful, too. The challenge is transplanting the stemless ball of wickedly sharp spines. The combined soil and plant weight makes golden barrel unwieldy to carry, which complicates matters further.  Here’s how to do it safely without damage to you or the plant.

Protect Yourself

potted
This basketball-sized golden barrel is planted in a perfect-sized salvaged container to allow for future growth and easy watering.

To start, you’ll need long, thick, solid-leather gloves, because picking up pots of golden barrels is a wrist and knuckle nightmare for bare skin. Loosely wrap the cactus in a piece of carpeting, or find a cardboard box that fits over the spines tight enough to “catch”. The box is a bit better because it lets you turn the cactus upside down to stand while you carefully remove the pot. This exposes the root ball and facilitates preparation for transplanting.

When inspecting the root ball, look to see if your large cactus has been field grown and recently potted up. Field-grown cacti are cultivated on slopes that provide rapid drainage. They are dug and potted up in nursery soils that typically drain more slowly and are less suited to cacti longevity because they’re viewed as temporary. To protect your investment, inspect the bottom of the plant and remove any organic matter that may provide excess moisture. Then you will want to prepare your container for planting.

Planting Barrel Cacti

bare root
Newly dug from the grower’s field, the shallow, wide roots of the golden barrel are exposed temporarily until transplanted.

Your decorative pot must be wide enough to contain the cactus and have at least 1 inch or more free space on all sides to allow for new growth, watering space, and surface evaporation. Use a concave pottery shard to dome over the drain hole to prevent erosion. Then open a fresh bag of Black Gold Cactus Mix, a fast-draining medium containing a blend of perlite/pumice or cinders, earthworm castings, and compost. It encourages vigorous growth while ensuring ample aeration and drainage.

Use dry potting soil right out of the bag when potting up your golden barrel cactus. Place a layer of soil at the base of the pot, then set the top of the cactus root ball about 1-2 inches below the pot’s edge, and hold it there while you pour in the mix around the sides. Allow the mix to filter down and lightly pack it to create a porous yet solid base.

BG_CACTUSMIX_1CF-FRONTDo not water the cactus directly after planting, and put it in a partially shaded location. Wait a couple of days before watering, so any injuries to roots during the planting process have had time to heal themselves. Then water in thoroughly. Add more potting soil where settling or pockets occur.

For more visual interest, try adding a surface layer of gravel, glazed tile shards, or tumbled glass. Place in full sun.

Finally, try raising the bottom of the pot up with broken tile shards to create a gap between the drain hole and saucer. This facilitates rapid drainage to create the perfect conditions for cacti and succulents. It also protects decks and paving from what can become a very heavy, beautiful and ferocious plant in your garden.

When in Drought, Choose Succulents

Barrel cacti, agave, and echeverias are all bold succulents for droughty landscapes.

Whenever there are statewide water cutbacks in California, everyone has to rethink some of the plants in their home landscapes. Rather than viewing this as a tragedy, make it an opportunity to dive into some of trendiest plants filling gardens of the rich and famous.  If you’ve always wanted that great, clean succulent garden look, there is no better time to make the change.

In the past, most gardeners planted annual flowers for pockets of color.  Instead, plant these same spaces with exciting and colorful succulents.  This is a great idea for high-profile areas around outdoor living spaces, pools and spas, or courtyards where you can enjoy their diverse beauty up close and personal.  Be prepared to treat them as annuals, if you live in a frosty climate. You can also overwinter them indoors. Just dig and pot them up at summer’s end to green up indoor rooms all winter long.

The Best Soil for Succulents

The single biggest problem with succulents in traditional gardens is too much water caused by over irrigation in slow-draining clay ground.  Too much water rots succulent roots and stems—killing plants quickly.  Solve the soil dilemma by creating pockets of Black Gold Cactus Mix potting soil to improve rooting conditions. Do this with larger succulents by replacing the soil one hole at the time.  You can provide even sharper drainage by amending mixes with additional Black Gold Perlite.

Sometimes succulent pots need extra water-holding amendments, especially when irrigation cutbacks start drying out your planters. Black Gold Cactus Mix has just enough water-holding capacity to keep roots growing well.


forms gilmer3
Jewel-box succulent container garden

Planting Succulent Beds

Once your soil and pots are prepared, its time to bring the vibrant echeverias, festive flapjacks, and ever-popular black aeoniums into your yard.  If you’re planting a six-inch potted specimen, dig your hole twice as wide and half again as deep as the nursery root ball.  Puncture the natural soil at bottom of the hole numerous times with a piece of pipe or rebar.  Go as deeply as you can to provide miniature sumps that encourage filtration and keep water from accumulating at the bottom of the hole.  Then fill with potting soil, and plant away.

Planting Succulent Containers

BG_CACTUSMIX_1CF-FRONTIf you have a built-in masonry planter, create a close-range jewel-box garden.  This term is used for the vivid succulent gardens that are as colorful as the contents of grandmother’s costume jewelry box.  Here you can plant a lovely rainbow of kalanchoes, flowering aloes, and geometric crassulas.  When you add hardy sedums and sempervivums, they’ll survive through the coldest winter to anchor next year’s display.

Remove the top foot of soil in the planter and replace it with cactus potting soil, then arrange your colors in drifts or swaths of small bright plants.  Accent them with sparkling slag glass, driftwood or special rock minerals and crystals for an exciting jewel-box look.

Although this California drought is a disaster for many, it may be the catalyst you need to replace water-intensive plants with exciting new succulents.  In the beginning, you may not know their names or their ultimate forms, but over the coming months, you’ll learn to recognize them and get a feel for how each grows. Though we are often averse to change in life, it’s often the doorway to our greatest accomplishments.

Raising Agave Pups

This beautiful old mother agave has produced a bevy of pups around herself to take over after she flowers and dies.

Agave are the most widely adaptable succulents, but what sets them apart is that they flower only once at the end of life and then they are gone.  It literally takes an entire lifetime for each plant to save up enough fuel to reproduce.  They do this by bolting, sending up flower stalks much like a head of lettuce does in early summer.  Some agaves can produce enormous bloom stalks up to twenty feet tall, with nectar-rich flowers raised high for accessibility to bats and hummingbirds.  Some gardeners allow the bloom stalks to remain standing until the flowers fade and the stalks dry out, while others prefer to remove them more promptly to maintain a more controlled appearance.

Agave Pups

Agaves reproduce another way to maintain their numbers when the climate is too dry for seeds to germinate.  They form “pups” around the aging mother plant.  An agave pup, or offset, is simply a new vegetative shoot that rises from the parent’s root system.  When the parent plant dies, the pups remain alive to take the parent’s place, though it takes years to fill in the ugly gap where the parent plant formerly existed.

Nature grants us the option of filling in that hole ourselves by transplanting offsets into this gap.  But for those who want to move their agave or do away with it altogether, a second option is to remove more pups and pot them up to accent yard, patio, porch or garden.  Rehabilitating a flowering agave is also the perfect way to obtain lots of new agaves for the landscape without spending a dime.  If the pups are relatively uniform in size, they can be planted in a series of identical pots for a bold visual repeat in the garden.  For this, and all other agave plantings, use Black Gold Cactus Mix that ensures free drainage so roots won’t rot.

pups
After this dead agave was removed the roots sent up a patch of new pups to be transplanted elsewhere

Transplanting Pups

Excavate pups carefully to avoid any unnecessary damage to the leaves and roots.  Wounds are the fast track for diseases to enter these succulent tissues and cause ugly brown rot.  Wash away the soil and cleanly cut the root tips that are frayed or torn from newly dug plants.  Set the prepared pups in the dry, warm shade for a week or two to callus off root tips, as well as scratches and nicks anywhere else.

Repurpose nylon window screen to cover the pot drain hole, so potting material won’t sift through the bottom.  Fill the pot 2/3 of the way full with dry potting soil and nestle the agave into the soil, then fill in along the edges being sure not to cover the base of the rosette.  (Set soil level low enough to fill the top of the pot with a lot of water when watering is needed.) Gently pat the soil down to reduce any large air pockets.

flower stalk
A single Agave desmettiana produces a tall bloom stalk to flower and set seed at the end of life.

This dry planting method is unique to cactus and succulents.  With moisture held within their succulent tissues, you need not water the transplants immediately, if outside conditions are moist and cold. Add some pieces of broken tile beneath the pot to create a gap that facilitates more rapid drainage.  If the surface soil is visible, use decorative washed gravel for a nicer appearance and to keep white perlite from floating to the surface.

With so many Agave cultivated all over the Southwest, there are always plants flowering each spring and summer for lots of free pup opportunities.  Although Agave species vary in climate preferences, when you harvest pups from local plants, you know that they are bound to do well because that’s where mom raised them.