Articles

Growing and Harvesting Popcorn

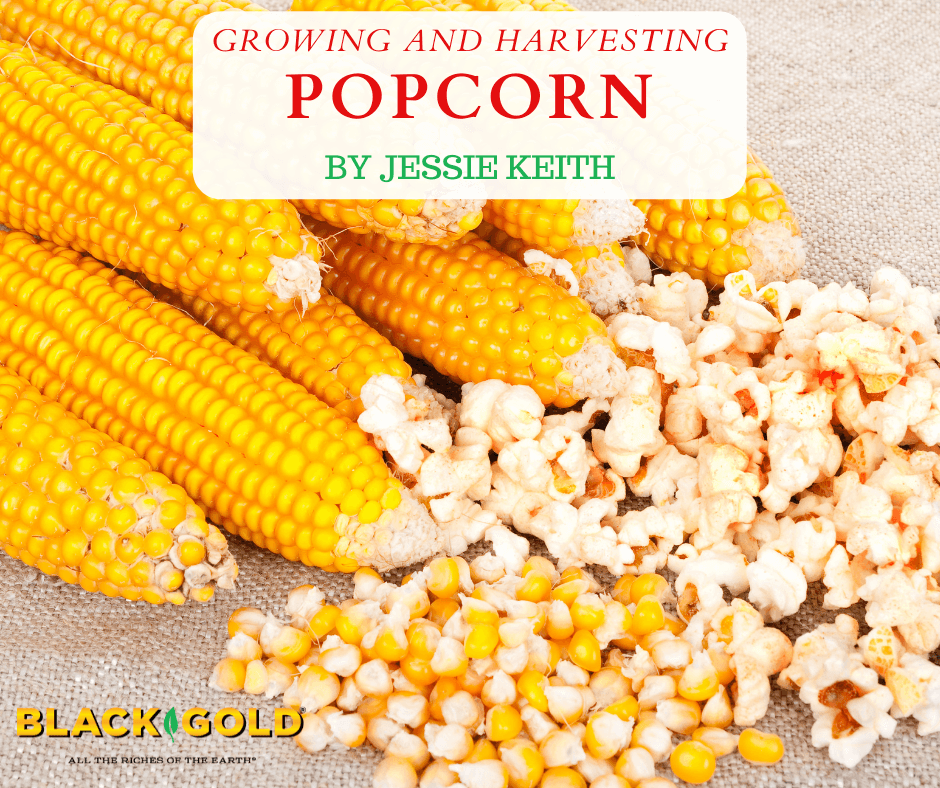
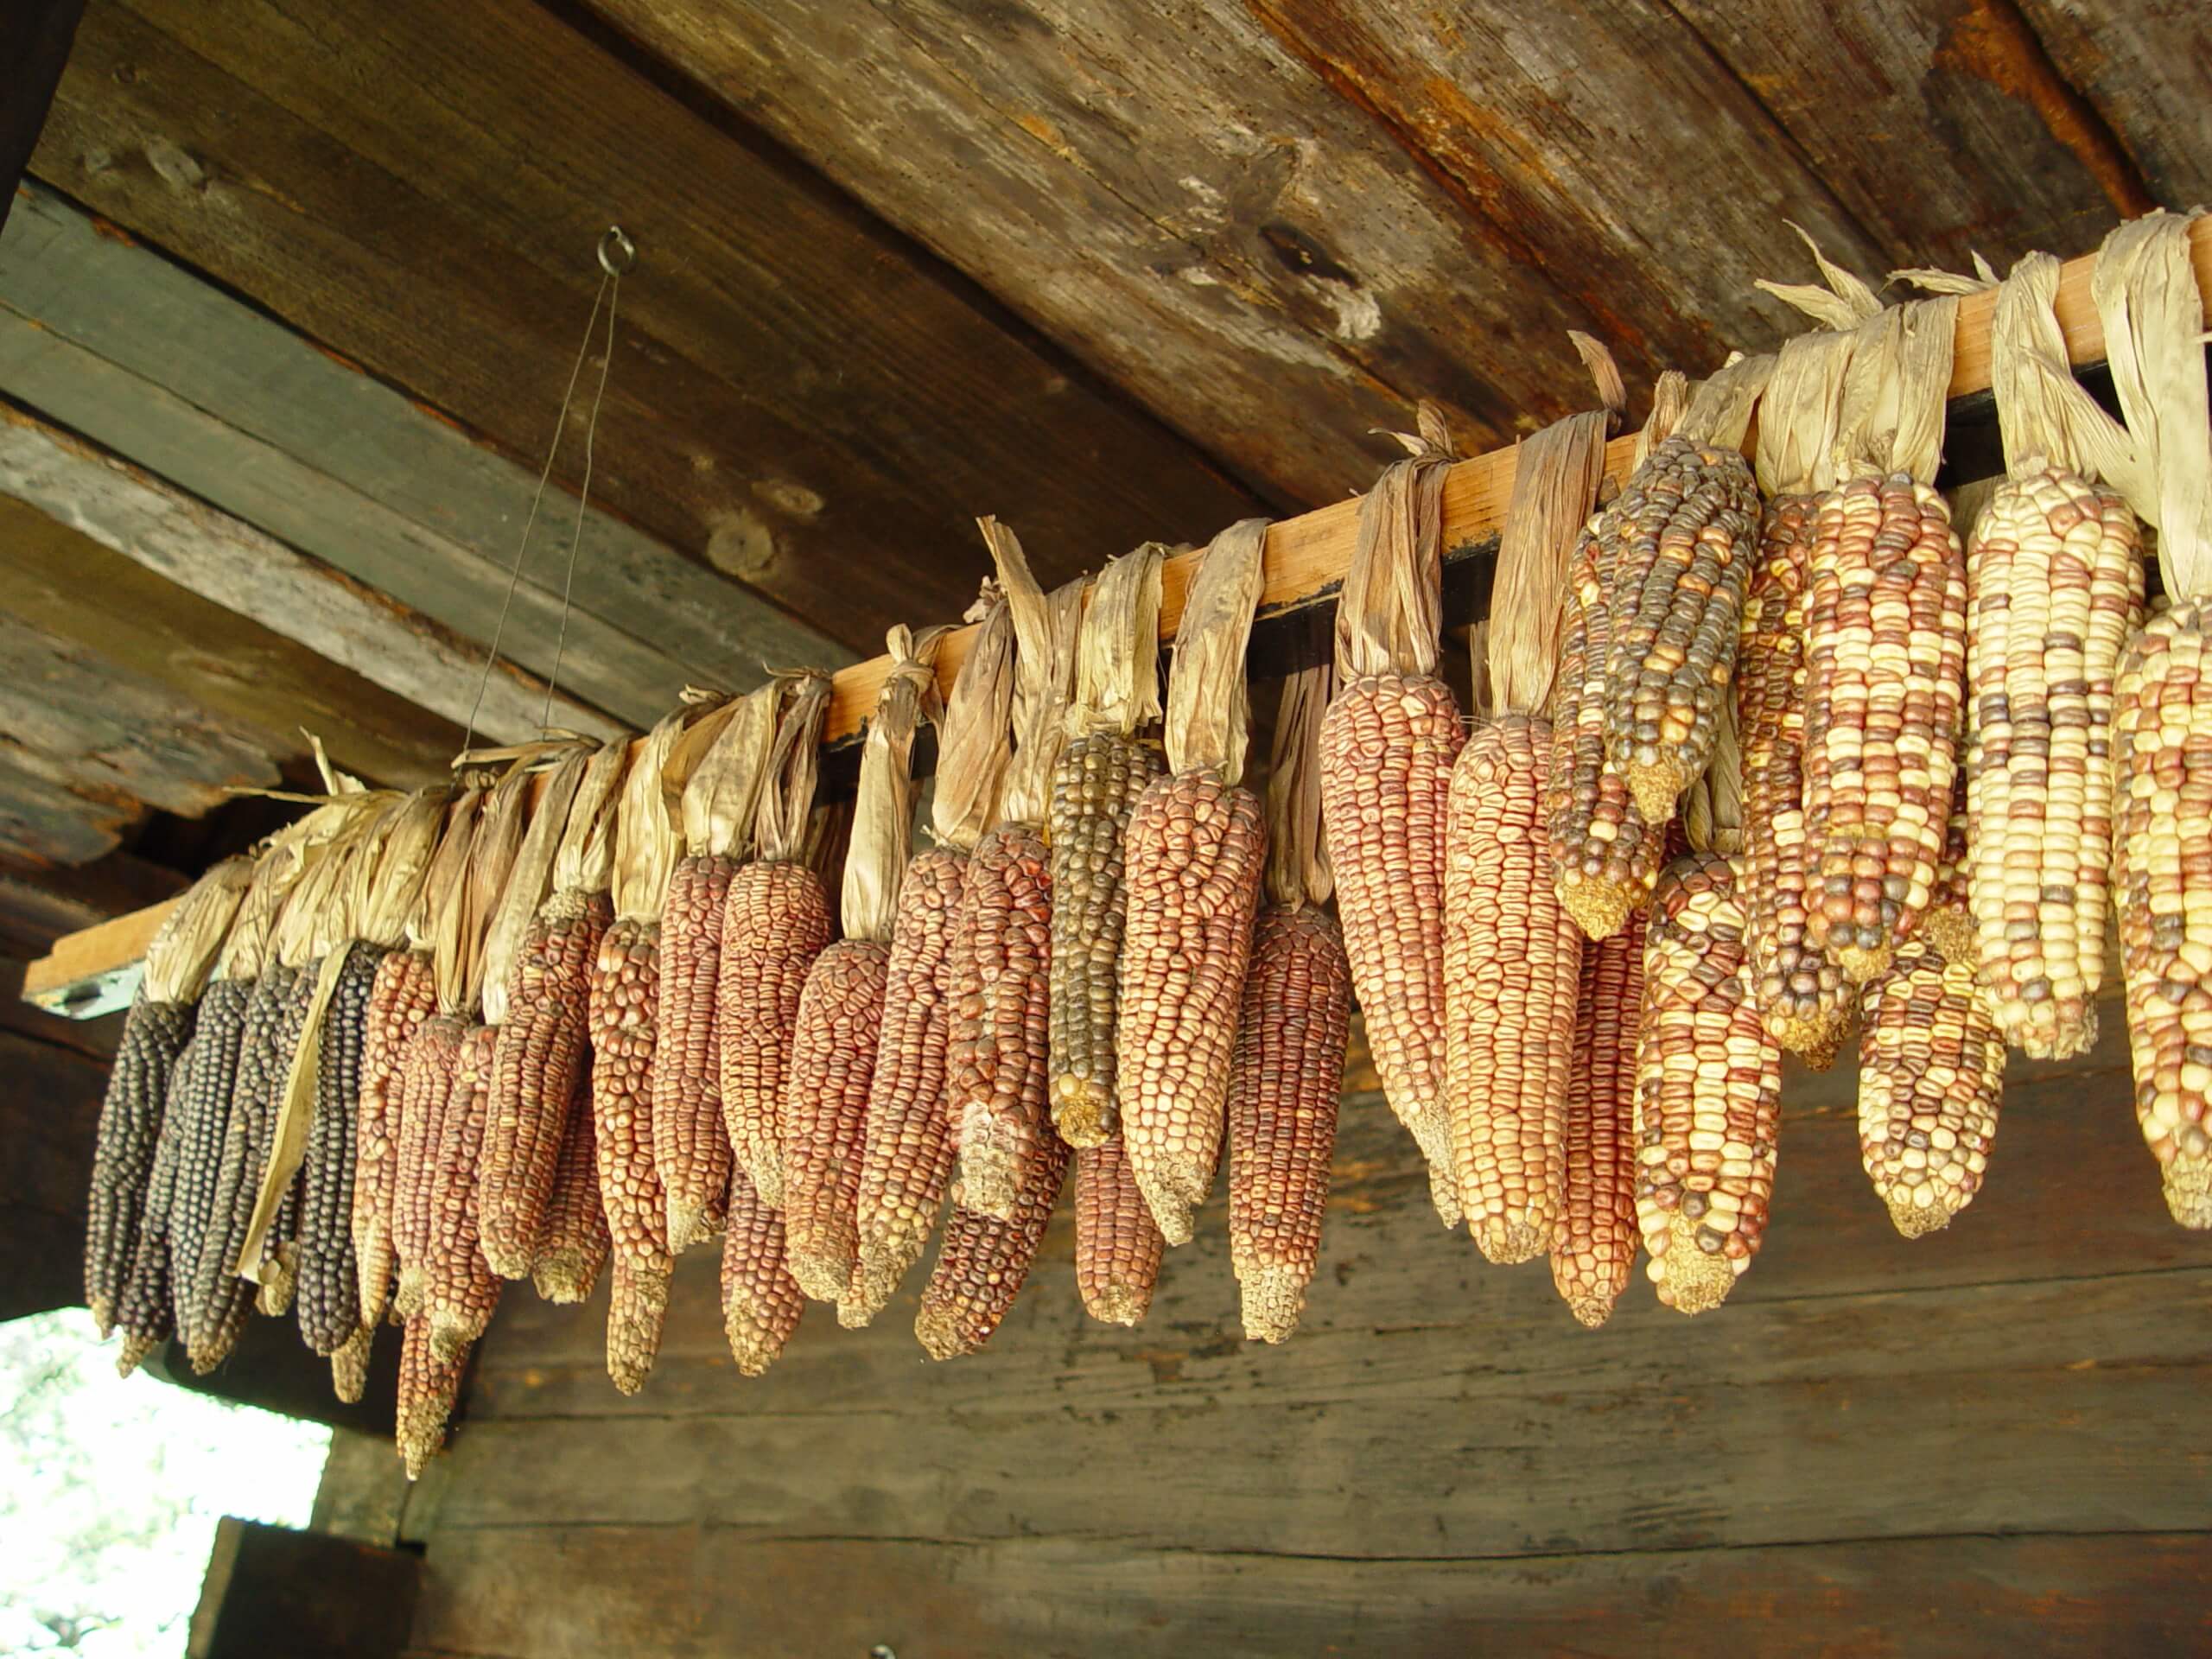
Popcorn is one of those crops that can last all year long until your next crop if you dry and store it correctly. And, as with any vegetable, growing your own offers more opportunities to try different delicious and unique types. Kids love to grow popcorn as well. There is something satisfying about picking off the dried kernels, jarring them up, and popping your first batch of buttery homegrown popcorn.

Planning one’s popcorn crop starts in mid-spring, just before corn planting time. There are several seed vendors that sell favorite, reliable varieties for new-time growers–Baker Creek Heirloom Seeds, Harris Seeds, High Mowing, Johnny’s Selected Seeds, Jung’s, and others. Many have something unique for popcorn connoisseurs as well. Most offer miniature varieties as well as large-kerneled types. I like big, fluffy popcorn, so these are the varieties I like to grow and promote.

Six Top Popcorn Varieties

‘Mini Blue’ is an unusual heirloom popping corn that yields earlier than most.

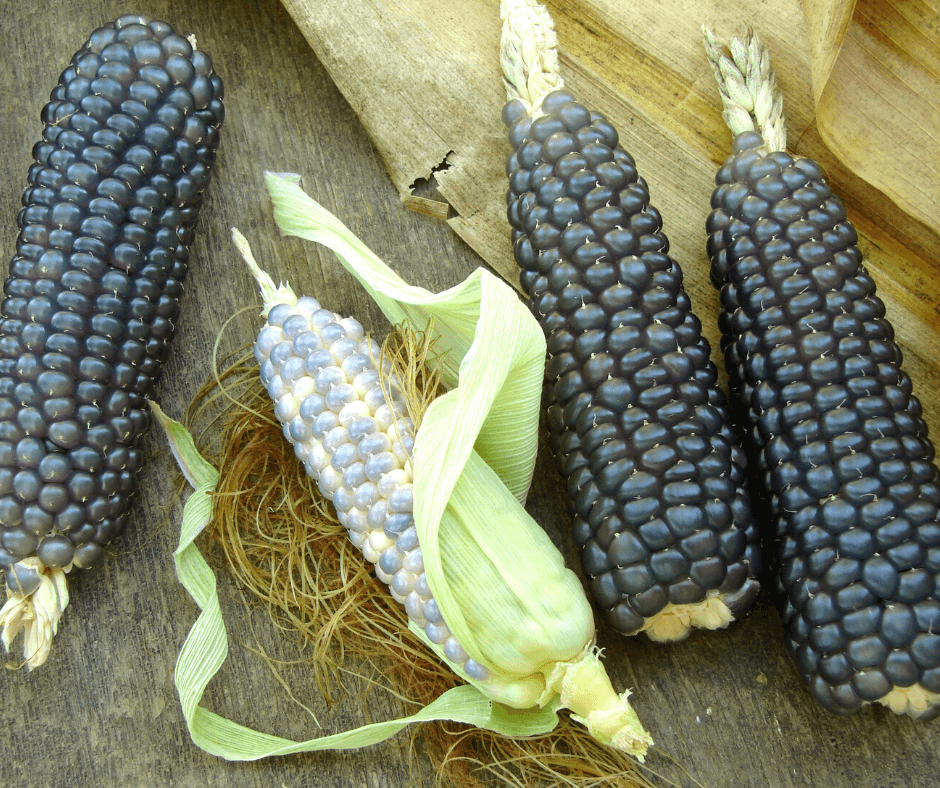
‘Dakota Black‘ (95 days) is a beautiful heirloom popcorn with lustrous black kernels that are medium-sized and extra delicious when popped. The attractive ears are 5-6 inches long when mature.

Early Pink‘ (85-95 days) has large, mauve-pink kernels that make truly lovely decorative corn until the wintertime when you can hull it for crunchy popped corn. The ears reach 5-7 inches.

Mini Blue’ (80 days) has large blue kernels on  4-inch ears that pop up into light, fluffy, flavorful popcorn. The plants are noted as being productive.

‘Mushroom’ (103 days) gourmet popping corn forms big, round, fluffy popped corn that is delicious. It has yellow kernels, long ears, and is recommended for kettle or caramel corn because it is easy to sugar coat.

‘Robust 997’ (112 days) is a reliable classic popcorn variety with yellow kernels that are large and tender when popped. The high-yielding plants bear lots of 7-8 inch ears.

‘Top Pop’ (100 days), the name says it all. It has large yellow kernels that pop up into light, tender popcorn. The plants are also productive and vigorous. It is my top pick for new popcorn growers.

Growing Popcorn

Productive popcorn stalks may produce up to five ears or more.

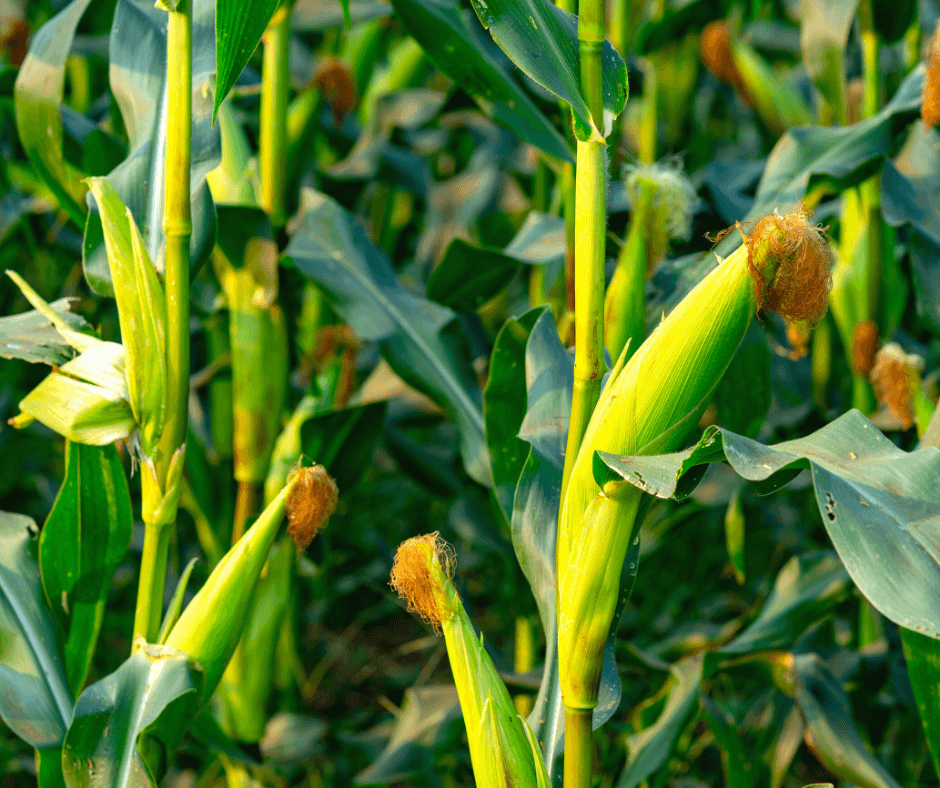
Plant corn in the ground in late spring, once the soil is warm and frost is through for the season. (Click here for your last frost date.) Popcorn needs full sun and weed-free vegetable garden soil that drains well and has average fertility and a neutral pH. Work Black Gold Natural & Organic Compost Blend into the soil before planting to increase fertility. Plant the seeds about 2 inches deep and 12 inches apart; keep them lightly moist for good germination. You will need at least three rows of six plants for reliable pollination and lots of ears of popcorn. Corn plants require heat, so once the temperatures rise, they will take off. Keep them regularly watered during times of high heat and little rain.

Popcorn Pests

There are several pests to watch out for, including corn earworms, which eat the ears from within. Apply Bacillius thuringiensis (BT), which is approved for organic gardening, to the young tassels to keep these pests away. The common fungal disease, corn smut, will distort the ears, but it is edible (read about edible corn smut here!). Fungal northern corn leaf blight may develop under cool, wet weather conditions and cause leaf lesions and seedling death. The bacterial wilt called Stewart’s wilt is less common but deadly and will cause whole plants to unexpectedly wilt and die. Choose resistant varieties if wilt and blight are problems in your area. Corn-belt states (western Indiana, Illinois, Iowa, Missouri, eastern Nebraska, and eastern Kansas) tend to have higher instances of disease.

Drying and Storing Popcorn

Mature ears can be hung to dry or left to dry on the stalk.

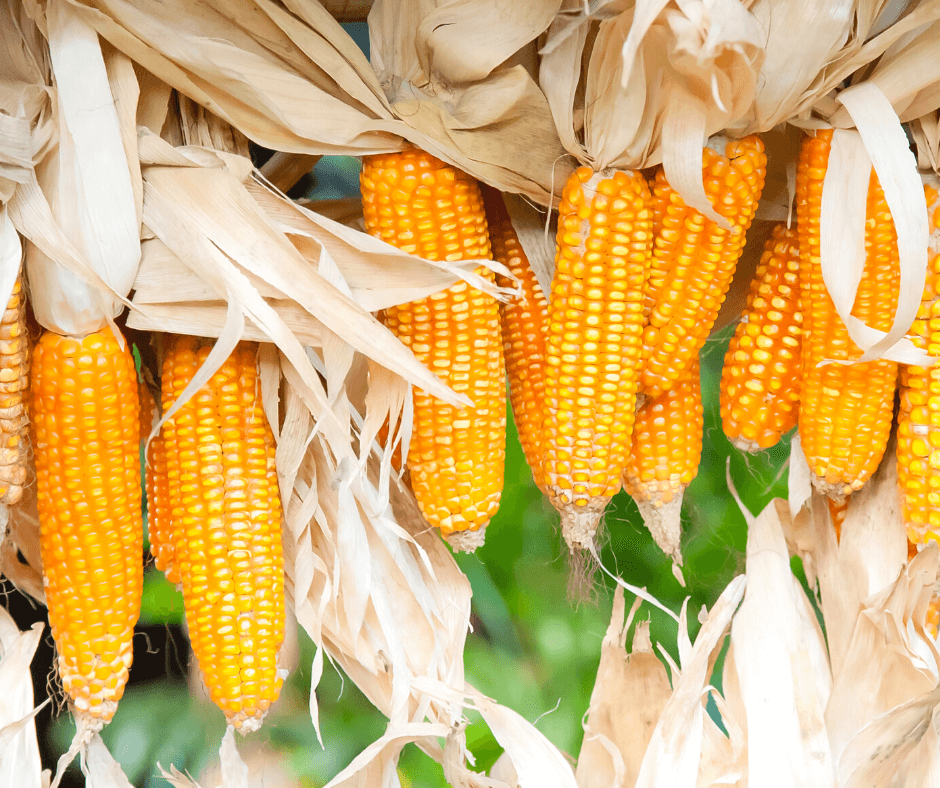
There are several ways to dry popcorn. If weather conditions are hot and dry, then allow the ears to dry on the plant as you would with field corn. If you are concerned about too much rain, then let the ears fully mature and begin to dry. Then, harvest them and finish drying them by hanging them in a cool, dry place. You will know they are ready when the leaves, top of the cob, and kernels feel dry.

You can leave them on the cob, or for easier popping, you can pick or hull the ears. It’s a fun job to do, so invite the kids to help. Simply pick off the dry kernels, and place them in a glass jar with a tight-fitting lid for storage, and place it in a cabinet close by to pop whenever you want!

Perfect Stovetop Popped Corn

Fresh popcorn is the ultimate wintertime treat.

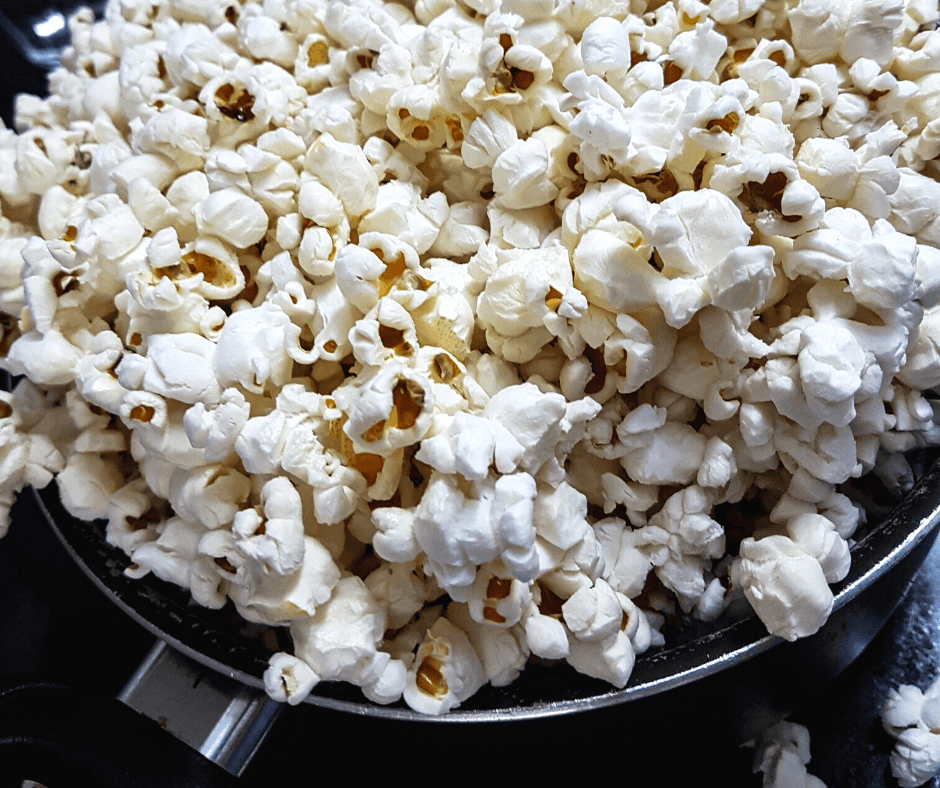
I prefer to pop popcorn the old-fashioned way, in a tall pan with a little oil and a tight-fitting lid. My greatest key to success is shaking the pan every minute or so to make sure that the popcorn does not become too brown or burn.

  • 2 tablespoons canola oil
  • 1/3 cup popcorn
  • 1 to 2 tablespoon/s butter
  • sea salt to taste

Heat the oil in the pan on medium to medium-high until sizzling. Add the popcorn kernels, put down the lid, and shake the pan intermittently to keep the popcorn moving. Listen carefully once it starts to pop. Most of the corn will pop up within a minute or two, but there are always a few that are late to pop. I usually wait until I hear 30 seconds of silence before taking off the lid to add the tablespoon of butter down the side of the pan to melt. Wait another 30 seconds for the butter to melt, and then toss the popcorn in the pan with the lid on to distribute the melted butter. Finally, shake it into a bowl and add salt to taste.

You can also add parmesan cheese, garlic salt, rosemary, cheddar cheese dust, ranch seasoning, or other flavors to make your popped corn extra tasty.

When Is the Best Time to Plant Corn in Northwest Oregon?


Best Time to Plant Corn in Northwest Oregon

“What is the best time to plant corn in Northwest Oregon at Zone 8?” Question from Joseph of Milwaukie, Oregon

Answer: Your last frost date in Milwaukie, Oregon is March 31st, and your growing season is approximately 222 days long, according to the Old Farmer’s Almanac. Corn likes to germinate when the soil and growing conditions are warm, and most corn varieties take between 65 to 75 days to produce ears if there is enough sunlight, warmth, and moisture. So, I would recommend planting your corn as early as mid-April. With such a long growing season, you can also start a second planting in mid or even late May, if you have space. (Click here to learn more about successfully growing and selecting sweet corn.)

Planting Corn

Plant corn in the ground in late spring, once the soil is warm and frosty mornings are long gone. Seeds should be planted about 2 inches deep, 8-12 inches apart, and kept lightly moist for good germination. Plant them in no less than 3 rows of 6 to ensure even pollination and good harvest. Provide full sun and tilled soil that drains well and has average fertility and a neutral pH. Working Black Gold Compost Blend into the soil before planting will increase success. Once temperatures heat up, plants will take off. Keep them well irrigated but not wet. Ears will be ready when they are plump, the husks are green, and the tassels have turned brown at the tops.

Happy gardening,

Jessie Keith

Black Gold Horticulturist

Three Sisters Gardens

Along the flood plains of America’s rivers, indigenous tribes cultivated crops for centuries.  Before levees, rivers spread out far and wide, yet shallow, with each spring flood depositing yet another layer of rich silt upon those from millennia past. These tribes grew the three sisters of Native American agriculture: corn, squash, and beans.  Growing in the three-sisters style is a great way to teach youngsters or to create a family project that demonstrates much about gardens, climate, and history.

087
Winter squash benefits from the shelter of the corn and beans.

The Benefits of Three Sisters Gardens

Unlike our farm-row monoculture plantings, three sisters agriculture plants all three crops close together on a single mound of earth. First, the corn is sown, germinates, and produces a young stalk.  Next, the beans are sown next to the corn to climb that stalk.  Like other legumes, beans fix atmospheric nitrogen into the soil to fertilize the heavy -feeding corn.  Winter squash is third, which benefits from the shelter of the corn and beans while the large squash leaves shade soil to keep root zone temperatures lower under each mound.

This easy backyard garden project is adaptable to different size spaces by adjusting the mound’s dimensions. It can be just 18″ in diameter for small spaces or for large gardens go up to four feet with proportionately more plants.  While irrigating with drip systems, some like to create a depression in the center of the mound that allows for an occasional deep watering ideal for hot dry days.

In the riverbank Indian villages, they saved bones and other leftovers from their fish preparation to fertilize the mounds. The heads, bones, fins, and organs were buried deep into the mound to decompose there and release important nutrients throughout the growing season.

Creating a Three Sisters Garden

ajaxhelper
Buffalo Bird Woman of the Hidatsa tribe.

When creating your own mounds, blend in generous amounts of Black Gold Garden Compost Blend to increase humus levels and overall fertility.  To boost microbe and micronutrient content work Black Gold Earthworm Castings Blend into the surface soil where the seeds will be sown.  In lieu of fish heads, which attract pests, install pockets of fertilizer deep within the soil mound where roots can find them for long-term availability to the plants.

Virtually any corn, squash or climbing beans can be used, but heirloom varieties of these American plants will be closer to those grown by the Indians. In the west explore Native Seed/SEARCH online for rare strains grown by tribes in the desert and northern Mexico.  These are the original three sisters varieties developed by Pueblo farmers, but those heirlooms grown by tribes in the north and east are adapted to shorter growing seasons.

bookThe river gardens were closely protected during the growing season by tribal members who kept a sharp eye out for marauding wildlife or theft. Often young women sat upon an elevated platform for a better view of the field and sang while watching for stealthy young men who’d steal the fresh ears to cook for themselves, and in the process, many marriages found their start amidst the “sisters”.

Buffalo Bird Woman’s Garden is a reprint of the 1917 book that documents the Hidatsa tribal gardens on the Missouri River flood plain. In this personal account, you will learn everything about the gardens and the role of women within them.  Most of all we learn from Buffalo Bird Woman just how intimate these indigenous people were with their crops:  “We cared for our corn in those days as we would care for a child; for we Indian people loved our gardens, just as a mother loves her children; and we thought that our growing corn liked to hear us sing, just as children like to hear their mother sing to them.”

Three Sisters On The Mound

indian cornSister #1 Maize   Any kind of corn grows this way but heirloom varieties are shorter with strong stout stalks.  If you find decorative Indian corn in the store and love the color, save those ears in a cool dry place to plant in your three sisters garden next year.  Order Indian corn seed online for the widest selection, particularly the new Glass Gem popcorn.  Small mound: 4 or 5 seeds 6″ apart.


Bean Diversity3Sister #2 Beans   For this growing method use standard climbing beans.  Most indigenous tribes grew beans for drying and winter storage, but any green bean that climbs is fine.  Small mound:  4  beans close enough to corn for easy climbing.


Navajo Tail SquashSister #3 Squash  Winter squash were harvested, sliced, strung onto sticks and dried in the open air before storage.  Stick with one variety to avoid cross-pollination.  Small mound:  2 seeds, one on each side of the mound.

Mexican Truffles or Huitlacoche

Fresh huitlacoche being sold fresh at summer market.
Fresh huitlacoche on display at summer market. These ears sell 50 times more than standard ears.

In polite company it’s called the Mexican truffle, but in the American corn belt it’s nothing but common smut (Ustilago maydis). In fact, the USDA has been trying to eradicate it for a century. If you have ever seen a smut infested ear of corn, you’d know why this bizarre sooty looking fungus freaks people out. No doubt backyard gardeners in the Midwest will see it often during rainy summers because the fungus thrives in warm, wet weather.

Huitlacoche

But, in other cultures the fungus is cherished like a select and delicious mushroom truffle. First appreciated by the Aztecs, the Mexican truffle was incorporated into many of their ancient dishes and named huitlacoche (wee-tlah-KOH-cheh). The translation from the Nahuatl language is “crow excrement”, which describes its unsavory appearance. Despite odd looks, this flavorful food is still a big part of Mexican cuisine today. It’s integrated into tamales and soups, or fresh puffed up kernels, called “galls”, are boiled for ten minutes then sautéed until crispy in butter. Cans of the fungus are commonly sold in indigenous marketplaces. Fresh ears can be found in summertime and are easily preserved by freezing.

Harvesting Huitlacoche

A huitlacoche on developing corn.

The traditional time to harvest Mexican truffles is when the infected kernels are puffy and white in their early state. At this time they are like mushrooms before their gills open. Some say they should be as soft as a freshly ripened pear. At peak the flavor is described as sweet corn and smoke. Waiting too long results in a truly smutty flavor because the kernal insides turn from delicious white flesh to masses of black spores. When sporulating kernels split open the spores are released traveling on the wind to nearby corn plants or soil. In the soil they can remain viable for up to three years.

In the wet central highlands of Mexico and Guatemala, small farmers search their crops during the rainy season for signs of the developing fungus. Infected ears are relished in home cooking and add to the sparse early season diet. Early collection of infected ears probably protects later crops from smut infestations as well. It’s profitable too. Farmers sell excess ears at fifty times what a standard ear of corn costs. In the markets of Mexico City over 100 tons of Mexican truffle are sold each season.

Huitlacoche Gains Popularity

An infected ear just beginning to produce smutty kernals.

Interest in pre-Hispanic ingredients has risen among those in the organic gourmet world. One famous dinner held in 1989 by the James Beard Foundation featured huitlacoche in many dishes in an effort to bring this new-yet-old food to light. As a result, the USDA began allowing select farms to intentionally infect corn with the fungus. The irony here is that scientists at the USDA working to eradicate smut discovered new, effective ways to infect corn with the fungus in order to test various cures.

In America, those most interested in huitlacoche cultivation are mushroom farmers who best understand the life cycle of fungi. But this is a unique form that only reproduces on corn ears, so it really falls into the purview of market gardeners. The Aztecs simply scraped the plants on the ground or with dried fungus to infect the kernels. Home gardeners could do the same if they were able to access dry infected ears. Kernel galls appear 10 to 14 days after point of infection.

It’s Just a Mushroom!

Uninfected meal corn ears air drying.

Despite the fact that it’s a delicacy in Mexico, this edible fungus has a hard time catching on in the U.S. and Europe. Perhaps it’s the black juice exuded as they are cooked, or maybe it’s just the idea of eating diseased corn that’s a turn off. Either way, those willing to try it should go fresh. The consensus is that the imported canned Mexican truffles are not nearly as good.

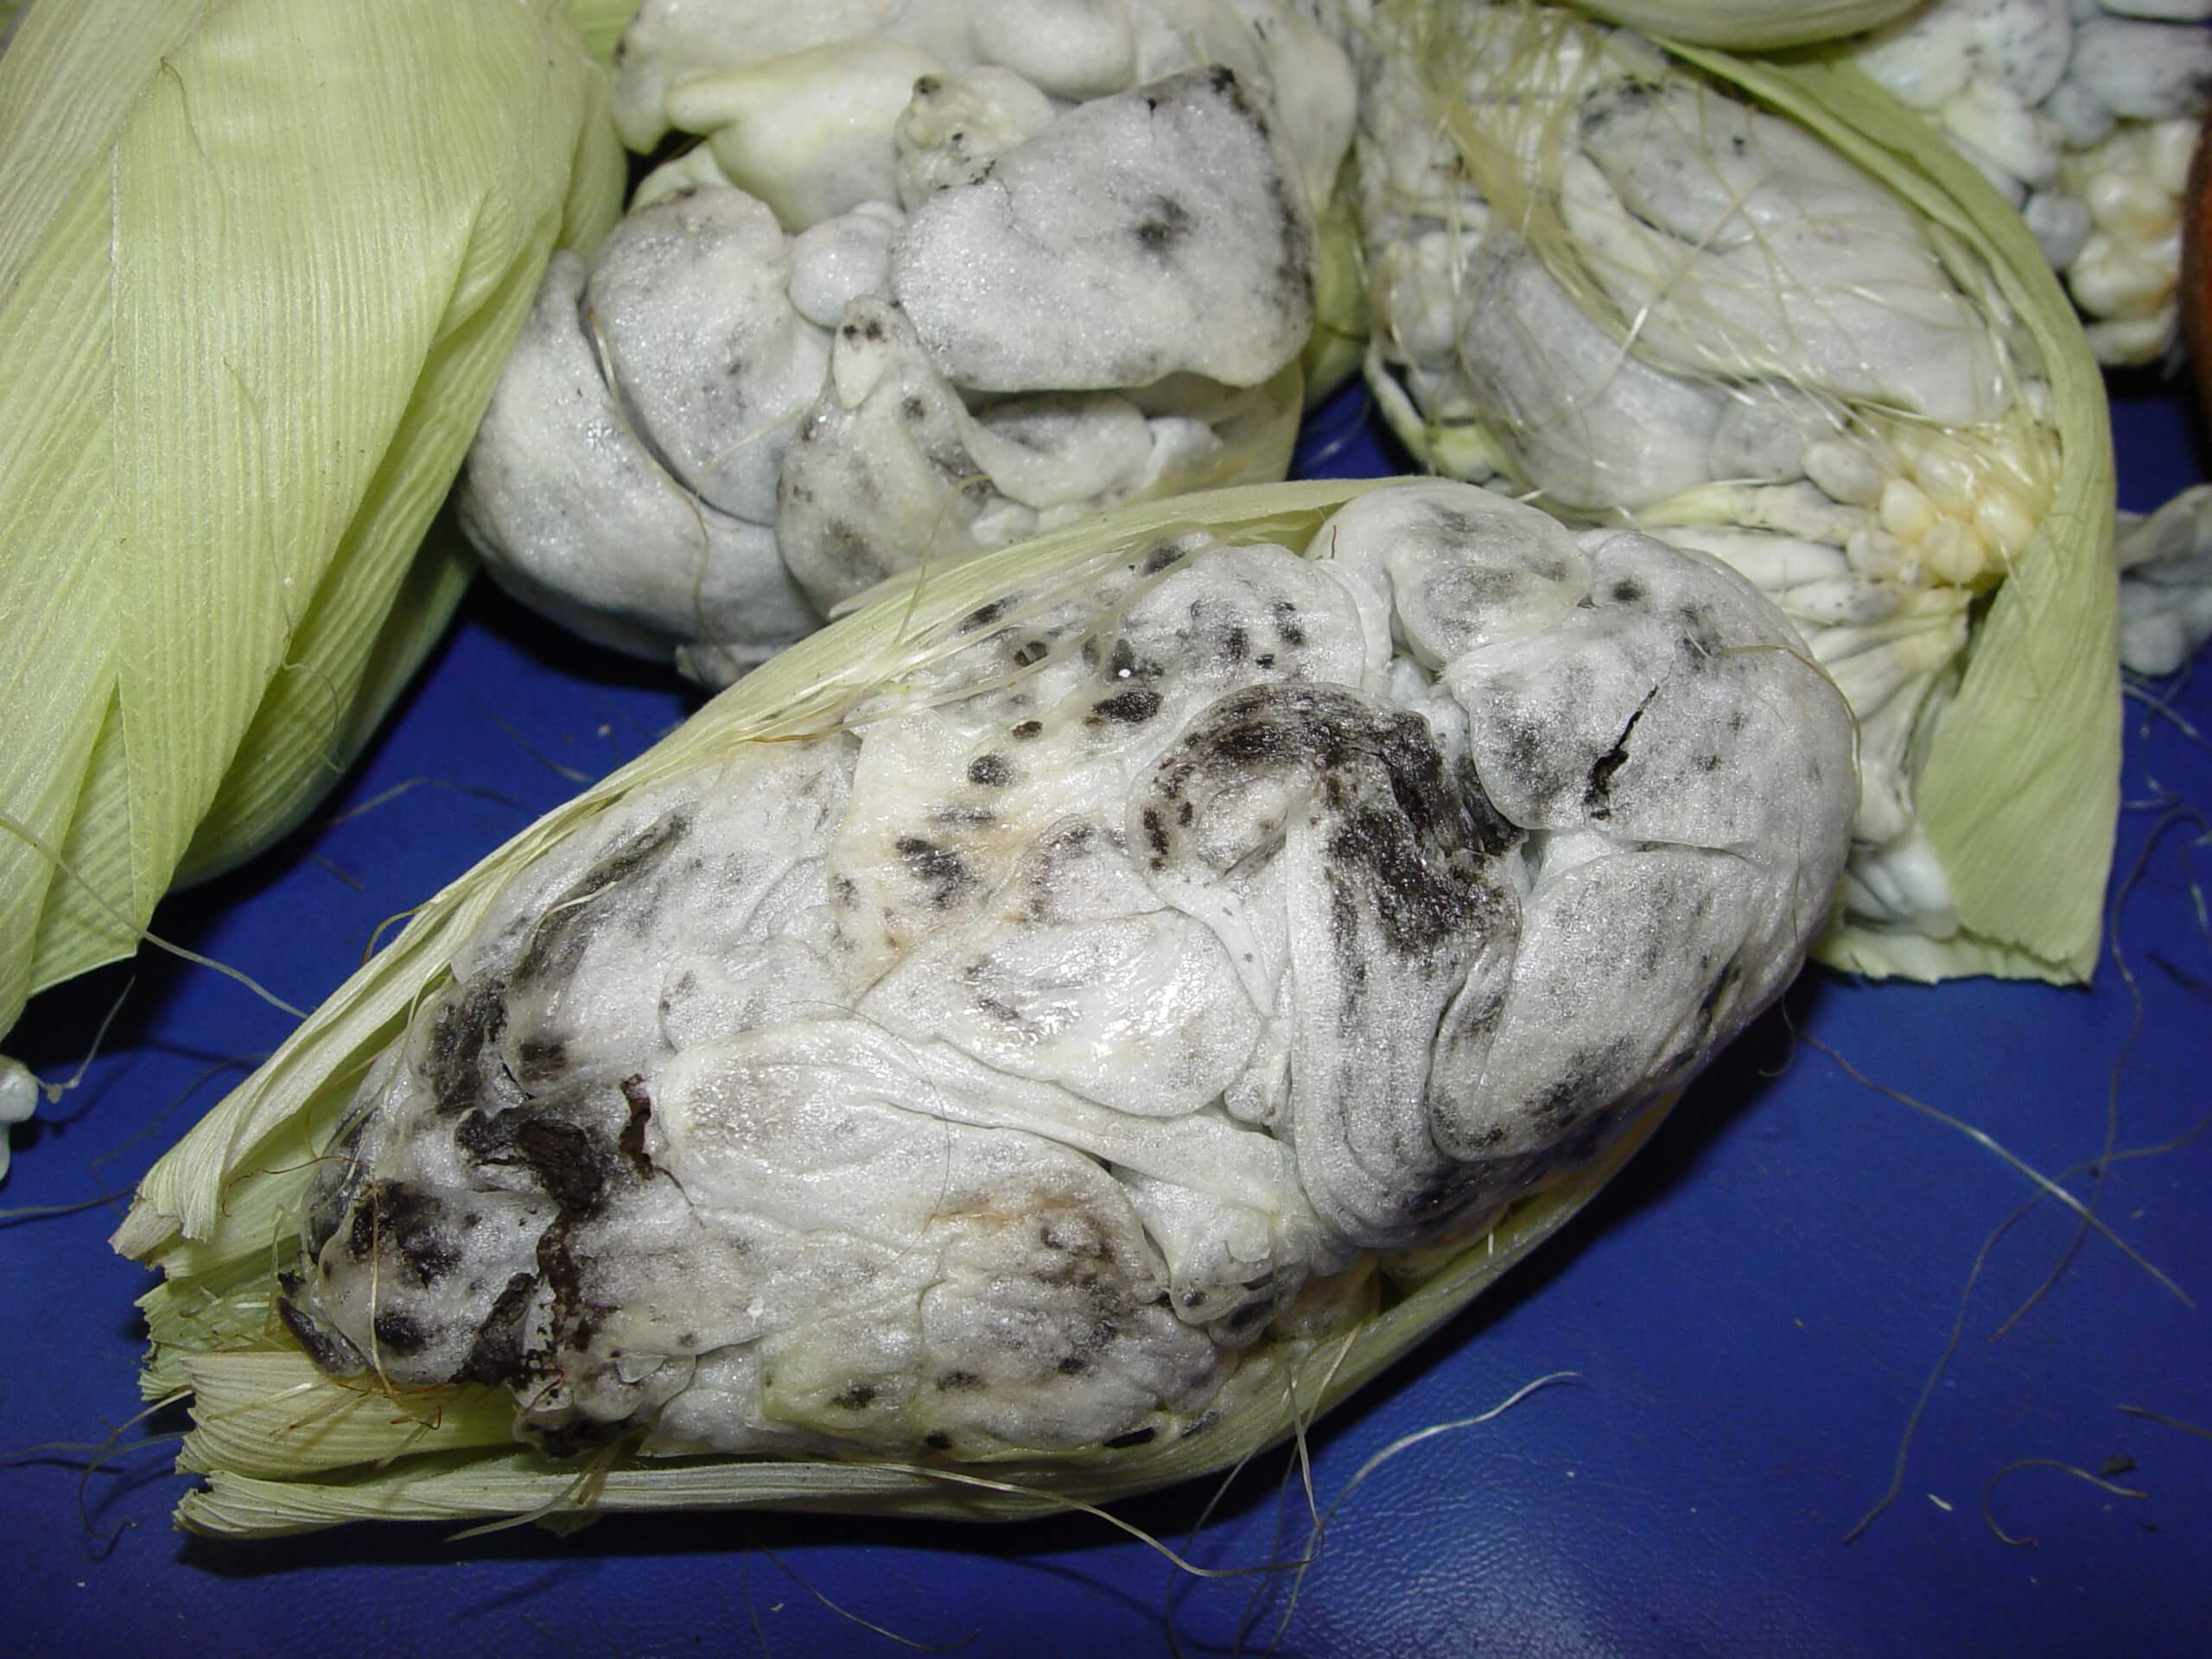
And it may not be difficult to find fresh ears in some parts of the country. For Midwestern gardeners in frequent flood zones, there is little doubt that what sweet corn is not destroyed by flooding will invite the sooty face of smut. Gardeners can always give their corn plants a fighting chance by planting them high in raised beds with well-drained soil amended with Black Gold Earthworm Castings, but under warm, moist conditions little can help against fungal disease. So why not welcome Mexican truffles as a new culinary adventure? Explore recipes on the Internet for preparation of the fungus in traditional Mexican dishes. Heirloom corn is even more prone to infection, for gardeners that are game.

In these years of climatic upheaval and instability, it’s always a comfort to discover interesting and nutritious new food in the wake of disaster. And for home gardeners with the spirit of adventure, corn-turned-mushroom will bring a strange but savory taste to late summer fare.