Articles

How Long Should My Pineapple Top Stay in Water Before Planting?

How Long Should My Pineapple Top Stay in Water Before Planting?

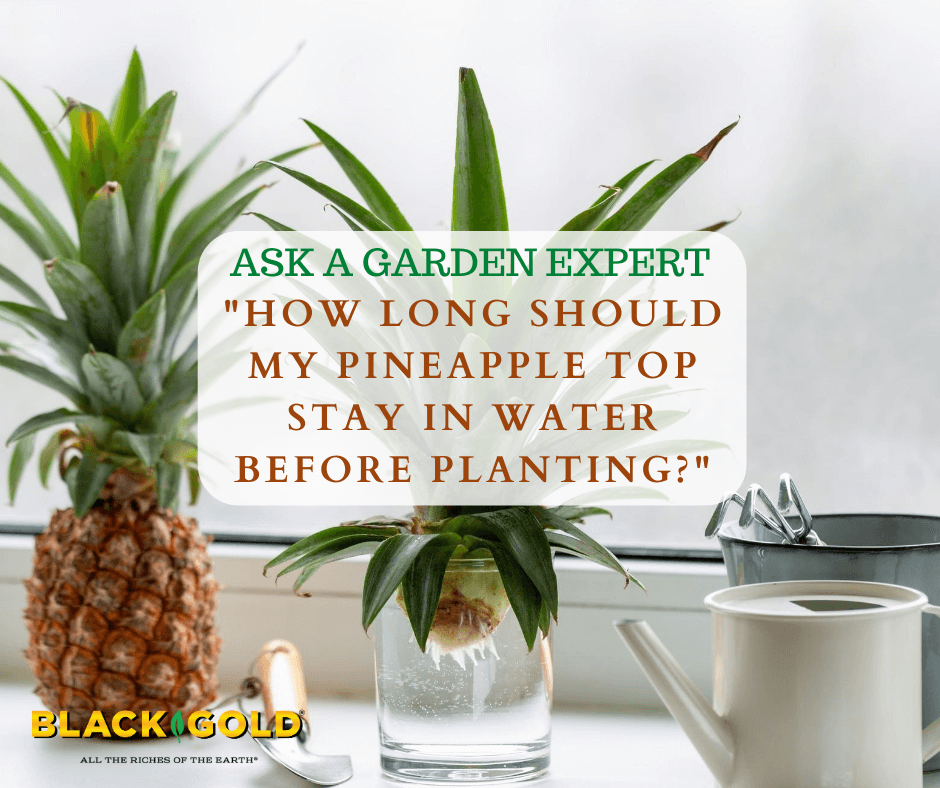
“How long should I keep my pineapple plant in water before planting?” Question from Daniel of Omaha, Nebraska

Answer: It is always fun to start your own pineapple plants from tops! And, if you give them the right care, they may even produce fruit for you–even more exciting! You will know that your top is ready to plant when it has developed roots that are 2 to 3 inches long or longer. To plant it correctly, follow these steps.

How to Plant and Grow a Pineapple

  1. Prepare your pineapple top for planting after it has developed roots that are 2 to 3 inches long or longer.
  2. Choose a pot that has drainage holes at the bottom and is at least 8 to 10 inches across.
  3. Use a fast-draining planting mix suited for bromeliads, like pineapples. Black Gold Cactus Mix is a good choice.
  4. Fill the pot with soil until there are 4 inches of headspace at the top. Place the pineapple top in and cover its roots–being sure to leave 2 inches of space at the top of the pot for watering.
  5. Water your pineapple until water runs through the pot and fills the saucer at the bottom.
  6. Place your pineapple in a sunny spot indoors. Water it every three days or so.
  7. After one week, feed it with a water-soluble fertilizer formulated for bromeliads. From there, feed it monthly.

Pineapples grow best in warm rooms (65 to 95 degrees Fahrenheit) with good humidity. Occasionally spritzing the leaves with bottled spring water can be helpful. Once your plant begins to grow and fill out, it may take several months to a year before it sets fruit.

Happy gardening!

Jessie Keith

Black Gold Horticulturist

What Hardy Roses will Tolerate Partial Shade?

What Hardy Rose will Tolerate Partial Shade?

“What rose will tolerate dry partial shade in zone 5b?” Question from Trish of Newton, New Jersey

Answer: Most roses are full-sun shrubs that require 6 or more hours of sun per day and average water, but there are a few that can take partial shade (4 to 6 hours of sun per day). Amending the soil with peat moss, applying a 2-3-inch layer of quality mulch, and providing them with drip irrigation are simple fixes that will overcome dry soil troubles.

Roses Tolerant of Partial Shade

Most shade-tolerant roses are contemporary varieties of antique shrub roses. Some of the best have been bred by the English rose breeder, David Austin (click here to view 6 David Austin roses for partial shade that are hardy to your zone). Another for partial shade is the apricot-flowered shrub rose Roald Dahl, which I have growing in my garden. The ever-blooming shrub rose is quite fragrant and easy to grow. If you are interested in a climbing rose for partial shade, try the French antique rose, ‘Zéphirine Drouhin‘. Its large, rose-pink flowers are fragrant, and its twining stems are thorn-free–another bonus.

To learn more about how to grow roses, I recommend watching the video below.

Happy rose growing,

Jessie Keith

Black Gold Horticulturist

Do Blueberries and Strawberries Need to be Fertilized?

Do Blueberries and Strawberries Need to be Fertilized?

“Do blueberries and strawberries need to be fertilized?” Question from Melanie of Holton, Michigan

Answer: Absolutely! Fertilization will encourage better growth, flowering, and fruit set. Each berry type has different needs when it comes to fertilizer.

Fertilizing Blueberries

Blueberries grow best in more acid soils (pH between 4.5 and 5.5) and require a specialty fertilizer formulated for acid-loving plants and/or berries. I generally fertilize in spring with a continuous-release fertilizer, but how you fertilize will depend on the product you choose. Follow the manufacturer’s application recommendations. There are many types of blueberry shrubs. To learn more, watch our video all about choosing and growing blueberries.

Fertilizing Strawberries

Strawberries like soils with a more neutral pH, and are less fussy. To encourage berry production, choose a specialty fertilizer formulated for strawberries or berries. There are many on the market. If your strawberries are June-bearing then I recommend fertilizing them in early spring and again later in the season, depending on what fertilizer you choose. If your strawberries are everbearing, then I would fertilize them with a continuous-release fertilizer in spring as well as a water-soluble fertilizer that will encourage them to produce berries through summer. For more information about growing strawberries watch this video.

I hope that this information helps!

happy berry growing,

Jessie Keith

Black Gold Horticulturist

Where Can I Buy Campari Tomato Seed?

Where Can I Buy Campari Tomato Seed?

“Where can I buy Campari tomato seeds for plants?” Question from Rena of Morehead City, North Carolina

Answer: The seed for commercially available Campari tomatoes is generally difficult to find (click here for a possible source), but there are many comparable well-branched, tasty, cocktail tomatoes that taste even better. ‘Mountain Magic’ is one to try that rivals Campari. Another is one of my personal favorites, the Italian heirloom ‘Principe Borghese‘. Its large stems of delicious fruits look like those of Campari, taste great, are ideal for salads, and even make perfect sun-dried tomatoes.

From there, I encourage you to watch the video below about growing tomatoes from seed to harvest.

Happy tomato growing!

Jessie Keith

Black Gold Horticulturist

When is the Best Time to Plant Lettuce in California?

When is the Best Time to Plant Lettuce in California?

“When generally is the best month to start lettuce planting [in California]?” Question from Rebekah of Clovis, California

Answer: Lettuce is a cool-season crop, which means that it thrives in cool weather and can even take a light frost but not hard freezes. When the weather becomes hot, most lettuce varieties quickly become bitter-tasting and set seed (bolt).

Based on the Clovis climate summary, your weather remains cool enough for lettuce from October through to April or May. Within this time, you should be able to grow more than one crop. Just be sure to grow it in fertile soil and keep the beds well irrigated during dry weather. We recommend drip irrigation for dry California climates. (Click here to learn about adding drip irrigation to raised beds.)  If you anticipate an unexpected frost, cover your plants with frost cloth.

Clovis, California Climate Summary

I encourage you to watch the following video about the 10 best lettuce varieties and how to grow them from seed.


Happy lettuce growing,

Jessie Keith

Black Gold Horticulturist

How to Grow Your Own Blueberries

Everyone who loves to grow their own food should grow their own blueberries. Blueberries are ideal for edible landscaping. They grow well in-ground or in containers. They’re bushy, attractive, and their leaves turn brilliant shades of orange, purple, and red in fall. Before adding them to your yard or garden, it’s good to know what types are available. You will be glad that you learned how to grow your own blueberries.

Blueberry Varieties Listed

Highbush Blueberries: ‘Blue Ray’ has extra-large-fruits early to mid-season, ‘Duke’ is high-yielding with upright shrubs, and ‘Elliott’ is a good late-producer.
Rabbiteye Blueberries: ‘Tifblue’ has large berries midseason and ‘Brightwell’ produces large clusters early to midseason.
Southern Highbush Blueberries: large-fruited ‘Cape Fear’, robust ‘Sharpblue’, and upright ‘Legacy’, which has very large, tasty fruits.
Designer Blueberries: The boxwood-like Blueberry Glaze® and cute, round Jellybean® have delicious fruit, tidy habits, and bright fall color (from Bushel & Berry).

Click Here for the Step-by-Step pdf About How to Grow Your Own Blueberries

Why Are My Verbena’s Leaves Pale?

Why Are My Verbena’s Leaves Pale?

“Most of the leaves on my verbena have become very pale.  Not yellow, just faded looking.  The plant is still blooming, but the foliage doesn’t look healthy.  Any thoughts on what’s going on?” Carlene of Conroe, Texas

Answer: Pale leaves are often a sign of stress, whether it be stress caused by excess heat, excess water, too little water, poor soil, a nutrient imbalance, or some other malady. Yours appear to be chloritic, but the discoloration is white and almost speckly, which is most likely spider mite damage. There also appears to be additional spotting. It is very challenging to provide a definitive diagnosis from a photo, so let me start with what Verbenas need for good growth and follow up with some additional suggestions for the possibility of mites.

Tips for Growing Verbena Successfully

Verbenas grow best in full to partial sun, and even though they are tolerant of hot weather, they should be provided partial sun during the hottest time of the day down in Texas. Plant them in average to fertile soil with excellent drainage. Once they are established, they will tolerate drought, but regular water makes plants happier. If they are in containers, water them daily and make sure the pots drain freely from the bottom. Fertilizer is recommended to keep them blooming all summer long. I recommend feeding them with Proven Winners Premium Continuous Release Plant Food because it is formulated for flowers, and you won’t need to feed weekly. If they become a little overgrown, consider cutting the old stems back to encourage new branches and flowers.

Identifying and Managing Spider Mites

These are tiny plant pests, and once you notice their damage, they are numerous and have already become a large problem. You will notice the damage when the tops of leaves look like they have little white spots across them. These are dead leaf cells that the mites have sucked dry. You might also see little webs on the leaves and tender stems of infected plants.

To see if you have mites, take a clean piece of white paper, hold it beneath the leaves, then tap the leaves onto the paper. If you have mites, lots of tiny specs will fall, and eventually, they will start crawling around. These are spider mites!

To manage them, remove the worst of the damaged leaves if you can. Then spray, wash, and wipe the remaining stems and leaves thoroughly. For potted plants, remove the top inch of potting soil and replace it with fresh. (We recommend using Black Gold All Purpose Potting Mix.) It also helps to wipe the container down, in case any mites have strayed. Finally, spray the plants with insecticidal soap or Neem oil (especially underneath the leaves). Continue to do the tap test and wipe and spray leaves as needed. In time you will overcome your spider mite problem.

I hope that these tips help!

Jessie Keith

Black Gold Horticulturist


How Should I Feed and Weed My Asparagus?

Here is my midseason asparagus patch. Cutting back wayward stems in summer can also keep clumps tidier. (Image by Jessie Keith)

“What kind of fertilizer should I use in my asparagus patch? What can I use to control the weeds in my patch?” Question from Linda of New Providence, Iowa

Answer: Asparagus is one of those spring vegetables that I think everyone should grow if they have the garden space. It’s so easy and so delicious. Here are some tips for easy weeding and care.

Asparagus Weed Control

When it comes to weed control, I always started by placing a wide cage around each asparagus clump to keep them upright through summer for easy weeding below. Staking and tying are two other options. Any caging or staking system will keep the rows looking good and make them more accessible for weeding. Then I add a layer of newspaper, wetted thin cardboard, or burlap mulch cloth along the sides of the asparagus rows and top it off with a thick layer of seed-free straw, leaf mulch, or grass clippings (sometimes all three). This step makes harvest less muddy, especially in moist springs, and keeps surrounding weeds down. Finally, I hand weed around my emerging spears. The use of a garden knife, or Hori Hori, will allow for effective precision weeding among clumps. If you don’t have a garden knife, it’s a good investment. Just be sure to keep Hori Horis out of reach from children because they are very sharp. I also recommend wearing strong gloves when working with one.

Asparagus Fertilization

When it comes to fertilization, asparagus plants prefer balanced, low-nitrogen fertilizers (5-10-10), according to Stark Brothers, a good source for asparagus. I always used OMRI Listed fertilizer formulated for vegetables, which always worked well for me. I also like to occasionally add a layer of Black Gold Garden Compost Blend around the crown to act as a mulch and provide added organic matter.

I hope that these tips help!

Happy asparagus growing,

Jessie Keith

Black Gold Horticulturist

Why Aren’t My House Plants Growing?

“Why would a houseplant just not grow? A couple of my houseplants won’t get any bigger or the growth is so slow it’s barely noticeable. I got them when they were small starter plants & have had them for a year or 2. These are my common plants…spider and prayer plant.  Any suggestions would be appreciated.” Question from Katherine of Las Vegas, Nevada

Answer: There are several reasons why your plants may be stunted or growing poorly. Reasons typically involve soil drainage, soil quality, fertilizer, and light. Here are seven house plants Q&As to make sure your plants are getting what they need.

  1. Does your pot have drainage holes and a saucer to catch water? If not, repot your plants in pots with good drainage. Otherwise, water will pool at the bottom of the pot and inhibit root growth.
  2. When you stick a finger in your potting soil is it saturated or dry? Even moisture is what you want for these plants. (Click here to read a great article about how to water house plants.)
  3. Is your pot big enough? Check to see if your plant’s roots are “bound” by trying to run your finger along the inner edge of the pot below the soil line.  If you feel tight roots along the edge, it is time to transplant your house plants into a larger pot. (Click here to learn how to repot bound house plants.)
  4. Did you choose good-quality potting soil? Good-quality potting soil should be lightweight, porous, and have premium ingredients, such as peat moss, coir, compost, perlite, and added fertilizer. We recommend Black Gold All Purpose Potting Mix for house plants.
  5. Is your potting soil more than three-years-old? If so, replant your house plants in fresh potting mix (not a problem in your case).
  6. Do you feed your house plants? Tropical foliage plants, such as prayer plant (Maranta leuconeura) and spider plant (Chlorophytum comosum), should either be fed with a continuous-release fertilizer, which usually feeds plants for up to six months, or regularly fed with a water-soluble fertilizer.
  7. Are you house plants growing irregularly, are they one-sided, or are their leaves elongated and thin? If so, they may be getting too little light. Be sure to provide them with bright, filtered sunlight for good growth.

I hope this information helps and your plants really begin to grow.

Happy house plant growing!

Jessie Keith

Black Gold Horticulturist


When Do I Plant Brussels Sprouts Up North?

Brussels sprouts are a fall crop. (Photo by Jamain)

“I’d like to grow Brussels sprouts in my garden for the first time this year. When do I plant, and how much water do they need?” Question from Amber of Bay City, Michigan

Answer: Brussels sprouts are a cool-season crop for fall. This means that they need cooler temperatures to grow well and set Brussels sprouts, and they do this best in the long, cool period of fall. In your northern zone, start plants from seed in early summer, and get them in the ground no later than August first. When starting plants from seed, it can take as long as two months to grow seedlings to planting size. You may also be able to purchase starts at your local garden center.

Grow Brussels sprouts in full sun and light, fertile, well-drained soil amended with compost, such as Black Gold Garden Compost Blend. Feed them with an all-purpose vegetable fertilizer at planting time, and give them plenty of water if weather conditions start to become dry. They like soil with light, even moisture. As they grow upward, they may require staking. (Click here to view a few good varieties available from seed.)

White cabbage moths, also called cabbage loopers/worms, are the most common pest (click here to learn how to manage them) iand harlequin cabbage bugs (click here to learn how to manage them) are also a problem, so keep a lookout for both. They must be treated on sight if you want a good harvest.

I hope that you have great success with your Brussels sprouts!

Happy gardening,

Jessie Keith

Black Gold Horticulturist