Articles

Desert Gold Poppy: Create a Superbloom in Your Backyard

Desert poppies stay low on windy hilltops.

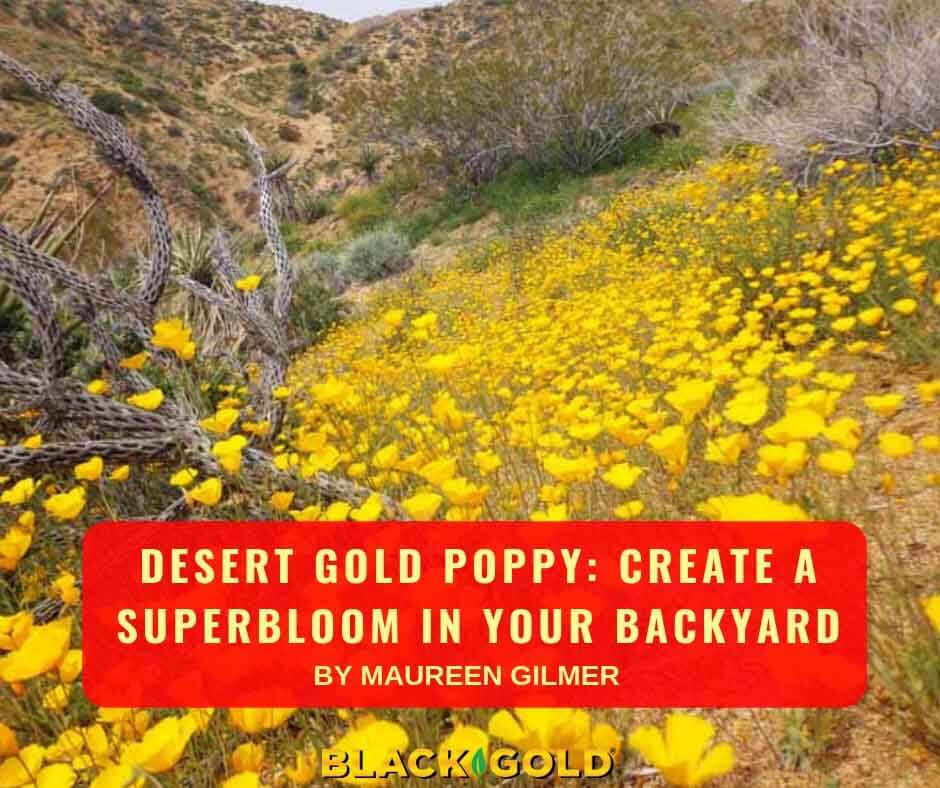
In the wave of Superbloom in California, a rare wildflower is making a massive appearance.  Desert gold poppy (Eschscholzia glyptosperma) is a smaller cousin of the famous California poppy (Eschscholzia californica) because it grows only in the desert. Virtually every aspect of the plant is dwarfed, a natural mechanism for greater efficiency in a very harsh, dry climate.

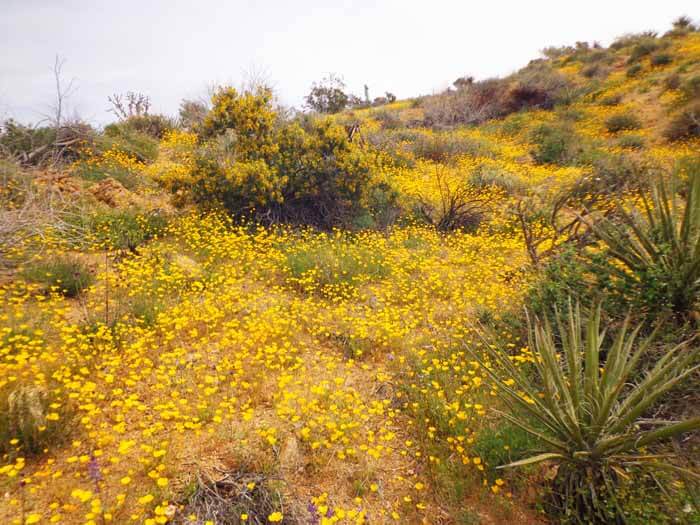
This year the gold poppies made their appearance upon the burned over hills of the desert, in golden swaths of color.  They clustered on the steepest hillsides, the most rugged ridge tops.  Here they are never disturbed, so seed quantity can accumulate and lay wait for years before enough rain falls to create a visible patch.  To see them close you must get up and out, perhaps do some hiking, but this year photos show their character and suitability for sowing onto very dry properties of the desert Southwest and Great Basin.

Siting Desert Gold Poppy

These poppies are in a sheltered location at the bottom of a slope.

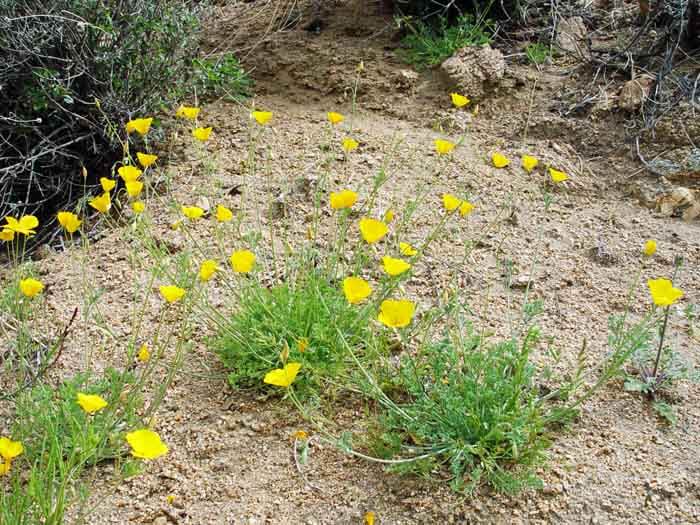
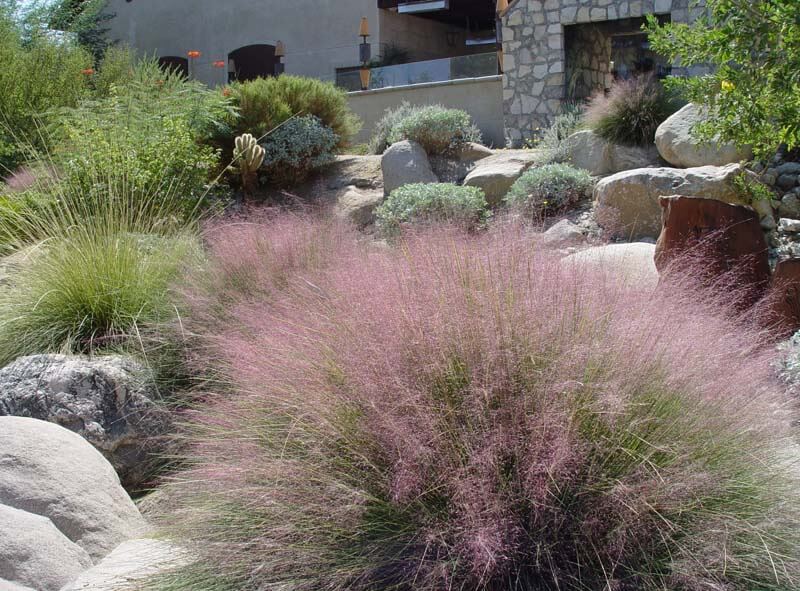
Desert gold poppy prefers alluvial fans and dry stream beds, which are easy to duplicate in desert gardens.  It is tiny compared to its famous California poppy cousinBoth show equally well en masse but are rarely found together.

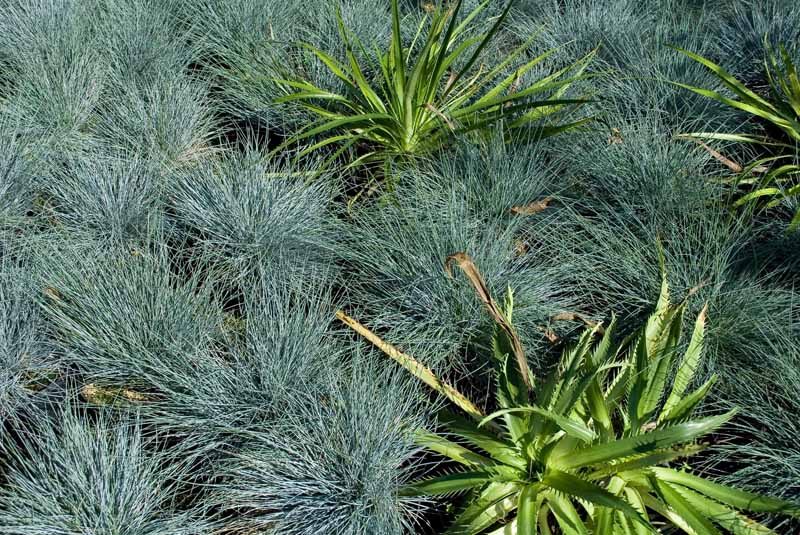
Microclimates define the desert poppy.  It is delicate and prefers to stay out of the wind by hunkering down into dry washes or clustering on lee sides of landforms.  Where it is windier, the desert poppy adjusts its height by shortening flower stems.  This drops blooms below the prevailing winds.  Big patches thrive where large yuccas provide windbreaks. Their low height also protects pollinating bees from winds.

This provides a clue to where to sow the desert poppy in home gardens. Choose a site where it’s likely to germinate and hopefully naturalize into a colony.  In most gardens scenarios the plant is twice as tall, and more widely spaced.

When sown in the fall, poppies have time overwinter, grow roots and flower by spring.  when sown in the spring, they sprout and then wither.  Some can perform as biennials or even short-lived perennials, depending on growing conditions.

Sowing Desert Gold Poppy

Poppy seed gradually filled this whole ravine resulting in a Superbloom.

Poppy seed is tiny and difficult to sow evenly.  The best way to be efficient with your introduction of poppies to your property is to blend them into a delivery material such as Black Gold®Earthworm Castings Blend.  This helps distribute the seed and provide a little organic matter to protect the seed once sown. Seeding is best done before a rain in the fall or early winter

First find a wide, shallow container and fill it half full with worm castings.  Next, sprinkle your poppy seed over the top, like you would add sprinkles to a white cake, striving for even coverage.  Once in place, use your bare hands to gently toss the castings as you would a salad, slowly blending in the seed.  Immediately sow this blend where you want it, otherwise, it will settle and lose its fluffy quality.

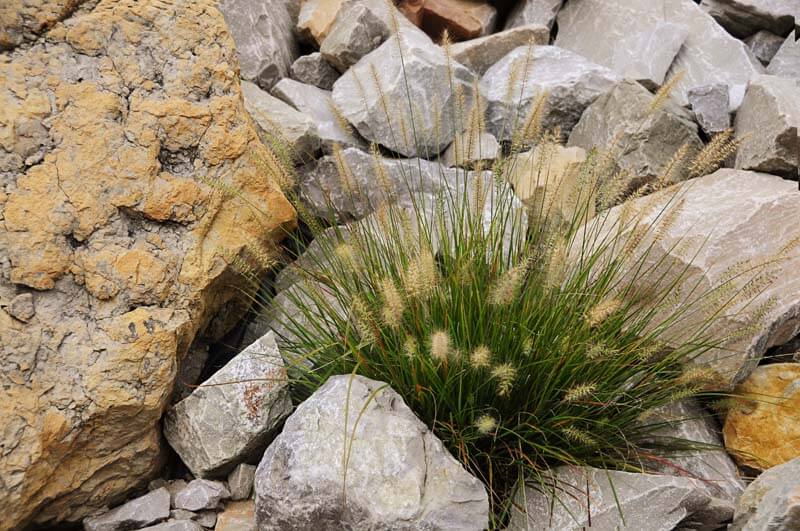
The more disturbed the ground, the better the poppies will row.  They don’t like competition either.  Fast-draining grainy soil, sand, or steep slopes with extreme runoff are this plant’s preference.  Open soils allow the tiny seed rootlets to easily penetrate the ground quickly after germination.

Sowing desert gold poppies will bring an annual Superbloom to your own backyard, farm, ranch, or rural cabin. Such natives will either sink or swim after the first year.  If they like your digs they’ll stay, have babies, and take up residence.  But for others, unless it’s an epic rain year, they may never return.

Garden Shrines: Dedicate Your Own Hallowed Ground

The pagans of Europe were the first to establish the notion of hallowed ground, an outdoor place set apart as holy.  Druid priests designated the very oldest oak in the ancient forest as an oracle, particularly when spring was close by. The priest would listen to the voices of the spirits in the gurgling of the spring and the whispers of the oak leaves, which they translated for their people.

This was the original church of nature where the combination of water and plants proved to be the most important elements of ancient earth-based spirituality.  Later the soaring lines and arches of great cathedrals are said to make indoor spaces more amenable to those with this outdoor tradition.

History of Nature Shrines

All over the world, pagans worshiped in the outdoors when the reasons for natural phenomena were unknown, making the outdoor holy ground essential to their beliefs. Many major religions, including Buddhism, Hinduism, and Catholicism, adopted the nature shrine after paganism died out. These tended to feature an image of a deity. The most well-known of these include the European grottoes dedicated to Christian figures and American bathtub shrines composed of old claw foot tubs planted on end to create an arched grotto for statues of the Virgin Mary. Wayside shrines of India are very different, and often associate their gods with certain trees and miraculous locations.

In the face of many environmental changes, gardeners today may benefit from the creation of an inspirational space in the garden where you can beckon nature to join you. Plants that draw wildlife bring in an important component of nature: birds, squirrels, and other wildlife. This integration of both flora and fauna into a hallowed location sets it apart for inspiration and contemplation. It is a promise from nature that many species continue to flourish despite Earth’s destructive history of comets, volcanoes, earthquakes, glaciers, continental drift, and other natural phenomena, proving we will continue, too.

Shrines to Nature

A shrine to nature can reflect your personal idea of beauty for a contemplative moody setting in the trees. If you have an old tree to use as the centerpiece, it can become a structural element. If none exists, plant a tree of importance to you or your spiritual path.

For example, Buddha attained enlightenment beneath a fig tree, so in India these are protected as bodi trees and venerated with brightly colored string and fabrics. Olives and Easter lilies are meaningful to Christians, and pomegranates, date palms, and other sacred plants are important to Jews.

Plants for Garden Shrines

If you are fortunate enough to have a property with a forested site, consider planting species well adapted to the shade and organic, acid soils there. Azaleas will your turn your special place into a bright, colorful haven before the trees fully leaf out in spring.  Evergreen rhododendrons and camellias are equally as beautiful and well adapted to wooded gardens. Another shade-loving shrub for acid soils is variegated winter daphne (Daphne odora ‘Marginata’) named for the legendary fragrance of its small white flowers.

When planting big, acid-loving shrubs, such as azaleas and rhododendron, it’s important to dig a shallow but wide hole. They are surface rooters and prefer to feed off decomposing leaves, so they don’t need a hole deeper than required to accommodate the root ball. Where soils are predominately clay, use generous amounts of Black Gold Canadian Sphagnum Peat Moss in your backfill.  This not only opens up the clay to improve drainage, but peat is also naturally acidic and perfectly tailored to these forest-floor species.

Many perennials make nice additions to these gardens. Bleeding heart (Dicentra spectabilis) is ideal for woodland sanctuary gardens.  The foliage is light, and the beautiful red, heart-shaped flowers are sentimental.  Old-fashioned coral bells (Heuchera sanguinea) or their hybrid variations with bright-colored foliage add vivid garden hues all season long. Ferns provide that primordial woodland feel, particularly potted tropical tree ferns or masses of hardy ostrich types, and ephemeral spring wildflowers help reign in the growing season.

Garden Shrine Statuary

It’s easy to integrate statues to the nature garden to focus the dedication to your personal path.  But for those who find nature itself their higher power and who want to protect her and venerate creation the woodland is an ideal sanctuary.  Once created, you’ll understand why such places were preferred for pagan shrines.  In today’s fast-paced world, time spent there with your higher power will help quell fears and renew you to face another day.


DIY Seed Starting: Seed Packets (Part 1 of 6)

Read the back of your seed packet to find details essential to successful germination.

Starting seed indoors is the best way to get your garden off to an early start. It also provides for earlier and longer harvest by extending the growing season. Not all plants are suitable to start indoors–these include large-seeded or fast-growing vegetables that produce quickly, such as beets, radishes, squash, and melons as well as zinnias and cosmos. Those warm-season vegetables that enjoy a long growing season, such as tomatoes and peppers, should be started early. They also have small seeds are hard to keep track of outdoors and easily washed away or eaten by pests when very young. Raising your slower-to-grow plants indoors where you can control growing conditions yields larger plants that thrive once moved outdoors.

Seed Packet Information

The first step is to read all of the information on the seed packet. It is your guide to growing a plant from seed. Each packet should have the following information:

Date
All seed packets are stamped with a “packed for” date, which should be the year of purchase. Like food, dates ensure fresh seed has high viability. Out of date seed is not always a bargain because they become less viabile each year, though some can remain viable for several years (click here for a seed viability list). With lettuce, for example, the seed can survive for up to five years if stored in a cool, dry place.

Depth
Each seed type is planted at a specific depth indicated on the back of the packet. If planted deeper than specified or too shallow it may fail to germinate altogether.

Time to Emerge
Seeds generally take a certain amount of time before germination. If you sow it properly, and the soil is warm enough, you can expect to see a seedling in the number of days specified on the packet. If there’s no sign of life well after the germination window, then there’s a problem.

Spacing
This indicates how much space is required between plants of the same type. Distancing plants ensures that they won’t be overcrowded. While it is not essential for indoor seed starting, it is helpful in determining the required number of seedlings for a given garden. It is also wise to provide seedlings enough space to grow well in cell packs or pots.

Days to Harvest
The days to harvest tell you how long it will take before a crop can be harvested. Days vary from cultivar to cultivar, so check them before purchase. Fast-growing vegetables are often more gratifying. Many long-duration crops can and should be started indoors.

Finally, make a record of the seeds you grew and their overall success. Keep those that work, and drop those that don’t.

DIY Seed Starting: Damping Off Prevention (Part 2 of 6):

You wouldn’t put your newborn child into dirty blankets for fear of dangerous germs in the bedding, so don’t germinate your garden seed in anything but fresh, soilless seed starting mix. Used or natural soil is riddled with fungal microbes, called Pythium and Phytophthora fungi, which are fatal to seedlings. They quickly cause roots and tender stems to rot.

Under warm, wet conditions ideal for seed germination, these fungi flourish. They’ll attack tender new sprouts as they break ground.


Preventing Seedling Damping Off

Indoor Seedlings - Maureen Gilmer
Use Clean Bedding to Sow Seeds Indoors.

What prevents damping off from getting a foothold is fresh mix, moderate water, sunlight, and airflow. Black Gold Seedling Mix is light and airy in texture, so it encourages drainage and good aeration, even when it’s warm and wet. Even the most dainty sprout will rise to sunshine without difficulty in this lightweight yet absorbent mix.

Unopened bags of Black Gold Seedling Mix do not contain the fungi that cause damping off. Fresh seedling mix also resists packing down and rarely retains too much moisture. Once you have opened a bag, seal it after use to help keep it free of disease-causing fungi because these spores can be in the air where conditions are damp and plants are growing.

Before sowing into Black Gold Seedling Mix, moisten the mix with warm water. Mix it as you would a salad by turning the material lightly with your hands, over and over until evenly wetted. Like salad, keep it light and just apply light pressure after sowing the seed.

DIY Seed Starting: Containers (Part 3 of 6)

Gardeners that start seeds at home have lots of containers to choose from. You can buy seed-starting flat kits, peat pots, reused containers, or even make seedling soil blocks. Some are more costly, while others allow you to grow more for less. My preference is to germinate seed in recycled containers to save your money and reuse plastic waste. Here is what to look for in good containers for seed starting.

Provide Cover

The biggest challenge when germinating seed is keeping the soil evenly moist, but not wet. Good cover with clear or translucent plastic tops ensures surface moisture. This is especially important in dry climates where evaporation rates are

Cheese Tray
Cheese Tray: This tray and cover saved after an office party makes the perfect enclosure for germinating seeds in small containers.

much higher. These regions are the hardest places to grow anything from seed. (In more humid climates cover is not always required.) If you let pots go dry for just a day or two, tender young sprouts may wither. If you’re busy with the kids or gone at work all day, you won’t be able to rescue wilted seedlings. If they suffer long enough, they will die. In the earlier stages of seed germination and growth, covers provide a safety net.


Seed Starting Containers

One of the most common seed-starting mistakes is sowing seed directly into deeper pots. In some cases, the soil surface can quickly dry out while deeper down it can remain wet, even saturated. When you rewet the surface soil where seeds lie, you risk further saturation deeper down, which can stimulate fungal disease or undesirable saturated soil conditions. Once a seedling’s roots grow downward, this can cause trouble.

For this reason, accomplished gardeners germinate their seed in smaller containers. If you don’t have seedling flats, recycled clear plastic fruit, vegetable, or take-out food containers

Salad Box
Salad Box: Clear-lidded take out boxes make ideal germination chambers.

with tops are ideal. The ability to close the top greatly reduces the rate of surface evaporation, thereby maintaining moist conditions without the need to apply more water. If lids are not available, plastic wrap can do the job. Just make sure there are holes in the top and bottom for oxygen and free drainage.


For larger projects, consider using purchased, lidded nursery flats with cell packs. For smaller plants, choose flats with smaller cells and for larger plants go for larger cells.

The goal of all these choices is to turn containers into miniature greenhouses where seeds are kept warm, stay evenly moist, and will be quick to germinate. Within this environment, control temperature and moisture levels by opening and closing the lid all or part way. (Click here for a vegetable seed-starting temperature chart.) This allows more or less air exchange during periods of wet or dry weather.

Fill the bottom of containers or cell packs with a few inches of pre-moistened, fresh Black Gold Seedling Mix, which is OMRI Listed for organic growing. Into this sow your seed. Once up and growing, each seedling will soon be transplanted into its own growing container.

Six Pack
Six Pack: Keep newly sown seed moist under clear plastic wrap until seeds germinate, then the plastic comes off.

Upgrading Containers

As seedlings grow, they often need more space to reach full planting size. For this second stage use six-packs or four-inch pots and Black Gold Natural & Organic Potting Soil. Larger pots will be needed for larger plants, such as tomatoes or zinnias. The transplanting process is explained in part six of this series (see the link below).

The most important part of starting the garden indoors is your choice of containers. The right one makes this easy to do, but the wrong choice can leave you perpetually struggling to keep moisture and warmth at optimal levels. Yes, it may be easier to get started with an expensive growing seed-starting kit, but you’ll pay for it.

Why not reuse free plastic containers from salad boxes to yogurt cups to help the environment? Or use all those containers you saved from previous season’s nursery-grown bedding plants. Clean them up in some hot water and soap, and they will be good to go. There’s no need to spend your money on anything except quality seed, seedling mix, and organic potting soil to get your garden off to a flying start indoors this year.

DIY Seed Starting: Proper Sowing (Part 4 of 6)

The first step of any seed sowing project is to read the entire label of the seed packet. That tells you how deep to plant each kind of seed and under what growing conditions. Those that are usually started indoors may be surface sown or planted 1/2 inch deep, depending on seed size and growing preferences. Each plant’s seeds have there own needs for germination, and some requirements are more complicated than others. Lucky, the seeds of garden vegetables and most annuals are quite easy to grow.

Choose the Right Mix

Whether you sow into cell pack trays or directly into individual containers, make sure you use fresh Black Gold Seedling Mix to provide a good growing environment. It is a soilless mixture, often called media, is comprised of fine Canadian sphagnum peat moss, perlite, and a wetting agent. These ingredients ensure that it’s lightweight and takes up water easily. Set aside a container of dry media, then moisten it before filling your containers. Press it gently into your growing containers, but don’t it pack down, so it remains porous enough to for oxygen and moisture exchange.

The Right Planting Depth

Before planting, created holes at the required depth using a dibble stick or repurposed knitting needle in your cells or pots. If you’re growing in a tray or recycled container score rows in the media to the indicated depth. If you’re growing in 4-inch pots, poke three seed holes spaced apart. Now it’s ready for the pots to receive seed.

There’s no challenge with large seeds because these are easy to sow with your fingers and require a deeper planting depth. The tiny ones can be a bigger challenge to handle. Some gardeners take a piece of scrap paper and fold it in half. Into the V at the bottom, a small number of seeds may be placed; then the paper held folded. Tap the bottom and from the lower end of the fold will come the tiny seeds. They’ll drop precisely into your rows or pots, one at a time. Beware of planting too densely because this makes it tough to untangle the seedlings when the time comes to transplant them. Very tiny seeds should also be sown on the surface. After watering, they will become covered enough with media. (To learn more about seed sowing depths for popular crops, click here.)

Once sown, use any reserved dry media to cover seeds. For deeper planted seed cover them with excavated material from the planting hole or row. Then gently press down the media to ensure good soil contact.

Storing Seeds

When sowing is completed, be sure to seal any remaining seeds inside their packets, and store them in a cool, dry place. If you have an unexpected germination problem, the backup seed will be vital for replanting. Being able to refer back to the instructions in the packet can also come in handy.


DIY Seed Starting: Watering (Part 5 of 6)

Every gardener has done it at least once. Watering newly sown pots too aggressively, which dislodges seeds, moving them all across the soil surface. That’s why watering indoor seedlings properly is essential in the first weeks after sowing.

Watering Seeds

How you water seeds depends on the sowing depth, pot size, and available watering tools. Shallowly planted seeds need more gentle watering tools, such as misters, while more deeply planted seeds can tolerate the water pressure from fine watering cans and spray nozzles. They can also be bottom watered from their tray or dish.

If you live in a warmer climate, take pots or flats outside to water. Buy a nozzle for your hose with a mist setting to gently soak pots. With a misting nozzle, you can water the soil’s top layer without over-saturation. Bottom watering will help moisten the soil below. Where winters are cold, rely on super-fine sprayers or misters.

Fine Spray - Maureen Gilmer
Fine Spray: This short-handled water wand features a fine spray nozzle ideal for young seedlings.

Watering Seedlings

For seedlings, there are two watering options–top or bottom watering. If you like to water from the top, tiny seedlings should continue to be misted, but once they develop several leaves, they can be watered with a small watering can or nozzle with fine, well-distributed flow. Make sure you water enough to allow the soil to drain to the bottom. Let surface soil become somewhat dry between watering to avoid fungus gnat and fungal disease problems. (Click here to watch our video about fungus gnats.)

Mist - Maureen Gilmer
Mist: Adjustable nozzles offer a mist setting for seedlings.

Bottom watering pots from trays or saucers allows moisture to wick up through the drain holes to growing roots. It wets the soil mass completely without dry pockets.  This bottom-up method may be repeated every week or two, depending on how hot and dry the local climate.

Finally, keep your eye on the weather as the weeks pass. When conditions are humid, water less. When it’s hot or dry, water more often. Overwatering can lead to root and stem rot and underwatering will parch and kill seedlings.

As you bring your seedlings outdoors to harden off, watch out for windy weather as it tends to rapidly draw moisture out of both the foliage and the soil. Then check your crop twice a day to determine watering needs, and let Mother Nature take care of the rest.

DIY Seed Starting: Transplanting Seedlings (Part 6 of 6)


Most seedlings will need to be transplanted as they grow. Larger containers and a more robust mix with added fertilizer will enable seedlings to become large, vigorous plants. (Note that good seed starting mix contains no added fertilizer because it keeps some seeds from germinating.). As long as the light is plentiful, repotting will help your seedlings develop stronger roots and shoots.

Seedling Pot Size

A 3- or 4-inch plastic pot or larger cell packs are ideal for the transition. If you want to reuse containers for a greener approach, use recycled tin cans, yogurt cups, or similar-sized containers; punch two to three holes in the bottom of each for drainage. Use a hammer and thick nail for tin, and a paring knife or screw driver to poke holes into plastic (wear protective hand coverings when punching holes). For bottom support recycle flats from the garden center or line your pots up in a baking pan or any low, watertight container.

Seedlings - Maureen GilmerSeedling Potting Mix and Fertilizer

The potting mix you choose depends on your preference and garden type. If you like planting mix with added fertilizer, choose Black Gold® Moisture Supreme Container Mix or Black Gold All Purpose Potting Mix. Both feed products for up to 6 months. If your plants are going into an organic garden, use OMRI Listed Black Gold Natural & Organic Potting Soil. It is fertile, well-aerated, and holds water well. Because it does not contain a fertilizer boost, apply any quality, water-soluble organic fertilizer.

Fill each pot or container with soil to one-quarter to half-inch below the rim, so there’s enough room for water without overflow.

Transplanting Seedlings

Transplanting your seedlings should be done with a gentle hand. Use an ice cream stick or blunt butter knife to ease seedlings out of the media without tearing roots or disturbing the next seedling in line. Lift it from its roots. Always support the roots with the palm of your hand and lift a seedling by its leaves rather than stems, which are easy to bend or crush. Remove one seedling at a time. Use your finger or a dibble stick to open a hole in the potting soil large enough to accommodate the entire root system comfortably.

Plant - Maureen Gilmer
Plant: Don’t pick up seedlings by the stem; support the roots with your hand.

When transplanting tomatoes, they can be planted much deeper into the soil so new roots will form on the underground part of the stem. This is a rarity. With most other seedlings, transplant them at the same depth. Hold the seedling by the leaf and gently place the roots in the hole then cover with additional mix and lightly press it down. Next, water your seedlings gently. Allow them a week to revive from transplanting.

Hardening off Seedlings

On mild days take the whole flat of seedlings out onto the porch or covered outdoor area with partial sun to help them become adapted to outdoor wind and light. This transitional period is called “hardening off,” which is essential to toughen tender indoor plants to the harsher growing conditions of the outside. Over a week or two, slowly move them into higher light, if they are full-sun plants. If nights become warm, leave thems outdoors overnight to better adapt. Just keep them out of reach of curious pets and hungry wildlife.

With the nutrient-rich soil, growth will speed up so your seedlings will benefit from lots more direct sunlight. Just be careful over the first few days to ensure they adapt well to the exposure without wilt or burning.

READ MORE ARTICLES FROM THIS SERIES…

  1. Start Vegetable Seed Indoors Early
  2. DIY Seed Starting: Seed Packets (Part 1 of 6)
  3. DIY Seed Starting: Damping Off Prevention (Part 2 of 6):
  4. DIY Seed Starting: Containers (Part 3 of 6)
  5. DIY Seed Starting: Proper Sowing (Part 4 of 6)
  6. DIY Seed Starting: Watering (Part 5 of 6)
  7. DIY Seed Starting: Transplanting Seedlings (Part 6 of 6)

Transformative Grasses: Anchoring Gardens and Soils


This hardy fountain grass is in full summer bloom, releasing pollen in the breeze. (Photo by Maureen Gilmer)

Over the past year, California has experienced drought, wildfires, floods, mudslides, and extreme cold.  The rest of the Southwest has seen the same crazy extremes and has experienced high-damage potential within a short time span.  Everyone will have some rethinking to do, whether making structural repairs or just replanting to return beauty to the landscape.  For others, it may require a whole new assessment of site planting and soil protection.

There is just one group of important plants that are called for this spring to heal the land.  John James Ingalls tells us why in a most eloquent quote:

Grass is the forgiveness of nature–her constant benediction. Fields trampled with battle, saturated with blood, torn with the ruts of cannon, grow green again with grass, and carnage is forgotten. Streets abandoned by traffic become grass-grown like rural lanes and are obliterated. Forests decay, harvests perish, flowers vanish, but grass is immortal. – John James Ingalls, Yearbook of Agriculture, 1948

The Power of Grasses

Empty garden spaces can easily be transformed or revegetated by large, ornamental grasses. (Photo by Maureen Gilmer)

Grasses are natural colonizers.  They are nature’s repair mechanism for soil disturbance.  Soil bound by grass roots underground and broad foliar coverage above protects the surface from raindrop particle displacement (erosion).  On slopes, they are excellent for slowing runoff velocity as well; the slower the water flows, the lower the erosion potential.

This makes grasses the most natural quick fix for gardens and home sites damaged by extreme weather and disasters.  Not only are they the ultimate problem solvers for damaged ground, but large ornamental grasses will also turn sparse drought plantings into lush, beautiful landscapes this year.  When planted in spring, they flower by mid to late summer with tall animated stems that grow more beautiful as they complete their life cycle.

Grasses produce flowers held well above the foliage to catch the wind, which is integral to their reproduction. When pollen flies from grass plumes amidst prairies or drylands, it is caught on sticky flower parts called pistils for pollination and seed set.  In the fall, dry winds help distribute seed far and wide.  The remaining seed structures stand barren into winter until knocked down by snow or heavy rain.

Because grasses are found on every continent, their range of tolerances is significant.  In dry areas of the Southwest, the soils and water supply are too lean for many species that originate in summer-rain climates.  The key is growing grasses that will thrive in our heat and potential drought, so you need not increase irrigation.  They should be sufficiently adapted to drought to survive nicely when the wet cycle wanes.

Planting with Grasses

Grasses are such incredibly transformative plants due to fast growth and significant seasonal change.  They are the stars of late summer gardens when the flowers are heavy and stems nod and sway in the slightest breeze.  Designers know how important this “animation” can benefit an otherwise static garden dominated by rigid cacti, succulents, and arid species.

There are four easy ways to add adaptable grasses to your western landscape this spring.

Create Fast and Easy Fillers

Early in the year, upright maiden grass makes a lush, green single specimen. (Photo by Maureen Gilmer)

Tall grasses with a significant diameter at maturity, like maiden grass (Miscanthus sinensis ‘Gracilimus’, 7-feet high, USDA Hardiness Zones 5-9), are the fastest way to fill gaps in your planting caused by frost death, washouts, and slope failure.  Provided these grasses spots in full sun, and plant to fit a given space.  If garden space is too large for just one single specimen, plant a group of three or five for a bigger visual impact.

Add Texture to Succulents

Blue fescue is the perfect low-growing, fine-textured grass for planting among succulents.

Succulent plants are coarsely textured and physically stable.  Blend them with fine-textured shorter grasses that are of similar height to contrast the character of each. Try Mexican feather grass (Nassella tenuissima, 3-feet high, USDA Hardiness Zones 7-10) or blue fescue  (Festuca glauca, 1-foot high, USDA Hardiness Zones 4-8) for fine-textured appeal.

Enhance Boulders and Rock Gardens

Pennisetums are reliable anchoring grasses for rock gardens.

Boulders are always more natural when anchored by grasses.  Planting right at the edge allows roots to reach underneath and draw up cool moisture trapped beneath the stone far into summer.  Where rocks are plentiful, the roots of grass tend to do better in shallow soils where they find fissures of much greater depth where the water hides. Two kinds of grass for the task are tender fountain grass (Pennisetum setaceum, 5-feet high, USDA Hardiness Zones 9-10) and hardy fountain grass (Pennisetum alopecuroides, 4-high, USDA Hardiness Zones 6-9).

Enhance Background Seasonal Color

The Southwest native deergrass is our best large grass for the dry southwestern US and California. (Photo by Maureen Gilmer)

Bedding plant and succulent displays are animated by taller grasses in the background, particularly after blossoms fade. In the fall, when ephemeral annuals wane, the tall flowers of upright or airy ornamental grasses become sculptural. With this background, you’ll never be without interest except in the dead of winter. Deergrass (Muhlenbergia rigens, 4 to 5-high, USDA Hardiness Zones 7-9) is a good selection that offers a cloud of pinkish seasonal color.

Planting Grasses

Because grasses are very active rooters, gardeners planting in clayey soils that tend to clod-up should generously add Black Gold Garden Compost Blend to their backfill at planting time.  With heavy clay, like Adobe, mix compost in at a 50/50 ratio with excavated soil.  This introduction of copious organic matter will wake up the army of dormant microbes that exist in fertile clays and work with plants to make them more resilient. The organic matter allows new roots to grow much faster and penetrate deeper. Adding compost also helps prevent surface cracking as wet, clayey soils dry out.  Cracks in hardpan clay allow water to skim the surface or penetrate too fast in the wrong places, causing irregular saturation.

Let grasses make your garden immortal this year. Celebrate the repair and renewal opportunities that grasses offer to rethink landscaping after a very difficult winter. For those who have suffered from wildfire and flood, turn to Mother Nature’s repair mechanism for all things soil-related to receive her constant benediction.

Quasi Bonsai: Manageable Bonsai Beauty

(Image by Maureen Gilmer)

The price of neglecting to water your bonsai in midsummer even for a day will have to be paid in a withered plant.  You might as well plough the field and forget the seed as commit such negligence.  –Norio Kobayashi, Japan 1951

The little-known secret of true Japanese bonsai trees is that they are watered every day.  Not a single sunrise passes without the gardeners inspecting every bonsai inch and checking how much moisture is available to the roots.  It’s vital because the shallow, tray-like pots have two or more large drain holes and drain quickly.  There’s little room for moisture-holding soil.  These miniaturized trees grown in this ancient tradition live centuries due to intimate daily care.  It’s also why they are prone to die on our patios, too. Lack of such TLC is a bonsai killer.

Unlike the rigors and high cost of true bonsai keeping, you can change the rules a bit to create a more manageable quasi bonsai that offers the same look with a fraction of the care.  Anyone can make one if you understand what’s important to get it right.

Quasi Bonsai Creation

This Lantana dangler (next to the beautiful fig creation) requires a pedestal in the garden. (Image by Maureen Gilmer)

1. Pot Depth to Diameter Ratio

The first step is to find the right sized pot with sufficient depth to diameter ratio.  It may be oval or rectangular, but pot diameter must be three times pot depth.  Using this as a guide, find pots capable of holding more soil, so the plants do not dry out as fast as they do with traditional pan-shaped pots.  It’s really all about the proportions, so your choice may be a simple modern or classic ceramic pot, or even a recycled container.

2. Shrub Type and Size

True bonsai is a full-sized tree adapted to remain small due to perpetual pruning of top and roots to gradually dwarf leaves, flowers, and fruit as well as the trunk and branches.  For quasi bonsai, you select a dwarf woody shrub that bears a curious growth habit, instead. Damaged shrubs may prove to be the ideal starter plants for your twisted creation, when compared to a perfect nursery-grown specimen. One gallon shrubs are a good starting size.

Choose a shrub that is suitable for your bonsai-style pot. Make sure the pot is deep enough to contain at least half the root ball.  When transplanting, you’ll have to remove soil and cut and splay the roots at the bottom of the root ball to fit. Set the crown of the shrub so it lies a half inch below the top rim of the pot.  Pack the remaining spaces with Black Gold African Violet Potting Mix, or if unavailable, use Black Gold All Purpose Potting Mix. Ensure there’s free space around the pot edge that allows you to fill it with water to seep down at its own rate.  It also allows for moss or gravel without instant spill over when filled to the top.  With shrubs, this reduces the chance of crown rot from planting too deep.

3. Great Rocks

Bonsai can be an upright tree, a leaning tree, or one that naturally dangles off the edge of the pot.  The latter often requires a pedestal so the dangling part hangs in space.  In quasi bonsai, asymmetrical bonsai forms are challenging because the newly planted root ball can be pulled loose by the weight of the rest of the plant after the soil is wet from watering.  The trick to keeping the root ball in place is with a counterweight placed on top.  This is done with a single large rock selected for its size and compatibility with the plant and pot. It also protects the root ball from solar heat and surface evaporation.  The rock can be tall or flat, just as long as the weight is an adequate counterbalance.  This also keeps the pot from becoming tippy on the tabletop if one side is too heavy.

4. Quasi Bonsai Pruning

Once planted securely, pruning your quasi bonsai is the most rewarding part of the whole process. First study bonsai tree photos online to get a feel for the various forms and how they are pruned to resemble a larger tree.  Find a pair of stout scissors or clippers with a long nose that can reach into the trunk to prune out branches or twigs without breaking others.  Do this slowly, standing back often to look at the whole before returning to this detail work.  This is where you’ll find your Zen year after year as it matures.

The beauty of bonsai can transform a balcony, patio or yard with instant Asian elements.  Make your own this year and discover how easy it is to get the look without strict adherence to the art.  Study it well, know the forms and become a bonsai maven among your friends and neighbors.

Plants for Quasi Bonsai

The dense dangling form of Japanese juniper is coveted for quasi bonsai. (Image by Maureen Gilmer)

Many shrubs are good candidates for quasi bonsai. Here are five evergreen selections that are easy to grow and train.

Dwarf English Boxwood (Buxus sempervirens ‘Suffruticosa’): Maxing out at 12 to 18 inches tall, this is the best and greenest boxwood for pruning into a small upright form. Train it in a partly sunny location away from drying winds.

Japanese Garden Juniper (Juniperus procumbens ‘Nana’): This tiny juniper is superior to all other compact creeping junipers, due to its dense bluish foliage, tight growth habit, and slow growth. Locate it in full sun.

Dwarf Heavenly Bamboo (Nandina domestica ‘Fire Power’ or Harbour Dwarf): This Chinese garden shrub, with its vividly colored foliage, is an ideal choice in lieu of upright trees for creating a mini quasi bonsai grove. Dwarf varieties, which generally reach around 1-2 feet, make for easier training. Choose a full to partial sun location for dwarf heavenly bamboo.

Elephant’s Food (Portulacaria afra): This African succulent is like a small-leaved jade tree.  It’s commonly sold as small plants, grows quickly, and withstands hard pruning, while maintaining its heat, and drought resistance. Grow it in full sun to partial shade.

Dwarf Azalea (Rhododendron indicum): Evergreen foliage and scarlet or magenta spring blossoms make this dwarf azalea a great choice for quasi bonsai. Specimens naturally reach only 2-3 feet, so they are easily trained in a partially shaded garden location.

Dwarf English boxwood are perfect for quasi bonsai creations.