Articles

Garden Flowers of Victorian Floriography

Tulips, dianthus (pink flower left), and honesty (purple flower right) all have meaning in the Victorian language of flowers.

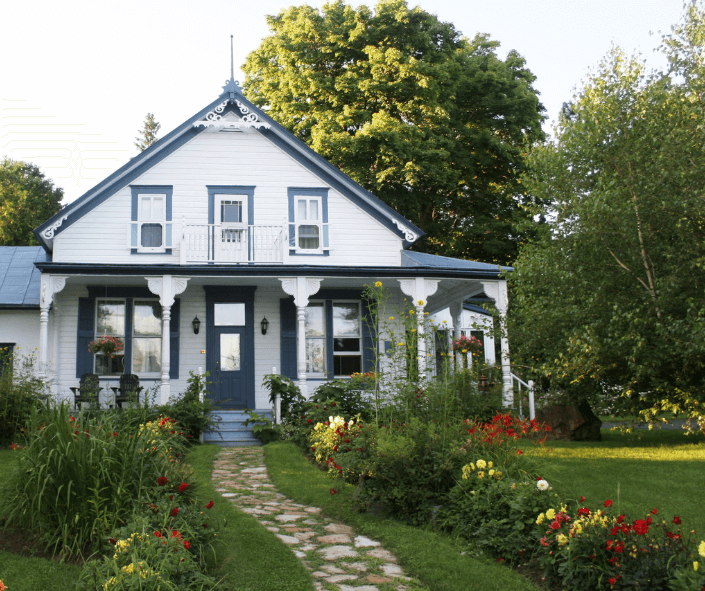
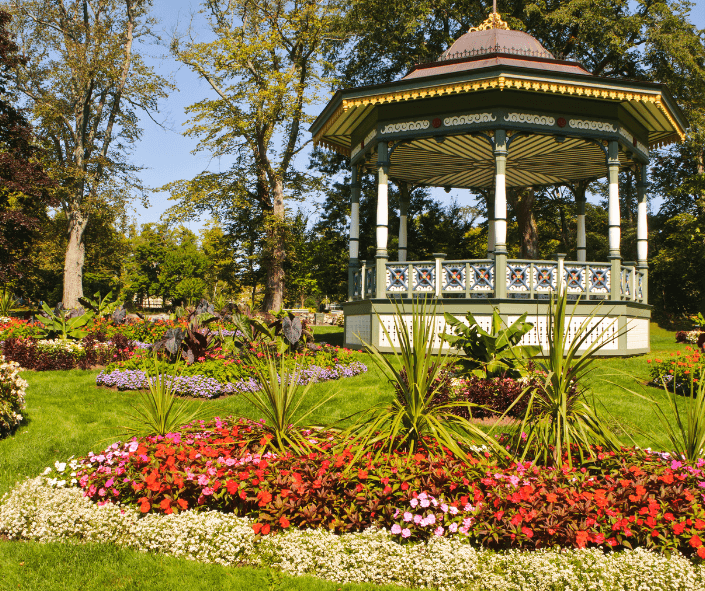
Since childhood, I have liked the styles and gardens of the Victorian Period (i.e., 1837-1901, the time of Queen Victoria’s reign in England).  While driving around my hometown of South Bend, Indiana, I was inspired by the ornate Victorian houses with simple garden plots filled with brightly colored flowers, and I favored family Victorian heirlooms. My favorite was a decorative Victorian bowl on our mantle covered in delicate pink roses painted from the rose garden by my great-grandmother. The floral bowl was a beautiful reminder of a family garden of the past.

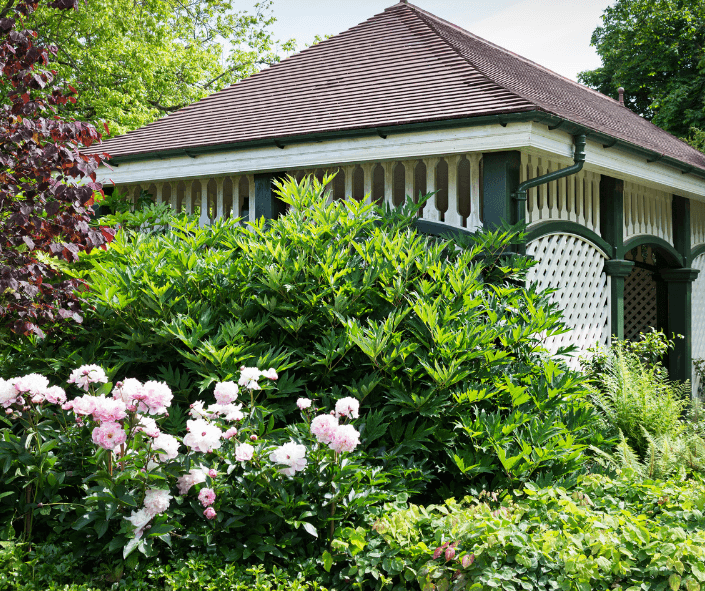
Later in life, I learned about the Victorian language of flowers, otherwise known as floriography. The knowledge has helped me fill my home garden with bountiful Victorian blooms filled with floral meaning, especially when my family bought our own Victorian home (built in 1885). I decorated the interior in the proper style with floral motifs, wallpaper, and decor. My gardens have been equally of the era. Old-fashioned roses, lilacs, bridal wreath spirea (Spirea x vanhouttei), spring daffodils, and other favorite Victorian garden plants dot my beds and landscaping–filling the spaces with meaning.

What is Floriography?

The modest Victorian-era home has sweeps of daylilies and dahlias down the walk.

The popular Victorian language of flowers was formally known as the practice of floriography.  It is the practice of giving meaning or symbolism to a plant, such as ‘warding off evil’ to garlic.  Beyond Victorian England, cultures around the world have had their own floral languages, but the Victorians took it to an unprecedented level, giving social meaning to hundreds of flowers and plants.

From the printing of the first dictionaries of floriography (Le Language des Fleurs by Louise Cortanbert in 1819, to the last, The Language of Flowers by Routledge, illustrated by Kate Greenaway in 1884 (still in print)) people went hog wild, sending increasingly complex messages to each other using plants. More contemporary books, such as The Complete Language of Flowers by S. Theresa Dietz, keep the interest alive.

Meanings of Popular Victorian Flowers

Impatiens (red and pink, foreground), called busy Lizzies in Victorian times, mean…

Especially popular with young adults, floral letters were sent in small-handpicked bouquets called tussie mussies or nosegays, which were wrapped in lace doilies and tied with satin ribbons.  If a question was asked, a nosegay presented by the right hand meant “yes”, and by the left hand “no.”  Nosegays given in an upright position represented a positive message, while one upside-down sent a negative one.  Here are some of the more interesting definitions, from among hundreds, given to common plants.  In some cases, such as carnations, hyacinths, and roses, the message varied depending on the flower color.

  • Apple Blossom (Malus spp.) signifies spring, innocence, and good tidings for the future.
  • Baby’s Breath (Gypsophila elegans) represents innocence.
  • Busy Lizzy (Impatiens walleriana) represent tenderness and kindness.
  • European Bluebell (Hyacinthoides hispanica) stands for humility.
  • Carnation, Striped (Dianthus spp.): No, I can’t be with you.
  • Cherry Blossom (Prunus spp.) represents education.
  • Daffodil (Narcissus spp.) is the flower for chivalry.
  • Dahlias (Dahlia spp.) inspire inner strength and dignity.
  • Dandelion (Taraxacum officinalis) is the bloom of happiness (not in our yard, but the bees enjoy them).
  • Daylilies (Hemerocallis hybrids) are given to inspire the recipient to forget their worries.
  • Fourleaf Clover, as anticipated is a sign of good luck but the plant can also suggest “be mine.”
  • Holly (Ilex spp.) branches ask the question, “Am I forgotten?”
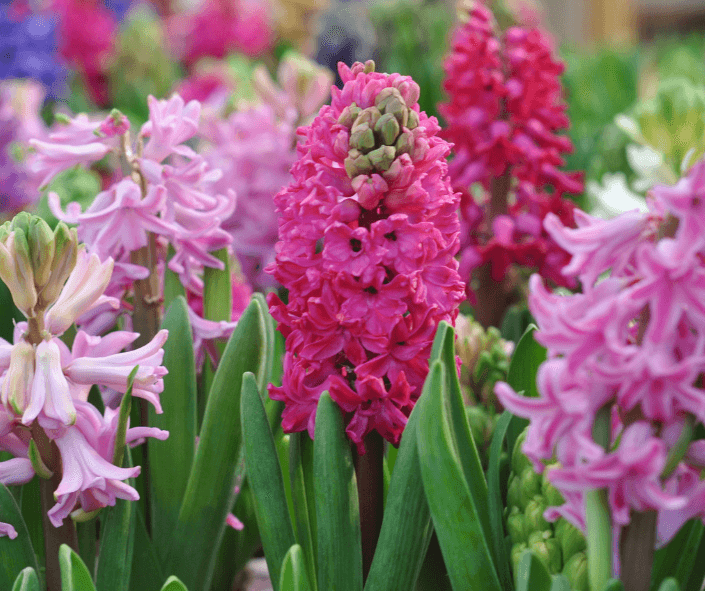
  • Hyacinths (Hyacinthus orientalis) stand for the following depending on color: yellow=jealousy, pink=playful joy, purple=deep regret, white=love and prayer.
  • Purple lilac (Syringa vulgaris) blooms are a sign of happiness and tranquility.
  • Lily-of-the-Valley (Convallaria majalis) represent the tears of the Virgin Mary.
  • Mints (Mentha spp.) are virtuous.
  • Oak Leaves (Quercus spp.) suggest bravery.
  • Yellow roses (Rosa spp.) are a sign of friendship and joy.
  • Red roses (Rosa spp.) continue to be a sign of love, which is why a dozen red roses are given to a beloved partner on Valentine’s Day or anniversaries.
  • Dried white rose petals mean death is preferable to loss of virtue.
  • Bridal wreath spirea (Spirea x vanhouttei) has bountiful white spring flowers representing prosperity, wealth, and victory.
  • Sunflowers (Helianthus annuus) signify long life, lasting happiness, and pride.
  • Red tulips (Tulipa spp.) are a declaration of love.
  • White violets (Viola odorata)  suggest, “Let’s take a chance on happiness.”
  • Mistletoe (Viscum album) continues to be used for celebratory Christmas kisses.
Peonies

Of course, these are just a few of the flowers used in floriography messages.  At the time, people relied on floriography for social fun. Entertainment often consisted of conversing with one another. Sometimes I wish the same social standards applied today. Technology is often considered more important than knowing one’s next-door neighbor. What a pity. Either way, there are still several books available online on the subject of floriography, should you be tempted to delve further into the subject. Then you can fill your garden with meaning.

For me, of all the flowers listed, I am looking most forward to spring Hyacinths. The hyacinth is a fantastic-smelling, brightly colored, spring flowering bulb, and a flower of choice in the 19th Century.  They were planted in sweeps to create patterned floral beds, all the rage at the time, and hyacinths are one of the easiest bulbs to force indoors giving an early taste of spring.  At its height, Holland growers offered almost 2000 varieties of hyacinths. Now there are only about around 30 varieties commonly sold.

A good place to find antique hyacinths is Old House Gardens. Their heirloom Easter Basket sampler is a good place to start or look for them at your local garden center in the spring. They thrive in garden soil amended with Black Gold Garden Compost Blend.

Hyacinths were beloved in Victorian times. Pink hyacinths represent playful love.

Easy-to-Grow Garden Tomatoes

‘Mountain Magic’ is an effortless Campari-style tomato with better flavor than the store-bought Camparis.

Fresh-from-the-garden tomatoes (Lycopersicon esculentum) are a seasonal delicacy every gardener should try to grow at home. Thirty-five years of tomato growing have taught me the effortless tomato varieties versus the more finicky, less productive types. Newer gardeners seeking to grow bountiful harvests of tomatoes should start with the standbys for ease of growth, flavor, and productivity. Of the nearly 60 tomato varieties I have grown, here are some of the most gratifying, flavorful, and easy. Some are modern cultivated varieties, and others are heirlooms.

Easy Beefsteak or Slicing Tomatoes

‘Kellogg’s Breakfast’ tomatoes are golden orange, flavorful, and bountiful.

Those who like traditional red tomatoes the best need to grow ‘Celebrity Plus’ (70-78 days) an updated version of the classic 1984 AAS Winner, ‘Celebrity’ (both are good but plus is more vigorous and disease resistant). The 8-oz fruits are produced on productive determinant (bushy) vines.

‘Kellogg’s Breakfast’ (85 days) is a golden-orange heirloom tomato with dense, meaty flesh and a distinctive tangy sweet taste. The large tomatoes can reach up to a pound each. Give the indeterminate (vining) plants good support. A strong cage is recommended.

‘Celebrity’ is a nearly foolproof red slicing tomato.

‘Mortgage Lifter’ (85 days) never disappoints. The long vines produce huge, red beefsteak tomatoes nonstop during the warm days of summer. Fruits commonly reach over 1 lb. each and regularly win taste tests.

Those seeking an exciting yellow and red bicolor with super sweet flavor need to try the effortless, ‘Virginia Sweets.’  The vining plants produce large slicing tomatoes with the best possible tangy-sweet flavor. The tomatoes are yellow with distinctive red streaks. Each tomato can weigh as much as 1 lb. each!

Easy Cherry Tomatoes

The tiny tomatoes of ‘Matt’s Wild Cherry’ are numerous and provide a burst us sweet tomato flavor.

The tiny currant tomato,  ‘Matt’s Wild Cherry’ (60 days), has bright red, sweet, flavorful fruit and produces nonstop with limited care once the vine gets going. The indeterminate (vining) tomato requires a sturdy cage and will branch vigorously, so pruning is sometimes required. (Click here to watch a video about how to prune tomatoes.)

My favorite cherry tomato of all time continues to be ‘Sungold’ (65 days) without fail. The cheerful orange fruits are super sweet and fruity and produced on vines that don’t stop until the first frost of fall. The weighty, long vines are vigorous and will continue to produce into fall. Provide a super strong cage and midseason pruning. After a long rain, ripe fruits may crack on the vine, but otherwise ‘Sungold’ is quite disease-resistant and trouble-free.

The golden fruits of ‘Sungold’ are my favorite.

A tried-and-true classic cherry tomato variety is ‘Super Sweet 100’ (70 days). The award-winning variety produces long trusses laden with bright red, sweet, slightly tart cherry tomatoes with minimal effort. Stake or cage vines.

(Click here to watch a video highlighting my 10 favorite cherry tomatoes for flavor.)

Easy Salad Tomatoes

The tomatoes of ‘Mountain Magic’ are bright red, tasty, and nearly without flaw.

The crack-free, bright red, salad tomato ‘Mountain Magic’ (66 days) rivals popular Campari tomatoes and is wonderfully easy to grow.  The large vine needs a strong cage and will continue to stay productive until frost.

Italian ‘Principe Borghese’ is a classic red salad or sun-drying tomato from Italy. The plants produce long trusses (7-10 per truss) of small, deep red fruits with a balanced tomato flavor. Like most tomatoes on the list, it is a vining type that needs strong support.

How to Grow Tomatoes

The following video provides simple steps to growing champion tomatoes.


Winter Garden Tasks for a Happy Garden

January is a good time to remove old Helleborus leaves, just be sure not to accidentally snip flower stems.

December was a month of trying to get my winter garden tasks all done before the end of the year. Here it is January, and I have not completed all my December tasks. Getting everything done is something that I have never been able to do because a garden is constantly changing and evolving. With the unpredictability of weather, it seems as though there is always a new task, and I often get distracted on starting on another before completing what I am working on. So, the tasks get moved deeper into winter.

Winter Garden Tasks

Move Hardy Perennials: I have heard some gardeners say that they can relax in January, but that is not the case with me. I consider January a good month to do some final ‘editing’ in the garden because there are always some very hardy plants that need to be moved or, in some cases, removed. This can be done in January as long as the soil can be worked and I only move very hardy perennials.

Move hardy perennials if the soil can be worked.

Divert Water: During this winter season, and this is just early January, we have had strong winds, some snow, freezing temperatures, and rain, lots and lots of rain. The rain was much needed, and so there are no complaints from me about it. Walking through the garden after a rain, there are some areas that have accumulated pools of water, and there are very few plants in my garden that have roots that will thrive in standing water. This is a perfect opportunity to create some diversion paths for the water and also an ideal time to add Black Gold Soil Conditioner (only available in the West) or Black Gold Natural & Organic Garden Compost Blend to help improve the drainage in low garden areas. By doing this now, I can observe what is working and what is not because we will soon have more rain, and I can see if there is still a collection of water.

Trim Back Helleborus Foliage: I spent several hours one morning cutting off the old leaves of the Hellebores. I was surprised to see new growth and flower stems beginning to break through the soil. A word of caution here, be very careful when cutting off the stems of the old leaves because it is very easy to snip off a new leaf or flower stem. Beware of early slug damage on newly emerging bulbs and on the new growth on Hellebores and treat accordingly.

Check Outdoor Garden Pots: My garden has many pots, and I have looked at every one to make sure that the water drains through and there is no standing water. Several of my pots did have standing water, and I was able to turn the pots on their sides and poke a metal rod into the drainage holes to un-plug them. This helps heavy, ceramic pots resist cracking in the winter.

Check outdoor pots to see if they are still draining.

Treat Moss: Moss in the lawn can be treated now, unless you love the look of natural moss. It is a good idea to check if it is a re-occurring issue. Usually, it can mean there is too much shade, poor drainage, or both. There are lawn moss control products available at garden centers, and this is a good time to apply them. Many of moss control products contain ferrous sulfate monohydrate, (iron), and iron will stain shoes, cement, decks, etc., so use it with caution and follow all of the manufacturer’s warnings. These products will turn the moss black in a couple of days, and then it can be raked out. If there are large areas that have dead moss, re-seeding might be necessary but wait until spring for that.

Enjoy what still looks beautiful and do any early pruning as needed.

Do Early Pruning: Winter garden tasks always seem to involve some pruning and on deciduous shrubs, it is often easier to prune and shape the plant before new leaves appear. While the major pruning on roses is usually mid-February, I like to do some pruning now and cut the hybrid teas and grandifloras to 3-4 feet.

Enjoy What Looks Nice: I find that the garden is enjoyable in the winter, although the expectations are different than they are in the spring and summer. My dogwood Midwinter Fire is a bright spot with its stems of red, orange, and yellow. The twigs are also a nice addition to indoor winter arrangements. My variegated evergreen shrubs also provide winter color to dark areas in the garden and are a welcome addition to what otherwise are bare garden stems.

Even though I enjoy the winter garden, I am eagerly awaiting spring!

Winter Garden Tasks for a Happy Garden – 2021

Winter Garden Tasks for a Happy Garden – 2020

My Midwinter Fire dogwood is adding lovely color to my winter garden.

Pruning The Garden in Winter


As for me, I believe that pruning is without doubt the biggest (dreadfulest) but most important job in the winter garden.  Young trees and shrubs need pruning then while the branches are bare.  The rules for pruning flowering shrubs depends on when they bloom.  Spring blooming shrubs (i.e. quince and viburnums that bloom on last year’s wood should never be cut in winter. But only after they bloom.  Summer and fall blooming shrubs such as Hydrangeas will bloom on new wood and can then be cut to the ground in winter.

General Pruning Rules

Be sure to use the right pruning tools for the job. Small pruning saws are best for larger branches.

The first step is to remove all dead wood at its base.  Then look to see if any branches are crossing and rubbing together. If you find crossing branches, cut one off leaving the best branch to grow.  The next step for almost all non-evergreen shrubs is to cut one-third of the oldest branches to the ground every three years.  This will ensure a new crop of younger shoots each year and help to eliminate pests that often attack the old wood first. A perfect example of this is the lilac.  A common mistake I have seen is to cut some shrubs into forms that are unnatural to their basic shape.  The worst offenders try to prune forsythia into shapes such as globes or rectangles.  There again, give forsythias room to spread and follow the three-year cycle.  If you have a small area buy a small shrub to fill it.  There are a few slow-growing shrubs that do not need pruning at all, as far as its shape is concerned.  The most common plant in our area is the Star Magnolia (Magnolia stellata).  Except for dead wood and rubbing branches leave it alone.

Pruning Winter Evergreens

Rhododendrons are and azalea

Pruning rhododendrons and azaleas and is a whole different story.  There is a difference between them relating to pruning, other than flower, leaf, and shrub size.   The difference is where the flower buds are located on the branch and when to prune.  Rhododendron flowers are found just above the leaf rosette and pruning consists of removing the old flowers, after spring blooming, while not hurting the leaf rosette just below it. That is where next year’s buds will form. Aside from removing dead wood, never prune them in winter for fear of removing their spring flowers.

Azaleas, on the other hand, form new buds all along the branch, so they will tolerate some light winter pruning.  Just remove any out-of-place branches, but not all the way back. Then you will have new flowers next spring.

Remember both plants require acidic soil.  If your plants start to look weak or yellow you need a soil additive. Copperas (hydrated ferrous sulfate) an inexpensive powder comes in small bags. Follow the instructions and add to a liquid mix for acid-loving plants.

Pruning Roses

Be sure to remove any dead or dying branches before you really start pruning living branches.

Roses are in a group by themselves. The main rule is to get rid of the old wood to discourage pests and encourage new growth (= more roses).  There are two groups of roses, one that blooms on last year’s wood and one that blooms on this year’s new growth. With both groups remove the oldest and weakest canes.  The oldest canes tend to be dark brown and woody. They need to go. The new-growth roses should have one-third of all old branches cut to the ground to keep the plant from pouring energy into maintaining old growth, and it should be done in the very early spring just when the buds begin to swell.  For a fuller-looking plant cut some of the inward-growing branches to open up the center.  For roses that bloom only on one-year-old wood (and I do not think there are many of these left) look at the stems.  They should be brownish-green.  Leave them and cut out anything older, but be sure to let new growth come along for next year. (Article: When is the Best Time to Prune Roses)

I also caution against the dreaded rose rosette virus.  (Article: Best Diseases-Resistant Roses) If you see any misshapen or oddly colored growth dig up the plant and burn it or put it into a large plastic bag to put in the trash. Even if everything looks okay douse your pruners with 70% Isopropyl Alcohol between each rose.  I encourage everyone to go online and see what bad growth looks like.

I also recommend going online to see the gorgeous new varieties of all the plants I have talked about, for example, Hydrangea paniculata images and a world of gorgeous shrubs will appear.

I hope I have given you enough work to keep you out of trouble and I haven’t even gotten to young trees.  So get going and happy gardening.

About Teri Keith


Garden columnist, Teri Keith, has gardened for over 50 years in her home state of Indiana. She served as a longtime IGC nursery manager specializing in annuals and perennials in Bloomington, Indiana and still gardens with passion. Each year she plants and maintains over 50 flower containers, many gardens, and a large collection of lilacs.

What Do I Need To Grow Container Vegetables?

“I am starting a container garden for onions, potatoes, and carrots. I will be using the Black Gold potting mix plus fertilizer. Will I have to add any other product to the potting mix? Thank you.” Dennis of Thaxton, Virginia

Dear Dennis,

Potted vegetables grow best in large containers filled with excellent potting soil,  like our Black Gold mixes, and quality fertilizer formulated for vegetables. Be sure that the containers drain well, and keep them evenly moist. Full sun exposure is a requirement. This is about all that you need. Thin your carrot as they grow, and space your onions and potatoes well. I also recommend that you read these articles about growing edibles in containers. We have many, many more on the site.

Happy gardening,

Jessie

Cold Frame Salad Gardening

Cold frames are like outdoor mini glasshouses for winter vegetable and herb growing.

Garden-fresh eating does not have to end in the fall. The onset of chilly weather means it’s time to enjoy cold-frame salad gardens filled with easy, cool-season greens, root vegetables, and annual herbs. These crops are fast to germinate and grow, and they will tolerate serious cold weather if your frame garden is properly placed, prepared, and maintained.

What is a Cold Frame?

In 2012 I co-wrote an article with John Everard about how to build your own cold frame. This is the cold frame that he designed! (See building details in the linked article below.) (Image by Jessie Keith)

A cold frame is a cross between a raised bed and a small, sunken, covered greenhouse. It is lowered into the ground to reduce winter freezing of cold-tolerant greens, herbs, and root vegetables. Most cold frames are designed with sturdy sides of either wood, stone, or brick, and they are topped with framed glass or plexiglass lids that can be lifted on unseasonably warm fall and winter days.

Cold frames were first popularized in Europe, where winter growing conditions are generally mild, but they are also useful for American gardeners. You can build your own cold frame or purchase a premade one. Building your own has its advantages because you can create something more for less, if you know what you are doing. For a great step-by-step building guide, please click here to read this article that I co-wrote with biologist and builder John Everard for Wilder Quarterly in 2012. John created a very useful design that can be sunk into the ground in our USDA Hardiness Zone 7 area.

Cold Frame Siting

Cold frames further south can be shallower because it’s warmer.

All cold frames should be placed in a somewhat elevated location with full sun and soil that drains well–standing water and vegetable cultivation do not go hand in hand. Some steps regarding cold-frame gardening depend on one’s location and climate. In the north, a cold frame should be placed in a sunny, south-facing spot close to the home. If you can, sink the frame a few inches below the soil level. The reflective heat from the home will provide a little extra winter protection, the south-facing sun will help heat the cold frame all winter long, and the added depth will reduce the chances of freezing on cold nights. Further south, you can choose a spot away from the home, and sinking the frame is not necessary. No matter where you live, be sure to be watchful of your cold frame on uncommonly warm winter days. Prop the tops open during the day to keep the internal temperature from getting too hot and stressing your greens.

Cold Frame Soil

Rich, dark soil is best for cold frame gardens.

Dark, lofty, highly amended soil that holds water well will yield the best vegetables. Start by amending the ground soil in the frame with good compost, like Black Gold Natural & Organic Garden Compost Blend. A 1:2 ratio of soil to compost is recommended, especially if the soil is high in clay or sand. Another option is to fill the bed with Black Gold Natural & Organic Raised Bed and Planting Mix. Adding a layer of compost as a protective mulch is also important and can serve as further insulation. (Click here to learn more about creating the best soil for raised beds.)

Cold Frame Salad Crops

Rather than harvesting whole lettuce heads, I recommend snipping away leaves for cut-and-come-again salads.

It is essential to grow cool-season, frost-resistant crops. These are largely cool-season greens, herbs, and root crops. There are lots of greens for the job such as mâche, kale, lettuce, mizuna, spinach, and Swiss chard. Any lettuce will do, but small, fast varieties are most favorable. Salanova baby lettuces (55 days from seed) produce sweet and crunchy heads of green and purple very quickly, and the looseleaf lettuce Baby Leaf Mix is a reliable cut-and-come-again mix. Spinach thrives in cool weather and may have smooth or savoyed (puckered) leaves. I recommend both the 1925 heirloom ‘Bloomsdale’, which has large, savoyed leaves and is slower to bolt than most, and the smooth-leaved ‘Corvair’, which is resistant to the fungal disease, downy mildew. Arugula cultivars vary in leaf shape, color and heat. The popular ‘Wasabi’ is an easy-to-grow selection with leaves that truly taste like hot wasabi, and the newer ‘Dragon’s Tongue’ is a visually pretty, finely cut variant with purple-red venation.

In the deep winter, cool-season root vegetables bulb up more slowly.

The best root crops include winter carrots and radishes. Radishes are by far the fastest, and my favorite variety for crisp, sweet flavor is the French breakfast radish D’Avignon. Click the following link to learn more about growing winter root crops and click this link to learn more about growing cool-season greens.

For delicate cool-season herbs, try cilantro, dill, and parsley. Cilantro likes it cool and may produce leaves throughout winter. When the weather heats up, it will produce starts stems of white flowers and bulbous seed heads that can be dried and crushed to make the spice coriander. Dill will bear ferny leaves that taste great in salads, spreads, and fish dishes. Lush clumps of curly or flatleaf parsley will also flourish in cold frames all winter long.

All of these plants can be directly sown into the frame from seed. They sprout fastest in the fall when germination temperatures are more moderate–between 70 and 40 degrees F. Some need to be sown on the soil surface, particularly the small seeds of lettuce, which need light to germinate. At sowing time, start by wetting the soil, and then gently sow and pat the seeds down. Follow up with a little more water to wet the seeds. Be sure to label all seed rows with labels showing the plant names and sowing dates.

Harvest salad leaves, herbs, and roots as needed through winter–I tend to use shears to trim off what I need on a given day. By early spring, the cold frame garden will begin to look tired. Feel free to clean it out and begin planting new vegetables for spring.

Does Excess Car Exhaust Damage Gardens?

“How would a parking lot with 16 stalls [and the car exhaust] next to my garden interfere with plant photosynthesis?” Sylvia of Belle Plaine, Minnesota

Answer: It is a very interesting question. Car exhaust contains gasses that are helpful to plants and photosynthesis and some that are harmful. Car exhaust is also everywhere, especially if you live in an urban area, though the increase in hybrid and electric cars is reducing car fumes. Still, nearby fumes may have some impact. Here is a breakdown of exhaust components from a standard car that runs on gasoline followed by the potential impacts of those gasses on plants and photosynthesis.

U.S. Environmental Protection Agency estimates of average passenger car emissions in the United States for April 2000
Component Emission Rate Annual pollution emitted
Hydrocarbons 2.80 grams/mile (1.75 g/km) 77.1 pounds (35.0 kg)
Carbon monoxide 20.9 grams/mile (13.06 g/km) 575 pounds (261 kg)
NOx 1.39 grams/mile (0.87 g/km) 38.2 pounds (17.3 kg)
Carbon dioxide – greenhouse gas 415 grams/mile (258 g/km) 11,450 pounds (5,190 kg)

(Click here for more exhaust gas details from Wikipedia.)

Carbon Dioxide and Plants

Here is the equation for photosynthesis as defined in Brittanica: 6CO2 + 6H2O → C6H12O6 + 6O2. Carbon dioxide is essential for photosynthesis, which is why it’s good to plant as many trees and garden plants as you can to help reduce this most abundant greenhouse gas. Plants take CO2 out of the atmosphere! Trees and large plants are highly effective photosynthesizers due to their sheer size, and grasses are super photosynthesizers, so consider planting a row of ornamental grasses (click here for some great ornamental grass options) or some trees and shrubs nearby to combat local CO2.

Carbon Monoxide and Plants

I found a technical overview of carbon monoxide in the atmosphere, which stated: “Carbon monoxide does not poison plants since it rapidly oxidizes to form carbon dioxide which is used for photosynthesis.” So, it is not harmful to plants either.

Nitrogen Oxides and Plants

Nitrogen oxides (NOx) contribute to smog, which blocks the sun’s rays, and acid rain, which is harmful to plants, so in excess, NOx is harmful to plants. Still, there is so much NOx in urban areas, the amount produced by the cars in the parking lot next to you would be negligible. On the plus side, you can plant nitrogen-fixing plants, such as plants in the pea and bean family as well as bayberry shrubs, to help with local NOx. These plants actively remove atmospheric NOx and convert it into a soil-borne form of nitrogen that benefits plants.

Hydrocarbons and Plants

In general, petroleum hydrocarbons are toxic to plants in high quantities, especially if they make their way into the soil (oil- or gasoline-contaminated soils). The cars nearby do emit hydrocarbons but in much lower quantities, so they should not be a problem for your garden.

As stated earlier, I recommend planting a tree, shrub, or ornamental grass buffer between your garden and the parking lot. Tough nitrogen-fixing options would be ideal! In addition to bayberry, try the following options suggested by my colleague Russell Stafford: “Outstanding legumes for perennial borders include false indigo (Baptisia spp.), wild senna (Senna spp.), yellow lupine (Thermopsis spp.), lupine (Lupinus spp.), and leadplant (Amorpha spp.).  The roster of leguminous shrubs is also lengthy, boasting such standouts as bush clover (Lespedeza spp.)…” (Click here to read the full article.)

For general greenhouse gas information, I also recommend that you read this informative piece from the EPA about greenhouse gasses and their management (click here to read it).

I hope that this information is helpful!

Happy gardening,

Jessie Keith

Black Gold Horticulturist

What Are the Best Container-Garden Plants for Shade?

Impatiens are classic potted flowers for shade!

“I’m in a complex where we can only plant in containers outside…and there’s a lot of shade to complicate matters…any idea for some plants that would do well contained without a lot of sun?  Thank you…also someone told me the ivy I did plant in a pot can be brought inside for a houseplant when it gets too cold outside true or not?” Question from Kim of Orangeburg, New York

Answer: There are lots and lots of wonderful annuals that thrive in shady locations. The perennial vine, English Ivy (Hedera helix), can grow in pots inside or out, and it will take shade, but there are many better options for shade containers. Here are some of my favorite shade-loving annual garden flowers for summer potted gardens.

Annuals for Shady Container Gardens

Begonias: You can’t go wrong with begonias, as long as you provide them with good moisture, especially through the hottest summer days. Two showy high performers are Bossa Nova® Red  Begonia and Illumination® Golden Picotee tuberous begonia. Classic wax begonias that you can purchase in flats at every garden center are also inexpensive and excellent.

Bush Violets (Browallia hybrids.): These annuals are nonstop summer flowers. Try the true-blue Endless Illumination Bush Violet.

Coleus (Solenostemon hybrids): There are hundreds of different types of coleus available with the most colorful, beautiful foliage imaginable. Click here for a wonderful coleus online nursery! (Click here to learn how to take coleus cuttings to generate new plants for free!)

Classic Impatiens (Impatiens walleriana): Pick up a flat of colorful impatiens at your favorite garden center, and plant them in shady pots for summer-long color. (Impatiens are also easy to start from seed! Click here to learn more.)

New Guinea Impatiens (Impatiens hybrids): These impatiens are generally taller and tolerant of a little more sun than classic impatiens. the tangerine-orange Infinity® Orange is especially pretty as is the crimson-pink and pale pink Infinity® Blushing Crimson.

Torenia (Torenia hybrids): You cannot go wrong with any of the spreading torenia in the Summer Wave Series. They spread and bloom all summer long. Summer Wave® Large Blue is really lovely.

For more ideas, try the Proven Winners Container Garden Recipe search. It is a great resource for gardeners just learning how to create spectacular potted gardens. Just be sure to choose “Full Shade or Part Shade” for the sun-exposure dropdown. I also recommend clicking here to learn more about growing perennials in containers.

Happy gardening!

Jessie Keith

Black Gold Horticulturist

How Can I Keep Plants Cool During Scorching Heatwaves?

Move potted plants to cooler locations during the most dangerous periods of a heatwave.

“It has been hotter than it’s ever been on record. How can I protect my plants from the severe heat?” Angie of Walla Walla, Washington

Answer: It’s scary when you live in an area that typically has mild summer temperatures, and you unexpectedly experience super high heat. Your tender plants are as used to it as you are, which means they’re going to struggle. From what I have read, your average June temperatures have highs around 80 degrees F. Being faced with temperatures well over 100 and even 110 degrees F must be really awful. Here are some ways to help protect your plants, especially those that are less heat tolerant. Specimens planted in full sunlight during the hottest times of the day (around 2:00 pm to 4:00 pm) need the most protection.

Four Ways to Cool Plants in High Heat

  1. Irrigate plants very well in the early morning. If temperatures exceed 100 degrees F, water again in the evening after the sun has fallen.
  2. Protect plants that are in full sunlight with floating row covers fitted with white shade cloth. These covers are easily placed over plants and removed. You can also simply purchase shade cloth and drape it over highly exposed plants. Both methods help. Gardeners in your area have also informed me that they have been moving patio umbrellas around their yards to shade their most prized plants. (One even said that her neighbor did not, and it resulted in some substantially fried rhododendrons and hostas.)
  3. Move containers into shaded areas or indoors during the most dangerous heat and water twice daily.
  4. Opt for lightweight, light-colored mulches. A cooling layer of straw around vegetable roots will really protect plants from heat, and long-fibered sphagnum peat moss makes a good, cooling cover for shade beds and containers. (Click here to learn about more mulch options.)

I also want to note that pets and wildlife also feel the stress. Leave water out for the animals and keep your pets from going outdoors for extended periods of time and walking on hot surfaces (grass only!). I also recommend that you read the following two garden articles for more helpful tips.

Cool Gardens: Designing for Summer Temperature Control

Nine Water-Saving Garden Tips to Fight Drought

Stay cool and happy gardening,

Jessie Keith

Black Gold Horticulturist

Growing and Using Fresh Stevia Leaf

You’ve probably heard rumblings of stevia before. Found in many soft drinks and juices, many people find the taste strange and not at all like sugar. I agree completely with you! When tasting stevia in its white powder or liquid form, I found it to be bitter yet super sweet at the same time, but fresh stevia is different.

Green stevia (Stevia rebaudiana) is what I grow in the garden and it is completely different than what you will find in the store. Native to South America, it is a tender perennial herb with serrated leaves that is 200 times sweeter than sugar. The fast-growing plant is easily grown in northern climates as an annual.

How to Grow Stevia

Stevia tastes best when the leaves are young and plants are not allowed to flower.

Stevia can be purchased as plants or can be grown directly from seed in OMRI Listed Black Gold Seedling Mix. Nearly every year I plant stevia seeds, and they always grow into happy, bushy herbs. Keep in mind, they like full sun and require lots of warmth to get growing. Plants can be grown in well-drained pots filled with Black Gold Natural & Organic Potting Mix.

You can plant your seeds in containers or in loose soil that drains well. Start your stevia indoors 8-10 weeks before planting outside or directly sow in the ground during late spring. They need warm soil to get growing.

Stevia plants can grow very large in a season, so space your plants 18 inches apart. Expect them to reach anywhere from 2-3 feet tall. Give them light to moderate water. Too much water will reduce leaf sweetness and can cause root rot. You should also pinch the plant back throughout the year to encourage bushier and stronger growth.

Harvesting Stevia

Fresh leaves can be easily dried in the sun or stems can be hung to dry.

Stevia can overwinter in Zone 8 or above, but I prefer to grow fresh stevia each year as the young plant’s leaves taste the best. During the summer, keep stevia cut back to stop flowering. Once the plant flowers, the leaf flavor is no longer tasty. The good news is, every time you prune it, you get to enjoy some fresh stevia!

You can also choose to dry the stevia by bundling stems together and hanging them to dry in a cool, dark place. At the end of the growing season, you will want to harvest the entire plant to dry. It is also best to harvest the stevia in the morning as that is when it is sweetest.

Using Stevia as a Sugar Replacement

I prefer using stevia to sweeten drinks and tea.

Speaking from experience, going sugar-free is not easy. Stevia is a natural way to get your sweet satisfaction without spiking insulin or causing inflammation. When grown organically in my garden, it feels so much healthier to me than synthetic sugar replacements. With that said, I don’t tend to use it as a complete sugar replacement.

Though many people do use stevia in place of sugar, it has its own unique herby taste that I find similar to sweet green tea, and since it is so much sweeter than sugar, a little goes a long way. I personally favor it for sweetening drinks, but it can also be used to sweeten other things.

How to Use Stevia

Stevia powder is easily used for cooking.

Sweetening up homemade baking, cooking, or drinks naturally is easy with stevia. And, the stevia does not need to be processed. Dried stevia leaf works just fine. Store stevia leaves in Mason jars until you’re ready to use them.

A single leaf in a hot cup of tea will bring a sweet, earthy flavor. You can also grind stevia leaves into a fine powder for baking or cooking. This can be done with a coffee grinder or a blender. I don’t recommend using the powder in drinks unless you want it floating at the top of your coffee–not nice.

The last way to enjoy stevia is by infusing it and using it as a liquid extract. To create the extract, stuff your dried herbs into high-proof drinking alcohol, such as vodka, and let sit for 24-36 hours. Any longer and it will get too bitter. Next strain out the leaves with a cheesecloth.  You can enjoy it like this or heat the liquid to evaporate the alcohol. Be careful, however, as boiling the mixture will affect the flavor. Keep the heat low and evaporate slow. The final infusion can be added to drinks or used for cooking.